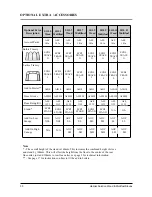
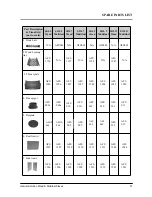
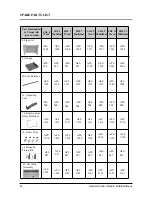
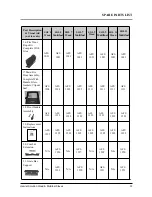
background image

18

Hamlet Stoves Wood & Multifuel Stoves

INSTALLATION

Primary flow and return pipes should be 28mm
diameter. The cylinder should be installed at a
higher level than the appliance, and as close to it as
possible (the higher the cylinder the faster the
circulation). The flow and return pipes should not
be longer than 20ft each. Pipe runs should rise
continually from the boiler to the cylinder. 
A radiator of approximately 25 sq.ft. should be
connected into the primary circuit, if installed in the
bathroom it provides a means of drying towels in
the summer.

Safety Vent Circuit

This circuit consists of a cold feed pipe, expansion
pipe, and expansion tank. The possibility that water
may boil can never be completely ruled out, and it
is therefore vital to ensure that cold water can be
supplied to the boiler and steam vented from it at all
times.

The expansion tank should have a capacity of at
least 7 % of the system's water capacity. The cold
water feed pipe should be at least 22mm diameter.

There must not be any shut off valves in the circuit.
Pipes should be run to avoid air locks. A spring
safety valve should be fitted to the expansion pipe
close to the boiler.

It is often possible, and is good practice, to utilise
the primary flow and return as part of the safety
circuit. The ball valve should have a copper ball.
The overflow pipe from the expansion tank should
be 28mm diameter copper. Pipes in unheated
spaces must be lagged.

FINAL CHECK

Before handing over the installation to the
customer it is strongly recommended that the
appliance is lit and the functioning of the chimney,
hot water and heating system is checked.

A checklist (Pre-lighting Checks) appears in the
Operating Instructions, but in addition to this the
installer should:

Operate the heating system and set the 

pump head.

Balance the radiators.

Re-vent and ensure no air locks.

Check the circulation round the primary 

system and the heat leak radiator, 
particularly when the pump is running, to  
ensure circulation is not reversed.

Be sure that the chimney is operating and 

that ALL smoke and fumes are vented to 
the atmosphere through the chimney 
terminal.

Check all joints and seals.

Clean the outside of the appliance to 

prevent any stains becoming burnt on.

Check the flue draught which should read 

1 - 2mm, or 0.1 - 0.2mbar.

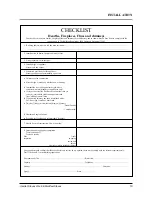
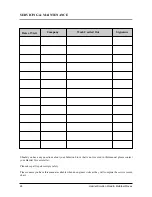
The following details 

must

be checked and

completed in full by the installer at the time of
installation. Please answer all questions as fully as
possible. 

Hamlet Stoves

can not be held responsi-

ble for chimney or installation.

HOT WATER SYSTEMS

Is the boiler cross-flowed?                   YES / NO
Are the pipes correctly sized?

YES / NO

What is the calculated output

required to heat the system? 
Is a heat leak fitted?

YES / NO

What is the return water temperature?

Is the pump thermostatically 
controlled by a pipe stat?

YES / NO

What is the height and distance of the 

hot water tank above the stove?

Summary of Contents for Solution

Page 1: ...Wood Multifuel Model Range Operating Installation Manual PLEASE RETAIN THESE INSTRUCTIONS FOR FUTURE REFERENCE Solution 7 Multifuel Rev 3 November 2006 AFS1292 SOLUTION BK054...

Page 2: ...the reliability of our product that we offer a Lifetime Guarantee Should you have any questions about our Solution Stoves that are not covered in this manual please contact the Hamlet dealer in your a...

Page 3: ...Annual Maintenance 21 Summer Storage Non Usage 21 Door Adjustment 21 Dissassemble Airwash 22 Fuel Retaining Bars Inspection 22 Fire Door Glass 23 Service Record 24 OPERATING INSTRUCTIONS Fuel Types 25...

Page 4: ...D IN THIS APPLIANCE TO USE THESE FUELS WILL INVALIDATE THE APPLIANCE GUARANTEE IF IN DOUBT CONTACT THE SOLID FUEL ASSOCIATION TELEPHONE NUMBER 0800 600 000 www solidfuel co uk THE USE OF SPARE PARTS O...

Page 5: ...fire If not properly installed and operated a house fire may result installation must comply with the Building Regulations and conform to all relevant fire safety standards Hamlet Stoves produce a var...

Page 6: ...otplate 6 Rear liner 7 Side liners 2 N A SOL 7 Wood 1 5 2 2 SOL 7 Multifuel N A SOL 5 Wood 1 4 2 7 1 5 2 SOL 9 Wood SOL 9 Multifuel 2 1 4 1 5 1 4 1 5 1 Grate bars 1 1 2 Wood burning tray SOL 11 Multif...

Page 7: ...Instruction Manual 13 Operating tool 1 1 SOL 7 Wood 1 SOL 7 Multifuel SOL 5 Wood 1 1 SOL 9 Wood SOL 9 Multifuel 8 Rear grate bar support 11 Fire door han dle Kool Touch 1 1 1 SOL 11 Multifuel SOL 11...

Page 8: ...1 5 SOL 5 Wood 3 2 1 7 8 4 8 2 2 SOL 9 Wood SOL 9 Multifuel Measured from rear of canopy to the tip of the handle The model and Serial Number of your stove can be found stamped into the casing centra...

Page 9: ...tion HEARTH The stove should be installed to stand on a constructional hearth of non combustible materials not less than 125mm 5 thick conforming to Building Regulations Dimensions of the hearth shoul...

Page 10: ...stove outlet to the outside air To ensure a good up draught it is important that the flue gases are kept warm and that the flue size suits the stove The termination of the outlet at the top of the flu...

Page 11: ...ent J of the Building Regulations for England and Wales is available from The Stationery Book shops and can also be viewed at the ODPM website at www safety odpm gov uk bregs brads htm Details on the...

Page 12: ...12 Hamlet Solution Wood Mutifuel Stoves INSTALLATION Fig 2 A Typical Rear Flue Layout...

Page 13: ...TYPICAL METAL INSULATED CHIMNEY SYSTEM TO BE INSTALLED TO THE CHIMNEY MANUFACTURERS INSTRUCTIONS IN COMPLIANCE WITH BUILDING REGULATIONS AND BS7566 PTS 1 4 A is minimum clearance for non insulated flu...

Page 14: ...or the other rear leg WOOD STOVE VERSION WOOD TRAY The wood burning tray should come fitted in your stove if not please follow these instructions Fully open the fire door and remove the two round fuel...

Page 15: ...e upper bar is fitted in a similar manner but with the end marked L inserted in the rear channel and the end marked H seated on the high section of the comb See fig 8 for the assembled grate layout GR...

Page 16: ...small liner s into the back of the fire Insert side liner panels See Fig 10 Fit the throat plate with the single bend and two cut outs to the front facing up The projecting lugs sit on top of the sid...

Page 17: ...s for individual heating systems should be carried out by a qualified heating engineer In many cases your supplier will be able to offer advice and assistance Direct Systems Stainless steel boilers ei...

Page 18: ...ipe from the expansion tank should be 28mm diameter copper Pipes in unheated spaces must be lagged FINAL CHECK Before handing over the installation to the customer it is strongly recommended that the...

Page 19: ...e calculated natural draught gas appliances only c If clay or concrete flue liners used confirm that they are correctly jointed with socket end uppermost and state jointing materials used d If an exis...

Page 20: ...uch up spray as some paints interact This could ruin the finish and invalidate the guarantee DOOR GLASS The door glass should remain clear during normal daytimeburning Howeverundercertainconditions su...

Page 21: ...w air movement through the stove by opening the airwash and prinmary air inlet s controls to about half way open or leave the door ajar This will allow a free flow of air through the appliance thus pr...

Page 22: ...let Lift outer cover free from body being careful not to damage the ends of each lug Fig 15 Slide off the spacer tube from the centre stud and retain for re assembly Unscrew the inner slider and clean...

Page 23: ...olts on the inside of the door securing the retaining clips Carefully remove any pieces of broken glass and sealing gasket wearing suitable gloves Re place the gaskets and line them up in relation to...

Page 24: ...our Solution Stove that is not covered in this manual please contact your Hamlet Stoves retailer Please keep all repair receipts safely Please ensure you have this manual available when an engineer vi...

Page 25: ...hurnacite Plus Centurion Maxibrite Extracite Pureheat Blazebrite Taybrite Sunbrite Doubles Singles Anthracite Large Nuts and Welsh Dry Steam Coal Large Small Nuts Approval does not cover the use of ot...

Page 26: ...r long periods consequently more care in setting the controls and some familiarisation is necessary when burning anthracite Use the smallest size fuel Stovesse or Small Nuts Proceed as for manufacture...

Page 27: ...s housed in a cover plate and is located above the fire door Sliding the control knob to the right as far as it will go achieves the fully open position Sliding it to the left will shut off the air in...

Page 28: ...de ashing is complete re set grate to previous position Empty the ash pan Note Do not force the riddling lever TO EMPTY THE ASH PAN Open the fire doors Fit the fork end of the operat ing tool into th...

Page 29: ...draught is not present in the chimney Fire door is closed If the fire goes out with unburnt fuel left in the firebox increase the air opening slightly and vice versa In the morning Open the air contro...

Page 30: ...erosol Paint Gothic Tracery SOL 11 Multifuel SOL 11 Wood Lattice Tracery AFS 101a AFS 101a AFS 101a AFS 101a AFS 101a AFS 101a AFS 101a AFS 101a AIB 0 AIB 0 AIB 8 AIB 8 AIB 9 AIB 9 AIB 10 AIB 10 Stove...

Page 31: ...2 Wood burning tray SOL 11 Multifuel SOL 11 Wood 3 Throat plate N A N A AFS 1197 AFS 1286 AFS 1286 AFS 1287 AFS 1287 AFS 009a AFS 009a AFS 010 AFS 010 AFGS 064 AFGS 064 AFS 009 AFS 009 AFS 1207 AFS 1...

Page 32: ...AFS 008 AFS 008 AFS 008 AFS 1214 AFS 1214 AFS 1215 AFS 1215 AFS 1010 AFS 1010 AFS 1010 AFS 1010 AFS 047 AFS 047 AFS 047 AFS 047 AFS 1205 AFS 1208 AFS 1208 AFS 058 AFS 058 AFS 051 AFS 051 12 Replaceme...

Page 33: ...ire Door Rope Kit Complete With Glue AFS 1021 SOL 11 Multifuel SOL 11 Wood AFS 1294 AFS 1294 AFS 1295 AFS 1295 AFS 1222 AFS 1222 AFS 1222 AFS 1222 AFS 1292 AFS 1292 AFS 1292 AFS 1292 N A AFS 1226 N A...

Page 34: ...final If your appliance proves to be defective as a result of faulty materials or workmanship during the guarantee period we will repair or replace it FREE OF CHARGE as long as the fire has been inst...

Page 35: ...any other costs including labour incurred in its replacement Documentation must be retained and produced in the event of a warranty claim This guarantee specifically does not cover accidental damage m...

Page 36: ...BARS WOODBURNING TRAY FIREBOX LININGS THROAT PLATE AIR WASH DOOR CATCH KOOL TOUCH HANDLE ASH PAN ADJUSTING FEET X 2 OPERATING TOOL CONVECTOR KIT FIXINGS X 4 OPERATING INSTRUCTIONS Model Serial No I ve...

Reviews: