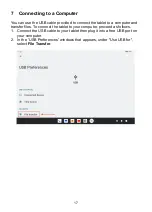
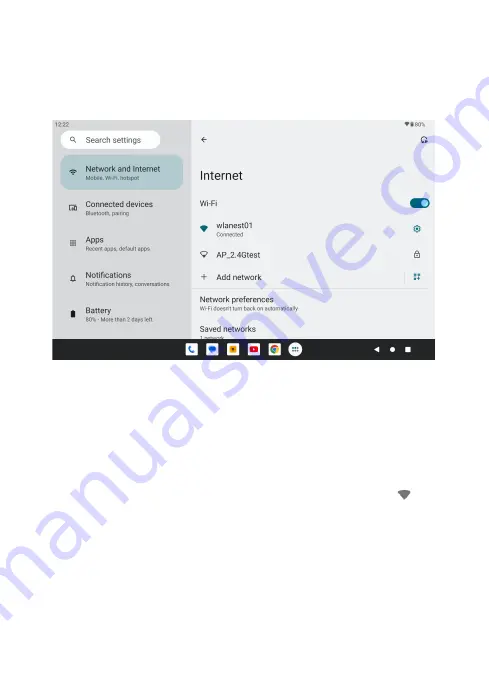
background image

12 

5  Wi-Fi Connection 

You have to setup a Wi-Fi connection in order to access to the Internet. 
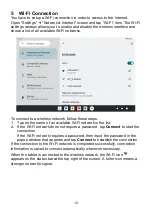
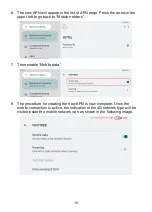
Open “Settings” 

à

 “Network & Internet” screen and tap “Wi-Fi” item. The Wi-Fi 

settings window allows you to enable and disable the wireless interface and 
shows a list of all available Wi-Fi networks. 


To connect to a wireless network, follow these steps. 
1.  Tap on the name of an available Wi-Fi network in the list. 
2.  If the Wi-Fi network does not require a password, tap 

Connect

 to start the 

connection. 
If the Wi-Fi network requires a password, then input the password in the 
popup window that appears and tap 

Connect

 to establish the connection. 

If the connection to the Wi-Fi network is completed successfully, connection 
information is saved to connect automatically whenever necessary. 

When the tablet is connected to the wireless network, the Wi-Fi icon 


appears on the status bar at the top right of the screen. A fuller icon means a 
stronger network’s signal. 


Summary of Contents for ZELIG PAD 810

Page 1: ...ZELIG PAD 810 10 1 MULTI TOUCH OCTA CORE TABLET PC USER MANUAL XZPAD810 4128FG www hamletcom com...

Page 2: ...2...

Page 3: ...wing standards EN 55032 2015 EN 55035 2017 EN 50663 2017 EN 50566 2017 EN 62209 2 2010 EN 62368 1 2014 A11 2017 ETSI EN 300 328 V2 2 2 2019 07 ETSI EN 300 440 V2 2 1 2018 07 SRD 5 8 GHz ETSI EN 301 48...

Page 4: ...spective owners The material in this document is for information only and subject to change without notice Specifications and appearance are subject to change without prior notice Product Registration...

Page 5: ...to zero or tablet connected to the power supply electrical interference may make the tablet touch screen inaccurate Full functionality is restored charging the batteries or disconnecting the power sup...

Page 6: ...photo files to my device A Copy the photos from your PC microSD card or USB storage device Videos Q What type of video files can I play on my device A Video decoding Full HD support all formats of vid...

Page 7: ...support is available at support google com android 1 3 Battery charging The tablet is equipped with a built in rechargeable Lithium battery It is suggested to fully charge the battery before use To c...

Page 8: ...7 USB C port For recharging and computer connection for file transfer 8 Speakers 9 Headphone socket 3 5 mm standard earphone jack 10 Microphone Nano SIM and microSD installation 1 Use the ejection pi...

Page 9: ...9 11 Flash 12 Rear camera...

Page 10: ...n the tablet Off When the tablet is ON press and hold the power button for around 3 seconds and the system will popup out power off option tap on Power off to turn the tablet off Remarks When battery...

Page 11: ...t and unlock the screen To wake up the tablet from stand by and turn on display do as follows 1 Press and release the power button 2 Slide up the lock icon in the bottom side of the screen to unlock t...

Page 12: ...Wi Fi network in the list 2 If the Wi Fi network does not require a password tap Connect to start the connection If the Wi Fi network requires a password then input the password in the popup window th...

Page 13: ...f the screen the mobile network icon will appear to indicate the signal strength 6 Enter the Settings Network Internet Mobile network screen and tap on Mobile data to enable the mobile data connection...

Page 14: ...mobile operator manually The following guide shows the steps to create a new APN in our case a FASTWEB SIM will be configured 1 Enter Settings menu of your device and select Network Internet 2 Select...

Page 15: ...15 4 Now enter the settings of your mobile operator 5 To save the new APN tap the three dots in the upper right and select the Save option...

Page 16: ...upper left to go back to Mobile network 7 Then enable Mobile data 8 The procedure for creating the new APN is now complete Once the mobile connection is active the indication of the 4G network type wi...

Page 17: ...the tablet to a computer and transfer files To connect the tablet to your computer proceed as follows 1 Connect the USB cable to your tablet then plug it into a free USB port on your computer 2 In the...

Page 18: ...ery for at least 6 hours before you start to use the device The rechargeable battery is designed and manufactured to be used and recharged frequently As same with all of lithium batteries the capacity...

Page 19: ...e the LCD screen Do not use any sharp objects to touch the LCD screen as this will scratch the screen Only use the AC adapter included with the device Using any other power adapter may damage your tab...

Page 20: ...20...

Reviews: