10
IMPORTANT!
To prevent injury and / or accident, please read and follow these simple rules:
1. Do not allow children to play on or near the equipment.
2. Regularly check that all screws and nuts are tightly secured.
3. Promptly replace all defective parts and do not use the equipment until it is repaired. Watch for any material fatigue.
4. Carefully read through the operating instructions before starting the equipment.
5. The equipment requires sufficient free space in all directions (at least 1.5 m).
6. Set up the equipment on a solid and flat surface.
7. Do not exersice immediately before or after meals.
8. Before starting any fitness training, let yourself examined by a physician.
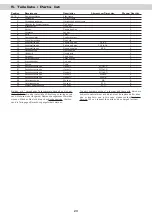
9. The safety level of the machine can be ensured only if you regularly inspect parts subject to wear. These are indicacated by an *
in the parts list. Levers and other adjusting mechanisms of the equipment must not obstruct the range of movement during
training.
10. Training equipment must never be used as toys.
11. Wear shoes and never exercise barefoot.
12. Make certain that other persons are not in the area of the home trainer, because other persons may be injured by the
moving parts.
13. It is not allowed to place the item in rooms with high humidity (bathroom) or on the balcony.
1. Safety instructions
This training equipment is for use at home. The equipment complies with the requirements of DIN EN 957-1/2 Class HC. Damage to
health cannot be ruled out if this equipment is not used as intended (for example, excessive training, incorrect settings, etc.).
Before starting your training, you should have a complete physical examination by your physician, in order to rule out any existing
health risks.
2.1 Packaging
Environmentally compatible and recyclable materials:
l
External packaging made of cardboard
l
Molded parts made of foam CFS-free polystyrol (PS)
l
Sheeting and bags made of polyethylene (PE)
l
Wrapping straps made of polypropylene (PP)
2. General
Summary of Contents for 4507
Page 1: ...BERM UDA XT BENC H Item Nr 4507 100 Jahre im Sport ...
Page 5: ...04 ...
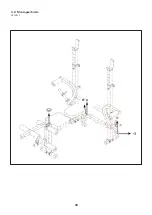
Page 6: ...05 3 2 Montageschritte Schritt 1 ...
Page 7: ...06 Schritt 2 ...
Page 8: ...07 Schritt 3 ...
Page 9: ...08 Schritt 4 ...
Page 10: ...09 Schritt 5 ...
Page 11: ...10 Schritt 6 ...
Page 15: ...14 3 2 Assembly steps Step 1 ...
Page 16: ...15 Step 2 ...
Page 17: ...16 Step 3 ...
Page 18: ...17 Step 4 ...
Page 19: ...18 Step 5 ...
Page 20: ...19 Step 6 ...
Page 30: ......
Page 34: ...04 ...
Page 35: ...05 3 2 Montageschritte Schritt 1 ...
Page 36: ...06 Schritt 2 ...
Page 37: ...07 Schritt 3 ...
Page 38: ...08 Schritt 4 ...
Page 39: ...09 Schritt 5 ...
Page 42: ...12 ...
Page 43: ...13 3 2 Assembly steps Step 1 ...
Page 44: ...14 Step 2 ...
Page 45: ...15 Step 3 ...
Page 46: ...16 Step 4 ...
Page 47: ...17 Step 5 ...


