background image

ADJUSTMENTS 

AND 

TESTING 

ANTEA 50 BT – BTS - BTO 

Doc. 

 10059284 

Issued 

 12/2016 

Ver. 

 AC 

Page 

 22 of 25 

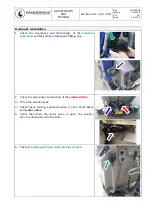
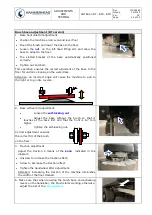
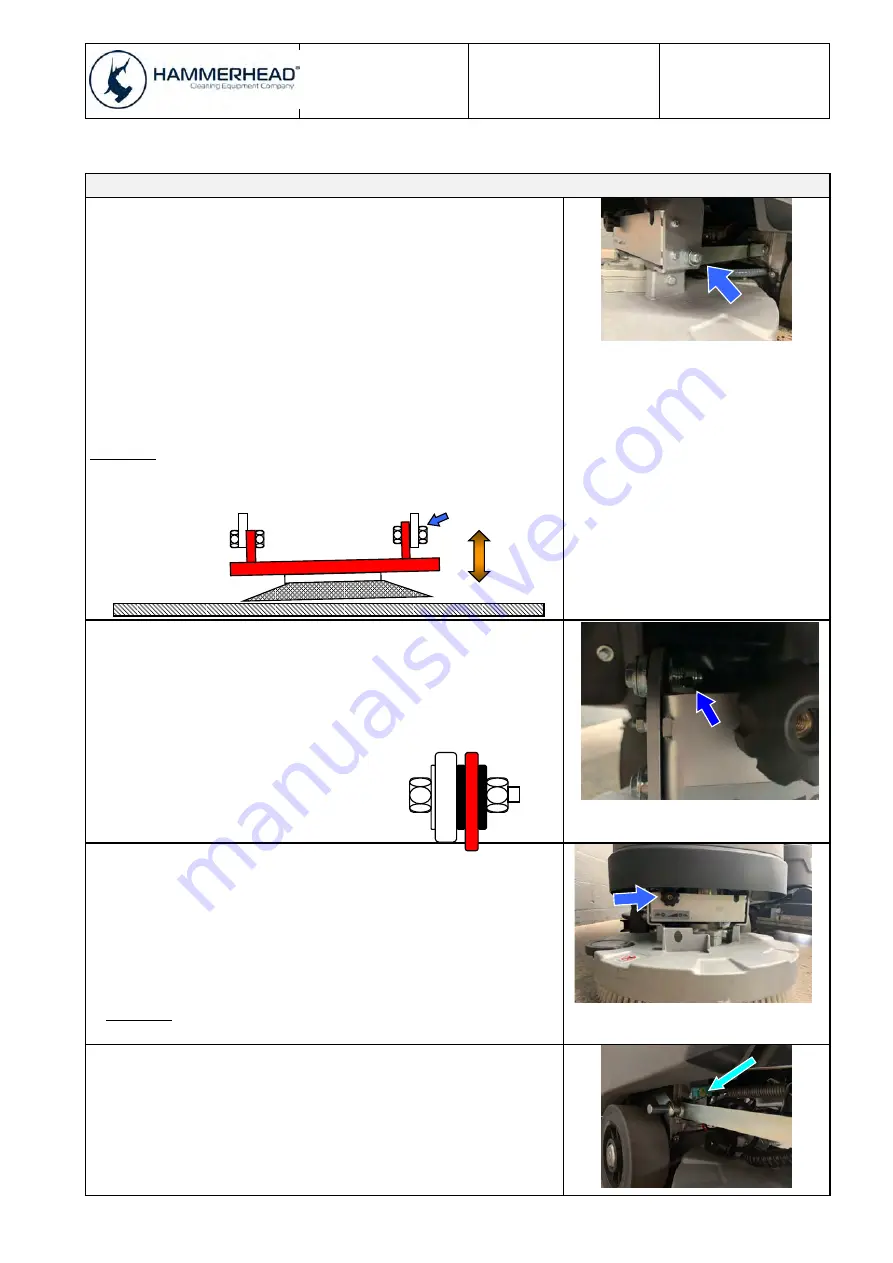
Brush base adjustment (BT version) 

1. Base horizontal tilt adjustment.

Position the machine on an even and level floor

Mount the brush and lower the base to the floor.

Loosen  the 

nut 

  on  the  left-hand  lifting  arm  and  allow  the

base to adapt to the floor.

The  slotted  bracket  of  the  base  automatically  positioned
correctly.

Tighten nut and bolt.

This  operation  ensures  the  correct  alignment  of  the  base  to  the 
floor for uniform cleaning on the work-track. 

Attention:  an  incorrect  angle  will  cause  the  machine  to  pull  to 
the right or to go into reverse. 

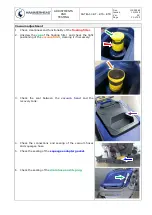
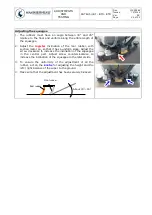
2. Base vertical tilt adjustment:


Loosen the 

self-locking nut 


Adjust  the  base  without  the  brush  so  that  it 

touches  at  the  back  first  and  that  the  front  is  6-7  mm 
higher. 


Tighten the self-locking nut. 

Correct adjustment ensures 

the correct tilt of the brush  

on the floor. 

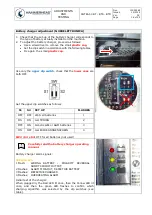
3. Traction adjustment

Adjust  the  traction  b  means  of  the 

knob 

  indicated  in  the

diagram:

Unscrew to increase the traction effect;

Screw to decrease the traction effect.

Tighten the handwheel after adjustment.

Attention:  increasing  the  traction  of  the  machine  diminishes 
the width of the floor cleaned. 

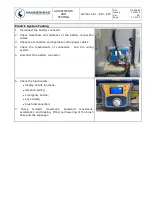
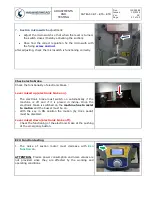
6. Make  sure  that  when  lowering  the  brush  base  and  activating

levers on the handlebar, the brush starts working. otherwise,
adjust the bar of the 

microswitch

.

Summary of Contents for 500 Series

Page 1: ...500 SERIES HAMMERHEAD CLEANING EQUIPMENT COMPANY R HammerheadClean com Easy to Use Efficient Economical ENGINEERED SIMPLICITY TM Adjustment Testing Guide...

Page 2: ...including the base functions of the machine This menu is intended for the operator of the machine advanced menu including the advanced features and settings of the machine This is addressed to experi...

Page 3: ...circuit on brush or vacuum motor output Check motor cables and conditions Overcurrent AL_5 Function Thermal protection on brush or vacuum motor Over temperature on brush or vacuum stage Wait 5 minute...

Page 4: ...uence Check connections of the connector of the key Swicth off and switch on again Key off failure AL_22 General Main Relay Failure Check the connections of the motors If it is ok the main Relay is da...

Page 5: ...y acts as a programming console Using a specific key sequence it is possible to access the two main menu user menu including the base functions of the machine This is intended for the operator of the...

Page 6: ...eneral Sets Display count meter Traction Traction Key Hourmeter mode key connected to ON OFF key Traction connected to traction motor General Sets Display tune 15 5 50 Display tune General Sets Displa...

Page 7: ...user menu Ex Modify the language setting from IT to EN 1 Switch off the machine by switching the key in OFF position 2 Enter the user menu Press at the same time with machine off key 4 and the key 6...

Page 8: ...ded Water Pumps sets Settings Access to parameters related to dosing system as detergent pump if included Chemical sets Settings Access to parameters related to vacuum motor Vacuum sets Settings Acces...

Page 9: ...Sets default Machine model setup with or without dosing system Model ANTEA General Sets default Setup for installed battery types Battery GEL General Sets default Reset for partial hour meter as in t...

Page 10: ...tion of Brush Current Protection alarm cut off motor Nom motor current Amp 25 Brushes Sets default Nominal timer joined with I_Nom define the condition of Brush Current Protection alarm cut off motor...

Page 11: ...2 sets V 2 1 Water flow Sets default Water quantity liter hour in the cleaning solution Step 3 of the water selector Flow3 sets V 2 6 Water flow Sets default Water quantity liter hour in the cleaning...

Page 12: ...he water amount lt h in the cleaning solution Step 2 of the detergent selector Flow2 set 28 Chemical Pumps Sets default Detergent quantity as of the water amount lt h in the cleaning solution Step 3 o...

Page 13: ...ith T_Nom define the condition of Vacuum Current Protection alarm cut off of the motor Nom motor current A 22 Vacuum Sets default Nominal timer joined with I_Nom define the condition of Vacuum Current...

Page 14: ...n Sets default Reverse ramp Time needed to move from forward to backward and vice versa Rev Ramp s 1 0 Traction Sets default Maximum forward speed as percentage of the maximum reachable speed FW Speed...

Page 15: ...on Sets default Not used Mode1 motor current A 35 Traction Sets default Machine breaking when moving switched on Runaway speed V 20 Traction Sets default Maximum current provided from the electronic c...

Page 16: ...sets Batteries voltage Battery V Monitor sets Traction motor voltage Traction voltage V Monitor sets Traction motor current Traction current A Monitor sets Traction motor current Traction ammeter A M...

Page 17: ...key 4 and the key 6 to display the value 60 as the standard password to enter the advanced menu 6 Use the key 2 to confirm the new parameter value of the password The advanced menu is now accessible 7...

Page 18: ...tion cables 3 Check the connection and tightness of the power cables 4 Check the functionality of connectors and the wiring system 5 Reconnect the battery connector 6 Check the functionality display a...

Page 19: ...ones are both OFF Set the upper dip switches as follows S1 S2 SET UP FLASHES OFF OFF Wet cell batteries 1 ON ON Gel TROJAN 2 OFF ON Generic GEL or AGM batteries 3 ON OFF Gel EXIDE SONNENSCHEIN 4 SW2 S...

Page 20: ...f the solution tank plug and fast water detergent filling cap 2 Check the cleanliness and sealing of the solution filter 3 Fill up the solution tank 4 Check hoses sealing solenoid valve on the brush b...

Page 21: ...filter 2 Unscrew the cap of the floating filter and check the right positioning of the vacuum filter cleaning it if necessary 3 Check the seal between the vacuum head and the recovery tank 4 Check the...

Page 22: ...ised up electronic brake on The electronic brake must switch on automatically if the machine is off and if it is placed in incline Once the electronic brake is switched on the machine has to resist to...

Page 23: ...use the machine to pull to the right or to go into reverse 2 Base vertical tilt adjustment Loosen the self locking nut Adjust the base without the brush so that it touches at the back first and that t...

Page 24: ...ocknut 2 Check the M8 screw that fixes the arm to the third point allows the longitudinal movement of the base so this can adjust itself to the specific floor 3 Adjust the pressure relief spring by ti...

Page 25: ...with suction motor on so that it has a uniform slope Adjust the screw clockwise to increase the inclination of the squeegee in the central part Adjust screw counterclockwise to increase the inclinati...

Page 26: ...g of the dosing system when present Check the functioning of the electrobrake Check the condition of the batteries clamps and cables Machine operating tests Fill the tanks with water and check for any...

Page 27: ...info hammerheadclean com HammerheadClean com ENGINEERED SIMPLICITY TM CONTACT US...

Reviews: