background image

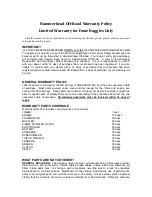
Hammerhead Off-Road Warranty Registration Form 

Registration Terms & Conditions: 

In order to activate the warranty, please follow the instructions below: 

1) 

Make a copy of the Bill of Sale 

2) 

Make a copy of Pre-Delivery Checklist 

3) 

Make a copy of Buyer-Safety Agreement 

4) 

Fill out warranty card and send with all above documents to: 


Hammerhead Off-Road 

Attn: Warranty Registration 
1200 Lakeside Parkway Ste. 325 
Flower Mound, TX 75028 


Or, Fax to 214-513-1738 


Or, ON-LINE at 

www.hammerheadoffroad.com


under dealer’s only section 


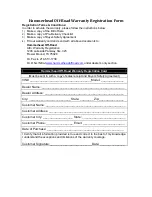
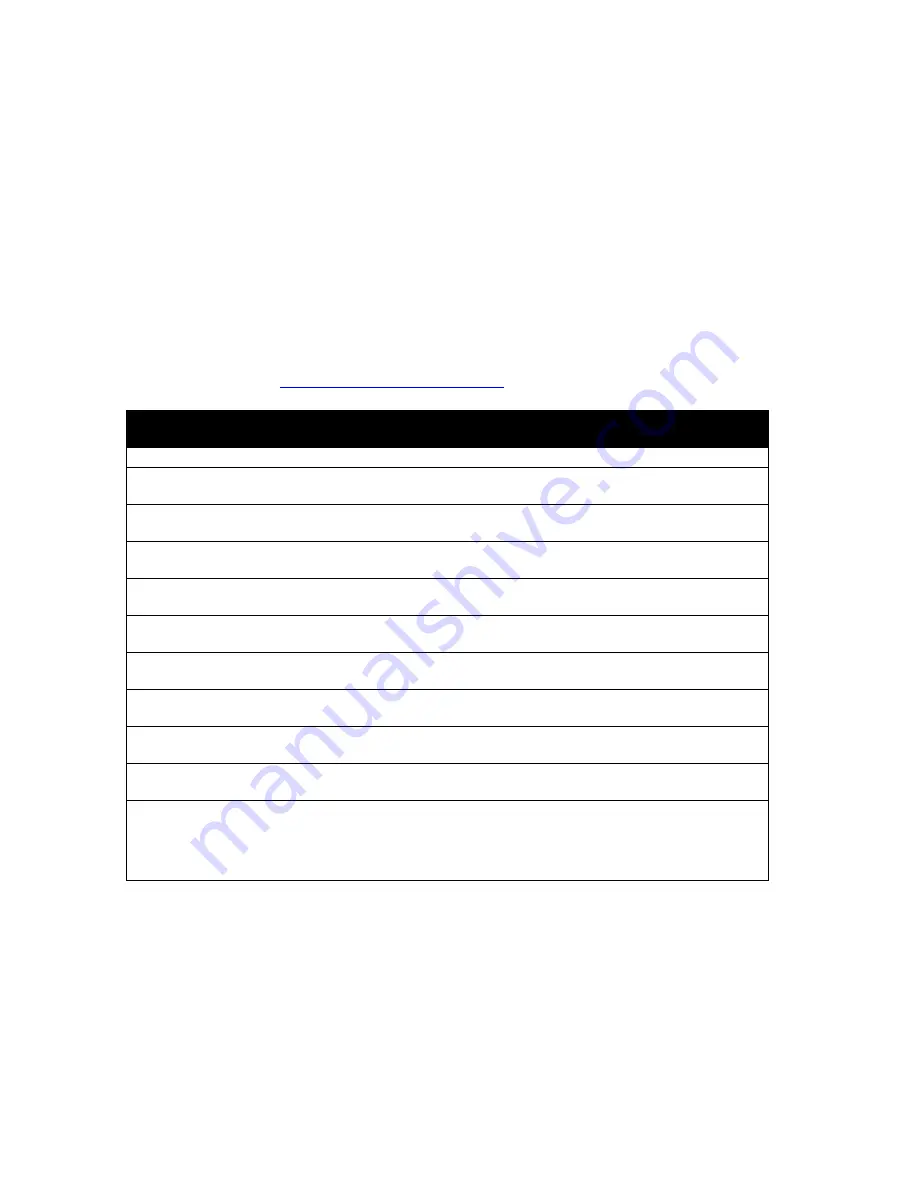
Hammerhead Off-Road Warranty Registration Card 

(Must be sent in with a copy of sales receipt and Buyers Safety Agreement) 

VIN# _____________________________________Model: ______________ 

Dealer Name: __________________________________________________ 

Dealer Address: ________________________________________________ 

City: _________________________ State: ________ Zip:_______________ 

Customer Name: ________________________________________________ 

Customer Address: ______________________________________________ 

Customer City: __________________ State: __________________________ 

Customer Phone: ________________ Email: _________________________ 

Date of Purchase: ______________________________________________ 

I Certify that all information provided is true and correct to the best of my knowledge.  
I understand the exceptions and limitations of the warranty coverage. 

 
Customer Signature:_________________________ Date: _______________ 

Summary of Contents for GL-150

Page 1: ...ts Manual This vehicle is designed and manufactured for off road use only USA only It does not conform to Federal Motor Vehicle Safety Standards and in regards to operation on public streets roads or highways is illegal FOR OFF ROAD USE ONLY MINIMUM RECOMMENDED OPERATOR AGE 16 DuneBuggy ...

Page 2: ... Most parts covered under your warranty except for the frame and engine are covered for 30 or 90 days Not all parts are covered Contact your dealer for details or questions about a specific part Warranty Parts are covered according to the schedule below from the end consumer s date of purchase All warranty paperwork must be received within 14 days of repair WARRANTY PARTS COVERAGE Warranty starts ...

Page 3: ...racing or use on rental tracks public streets public roads highways paved surfaces or right of ways Always wear an approved helmet and eye protection when riding Always secure loose clothing and long hair Always utilize seatbelts Please read the operators manual before usage and go over the Buyer Safety Agreement FAQ s 1 FOR WHAT REASONS CAN MY WARRANTY CLAIM BE DISPUTED OR DENIED Warranty can be ...

Page 4: ...s Safety Agreement VIN _____________________________________Model ______________ Dealer Name __________________________________________________ Dealer Address ________________________________________________ City _________________________ State ________ Zip _______________ Customer Name ________________________________________________ Customer Address ______________________________________________...

Page 5: ...roads or highways ______Do not allow your child to ride without supervision ______Do not ride under the influence of drugs or alcohol They can affect your judgment and slow your reaction time ______Always maintain a safe distance between your vehicle and vehicles around you ______Never ride this vehicle unless it has been properly adjusted and maintained ______Never run the engine in closed areas ...

Page 6: ... sure that it is kept upright and that the fuel cock is in the off position Otherwise fuel may leak out of the carburetor or the fuel tank ______Always follow the break in period as described in the owner s manual Not following the break in period will void the engine warranty ______Always clean the air filter as described in the owner s manual Improper maintenance of the air filter will void the ...

Page 7: ...ER AND SHROUD ASSY 9 OIL PUMP ASSY 10 DRIVEN PULLEY AND CLUTCH SUBASSY 11 TRANSMISSION ASSY 12 ELECTRIC SYSTEM 13 ELECTRIC STARTER ASSY 14 DRIVE PULLEY SUBASSY 15 CARBURETOR 16 FRAME GROUP 17 STEERING SHAFT ASSY 18 SUSPENSION ARM ASSY 19 REAR CARGO RACK SEAT BELT 20 REAR SWING ARM ASSY UPPER 21 ENGING MUFFLER AIR CLEANER 22 REAR SWING ARM 23 REAR HOUSING 24 WIRE HARNESS ELECTRICAL 25 REVERSE ASSY ...

Page 8: ...rious injuries or death Be sure to follow the recommended maintenance schedule and service your Dune Buggy accordingly Preventive maintenance is extremely important to the longevity of your Dune Buggy ȱȱȱ ȱ ȱ ȱ ȱ ȱ ȱ ȱ ȱ ę ȱ ȱ before and during initial use of the dune buggy It is also recommended to practice in a large open area and familiar with operations of this dune buggy We hope you will have...

Page 9: ...ated with operating or maintaining a Dune Buggy You must use your own good judgment ȱȱȱȱ ȱ ȱę ȱ ȱ ȱ ȱ ȱ ȱ ȱ ȱ ǰȱ DZ Safety Labels _ On the Dune Buggy Safety Messages _ Preceded by a safety alert symbol and one of two signal DZȱWARNING or CAUTION Physical harm may result from failure to adhere to the instructions that are described within the WARNING labels Safety Headings such as Important Safety Re...

Page 10: ... ȱ ȱ ȱ ȱ ȱ ȱ ȱ ěȬ ȱ ȱ ǯȱ ȱ ȱ ȱ ȱ made for pavement and the Dune Buggy does not have turn signals and other features ȱ ȱ ȱ ȱ ȱ ǯȱ ȱ ȱ ȱ ȱ ȱ ȱ ȱ ȱ ȱ ǰȱ ȱ ěȱ ȱ walk your Dune Buggy across Take Time to Learn Practice Even if you have driven other Dune Buggies take time to become familiar with how this Dune Buggy works and handles Practice in a safe area until you build your skills and get accustomed t...

Page 11: ...ȱȱȱ ȱ ȱ ȱ ȱ ȱ ȱ ȇ ȱ ȱ ȱ ǯȱ ȱ ȱ ȱ is dangerous and can increase the possibility for an accident Never run your Dune Buggy indoors The exhaust from the engine contains a tasteless odorless and poisonous gas called carbon monoxide Keep away from moving parts of the Dune Buggy The operator of the Dune Buggy should never place their hands or other parts of their body near any moving part of the Dune Bu...

Page 12: ...ns 3031112 WARNING WARNING ALL HAIR MUST BE TIED UP AND SECURED AT OR ABOVE SHOULDER LENGTH ALL LOOSE CLOTHING MUST BE SECURED ALL NECKLACES AND SCARVES MUST BE SECURED NO LONG HAIR READ OWNER S MANUAL AND ALL LABELS BEFORE YOU OPERATE THIS DUNE BUGGY NEVER OPERATE THIS DUNE BUGGY WITHOUT PROPER INSTRUCTIONS Beginners require adult supervision NEVER OPERATE THIS DUNE BUGGY ON PUBLIC ROADS It is in...

Page 13: ...ways wear an D O T approved motorcycle helmet eye protection boots gloves long pants and long sleeved shirt or jacket whenever you drive Although complete protection is not possible wearing proper gear can reduce the chance of injury should you have an accident The following suggestions will help you choose the proper protective gear Helmets and Eyes Protection ȱȱȱȱ ȱ ȱ ȱ ȱ ȱ ȱ ȱ ȱ ȱ ȱ ȱ ȱ ě ȱ ȱ ȱ...

Page 14: ...r seat belt could cause you to be thrown from the dune buggy causing serious injury or death WARNING Operating this dune buggy after consuming alcohol or drugs can seriously affect your judgment cause you to react more slowly affect your balance and perception and could result in serious injury or death Never consume alcohol or drugs before or while operating this dune buggy WARNING Improperly mai...

Page 15: ... Never operate the dune buggy on any paved surfaces including pavements driveways car parks and streets WARNING Operating this dune buggy on public streets roads or highways could cause a collision with another vehicle Never operate this dune buggy on any public streets roads or highways whether they are dirt gravel or paved surfaces WARNING Removing your hands from the steering wheel or feet from...

Page 16: ...uggy WARNING Failure to use extra care when operating on excessively rough slippery or loose terrain could cause loss of traction or vehicle control which could result in an accident including an overturn Do not operate on excessively rough slippery or loose terrain until you have learned and practiced the skills necessary to control the dune buggy on such errain Always be especially cautious on t...

Page 17: ......

Page 18: ...11 ...

Page 19: ...12 ...

Page 20: ...key clockwise to ON position Secondly push the Engine Start Button the illuminate button in for 5 seconds to start the engine If the engine does not start release the button for 5 seconds and try again Once the engine starts let it warm up for 5 minutes or until the engine idles at the normal speed 1500 1700 RPM before operation ...

Page 21: ...14 ...

Page 22: ...15 OPERATION Figure 2 REAR CARGO RACK FUEL TANK CAP TANK COMP FUEL SEAT BELT STEERING WHEEL Component locations ...

Page 23: ...mpting to adjust the seat ensure that dune buggy engine is stopped Never operate this Dune Buggy when the provided seat is not securely fastened to do so could result in a strong possibility of severe personal injury or loss of life Before attempting to adjust the seat ensure the dune buggy engine is stopped E Reverse Adjustment a Push forward the reverse lever to the D position so that the unit c...

Page 24: ...ing Instructions aǯȱ ȱ ȱ ȱ ǰȱ ȱ ȱ ȱ ȱ ȱ ȱ ȱ ȱ ȱ ȱ ȱ ȱ ȱ ȱ ȱ ǯ bǯȱ ȱ ȱ ȱ ȱ ȱ ȱ ȱ ȱ ȱ ȱ ȱ ȱ ȱ ȱ ȱ ǰȱ ȱ ȱ ǯ cǯȱ ȱ ȱ ȱ ȱ ȱ ȱ ȱ ȱ ȱ ȱ ǯ dǯȱ ȱ ȱ ȱ ȱ ȱ ȱ ȱ ȱ ȱ ȱ ǰȱ ȱ ȱ ȱ ȱ ȱ ȱ ȱ ȱ ȱȱȱȱ ȱ ȱ ȱ ǯȱȱ ȱ ȱ ȱ ȱ ȱ ȱ ȱ ȱ ȱ ȱ ȱ ȱ ȱȱȱȱ ȱ ȱ ȱ ǯ eǯȱ ȱ ȱ ȱ ȱ ȱ ȱ ǰȱ ȱ ȱ ȱȱȱȱ ȱ ȱ ȱ ȱ ȱ ȱ ȱ ȱ ȱ ȱ Ȭ ȱȱȱȱ ȱ ǯȱȱ ȱ ȱ ȱ ȱ ȱȱ ȱ ȱ ȱȱȱȱ ȱ ȱ ǯȱǻ ȱ ǯśǼȱ ȱ ȱ ȱ ȱȱȱ ȱ ȱ ȱ ǰȱ ȱ ȱ ȱ ȱ ȱ ȱ ȱ ȱȱȱ ȱ ȱ ȱ ȱ ȱ ȱ ȱ ȱ ȇ ȱ ȱȱȱ ȱ ǯȱ SERVICE INST...

Page 25: ... ȱ ȱ ȱ ȱ ȱ ǯȱȱ ȱ ȱ ȱ ȱ ȱ ȱ ȱ ǯ dǯȱ ę ȱ ȱǻ ȱŗȱŗȦŚȱ Ǽȱ ȱ ȱ ȱ ȱę ȱ ȱ ȱ ȱŗŖ ŚŖȱ ǯȱȱ ȱ ȱ ȱ ȱ ȱ ȱ ȱ ȱ ǯ eǯȱ ȱ ȱ ȱ ȱ ȱ ȱ ȱ ȱ ȱ ȱ Ğ ȱ ȱ ȱŗŖȱ ȱ ȱ ǯȱ ȱ ȱ ȱ ȱ ȱ ȱ ȱ ȱ ǯȱ ȱ ȱ ȱ ȱ ȱ ȱ ǯ C Spark Plug aǯȱ ȱ ȱ ȱ ȱ ȱ ȱ ȱ ȱ ȱ ȱ ȱ ȱ ǯȱǻ ȱ ȱ ȱ ȱ Ǽȱ ȱ ȱ ȱ ȱ ȱ ȱ ȱ ȱ ȱ ǯȱ ȱ ȱ ȱ ȱ ȱ ȱ ȱ ȱ ȱ ȱ ȱ ȱ ǯȱ ȱ ǰȱ ȱ ȱ ȱ ȱ ȱ ǻ ȱ ȱ Ǽȱ ȱ ȱ ȱ ȱ ǯȱ ȱ ę ȱ ȱŖǯŜDžŖǯŝ ǯ bǯȱ ȱ ȱ ȱ ȱ ȱ ȱ ȱ ȱ ȱ ȱ ȱ ǰȱ ȱ ȱ ȱ ȱ ȱ ȱ ȱ ȱ ȱ ȱ ǯ cǯȱ ȱ ȱ ȱ ȱ ȱ ȱ ȱ ȱ ...

Page 26: ...igure 10 E Cleaning Instructions ȱȱȱȱ ȱ ȱ ȱ ȱ ǯȱ ȱ ȱ ȱ ǰȱ ȱ ěȱ ȱ ȱ ȱ ȱ ȱ ȱ ǯȱ ȱ ěȱ ȱ ȱ ȱ ȱ ǯȱ ȱ ȱ ȱ ȱ ȱ ȱ ǰȱ ȱ ȱ ȱ ȱ ȱ ȱ ȱ ȱ ȱ ȱ ȱ ȱ ȱ ȱ ȱ ǯ F Dune Buggy Lubrication ȱȱȱȱ ȱ ȱ ȱşŖȱ ȱ ȱ ǯȱ ȱ ȱ ȱ ȱ ǰȱ ȱ ȱ ȱ ȱ everyday G Chain Lubrication ȱȱȱȱ ȱ ȱ ȱ ǰȱ ȱ ȱ ȱ ȱ ȱ ȱ ȱ ȱ ȱ ȱ ǯȱ See Fig 10 ...

Page 27: ...ȱ ȱǻ ȱ ǯȱŗŗǼ ȱȱȱȱ ȱ ȱ ȱ ȱ ȱ ȱ ȱ ȱ ȱ ǰȱ ȱ ȱ ȱ ȱ ȱ ȱ ȱ ȱ ȱ ȱ ȱ Ğǰȱ ȱ ȱ ȱ ȱ ȱȱ ǯȱ ȱ ȱ ȱ ȱ ȱ ȱ ȱ ǯ J Storage Instruction ȱȱȱȱ ȱ ȱ ȱ ȱ ȱ ȱ ȱ ȱ ȱ ȱ ȱ ȱ ȱ ȱ ȱ ȱ ȱřŖȱ ȱ ȱ ȱ ȱ ȱ ȱ ȱ ȱ ȱ ȱ ȱ ȱ ȱ DZ aǯȱ ȱ ȱ ȱ ȱ ȱ ȱ ȱ ȱ ȱ ȱ ȱ ȱ ǰȱ ȱ ȱ ȱ ȱ ǯ bǯȱ ȱ ȱ ȱ ȱ ȱ ȱ ȱ ǰȱ ȱ ȱ ȱ ȱ ȱ ȱ ȱ ȱ ȱ ǯ cǯȱ ȱ ȱ ȱ ȱ ȱ ȱ ȱ ǯȱ ȱ ȱ ǰȱ ȱ ȱ ȱ ȱ ȱȱȱȱȱȱȱȱ ǰȱ ȱ ȱ ȱ ȱ ȱ ě ȱ ȱ ǯ Figure 11 SPRING ADJUSTMENT CAM RIGHT ROTATE LEFT ROTATE Do not d...

Page 28: ...heels It is only necessary to remove the 4 lug nuts to remove the wheel See Fig 12 ȱȱȱ ȱ ȱ ȱ Ğ ȱ ȱ ȱ ǯ Figure 12 B Rear Wheel Replacement Do not disassemble the castle nuts when you replace the rear wheels and hub assembly ȱȱȱȱ ȱ ȱ Ĵ ȱ ȱ ȱ ȱŘŚ ȱ ǯȱ ȱ ȱ ěȱ ȱ ȱ ȱ ǯ ȱȱȱȱ ȱ ȱ ȱ ȱ ȱ ȱ ȱŚȱ ȱ ȱ ȱ ȱ ȱ ȱ ȱ ǯ See Fig 13 ...

Page 29: ...oper toe in dimension A should be 1 8 1 4 greater than dimension B b To adjust the alignments loosen the lock nuts on both sides of Front Tie Rods To make ȱ ȱ ǰȱ ȱ ȱ ȱ ȱ Ğǯȱȱ ȱ ȱ ȱ ȱ ȱ ȱ ȱ ȱ ȱ ȱ ǯȱȱ Ğ ȱ ȱ ȱ ȱ ȱ ǰȱ ȱ ȱ ȱ ȱ ȱ ȱ ȱ ǯȱȱ Recheck the dimensions for proper alignment Figure 14 A B RIGHT ROATE LEFT ROATE RIGHT ROATE LEFT ROATE LOOK NUT FR WHEEL TIE ROD FR WHEEL TIE ROD CL ...

Page 30: ... Valve clearance of engine A adjust C clean I inspect clean or replace if necessary L lubricate R replace I I I I I I I I I I I I I C I I R L A A C C C C A L C A 23 PERIODICAL CHECK AND SERVICES WIRING DIAGRAM GTS150 L BR W PU Y G B R BLUE BROWN WHITE purple GREEN YELLOW BLACK RED Y R G Y P Br START SWITCH 12V8AH BRAKE SWITCH B R B W G Br G Head Lamp G Br G Y B IGNITION SWITCH G Y G G Chock Assemb...

Page 31: ...y Geason Powersports This is your emission control system DEFECTS WARRANTY NOTICE Use of any Geason Powersports vehicle in any type of competitive event completely and absolutely voids this and all other warranties offered by Geason Powersports OWNER S WARRANTY RESPONSIBILITIES As the vehicle owner you are responsible for the performance of the required maintenance listed in your owner s manual Ge...

Page 32: ... of 1 accident 2 misuse 3 repairs improperly performed or replacements improperly installed 4 use of replacement parts or accessories not conforming to specifications set forth by Geason Powersports which adversely affect performance and or 5 use in competitive racing or related events B Inspections replacement of parts and other services and adjustments required for required maintenance C Any veh...

Page 33: ...his Limited Emission Control System Warranty issued by Geason Powersports IV LEGAL RIGHTS This warranty gives you specific legal rights and you may also have other rights which vary from state to state V This warranty is in addition to the Geason Powersports limited vehicle warranty VI ADDITIONAL INFORMATION Any replacement part that is equivalent in performance and durability may be used in the p...

Reviews: