background image

10 

2.0 AMP PALM SANDER

OPERATING INSTRUCTIONS

  1.  Selecting the right grade of sanding paper

Different grades of sanding paper can be purchased from the store where you purchased 
the tool. Available grades are: Coarse, Medium and Fine.
Use a coarse grit to sand down rough finishes, medium grit to smooth the work and fine 
grit to finish off.
It is best to make a trial run on a scrap piece of material to determine the optimum grades 
of sanding paper for a particular job.

GRIT CHART

Grit

Type

Example of use

60 or less

Very Coarse

Material removal, heavy paint removal, shaping wood

80-100

Coarse

Paint removal, rough surface preparation  
(eg. non-planed wood)

120-150

Medium

Surface preparation planed wood

180-220

Fine

Sanding between coats

240 or more

Very fine

Final finishing

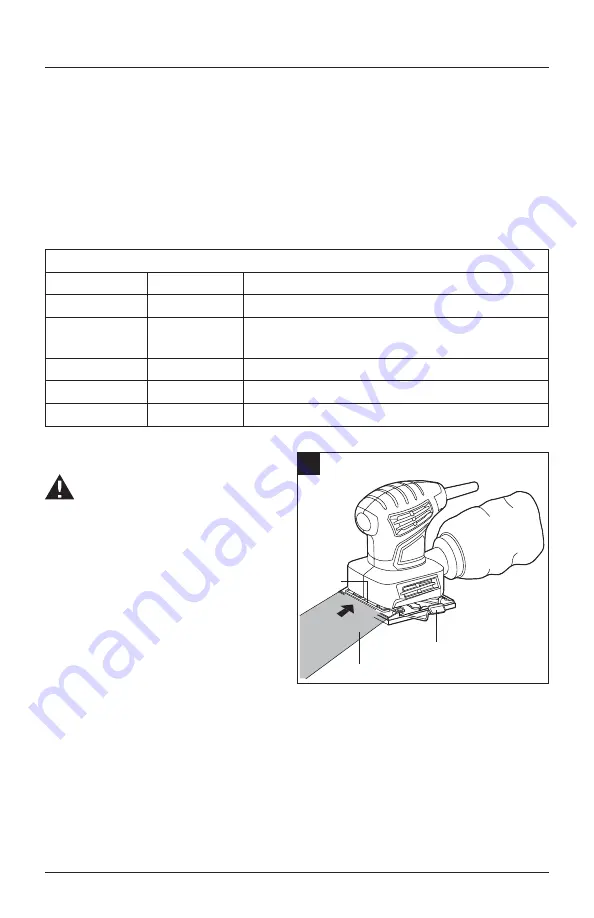
  2.  Attaching Abrasive Sheet 

 WARNING: 

Always ensure the tool 

is switched off and the plug is removed 
before making any adjustments or 
maintenance procedures.


  a)  To open clamping wire, lift 

clamping lever out of it’s pocket 
and then lower lever so it is 
positioned as shown.

  b)  Place the abrasive sheet (grit side 

up) between the clamping wire 
and base plate while aligning 
edges of the abrasive sheet with 
either edge of the pad. (Pre-bending the sheet makes attachment easier.) 

  c)  After inserting the sheet, raise clamping lever and return it to it’s original position 

making sure the clamping wire is secure.

  d)  Wrap the sheet around the length of the pad and attach free end of sheet under 

opposite clamp and repeat procedures a, b, & c above. The abrasive sheet must 
be drawn as tight as possible for efficient sanding, as a loose sheet can slip on the 
work surface.

2

Clamping 

wire

Abrasive Sheet

Clamping lever

Summary of Contents for HAPS020

Page 1: ...Number______________________ Purchase Date_______________________ Questions problems missing parts Before returning to your retailer call our customer service department at 1 877 888 1880 8 30 a m 8 0...

Page 2: ...ts Crystalline silica from bricks cement and other masonry products Arsenic and chromium from chemically treated lumber Your risk from these exposures varies depending upon how often you do this type...

Page 3: ...on always wear safety goggles or safety glasses with side shields and a full face shield when needed We recommend using a wide vision safety mask over eyeglasses or standard safety glasses with shield...

Page 4: ...FETY INSTRUCTIONS SAVE THESE INSTRUCTIONS This manual contains important safety and operating instructions for palm sander Model HAPS020 DANGER To reduce the risk of fire or electric shock carefully f...

Page 5: ...ating a power tool outdoors use an extension cord suitable for outdoor use Use of a cord suitable for outdoor use reduces the risk of electric shock If operating a power tool in a damp location is una...

Page 6: ...and or remove the battery pack if detachable from the power tool before making any adjustments changing accessories or storing power tools Such preventive safety measures reduce the risk of starting t...

Page 7: ...s a static discharge spark introduced in the box or excessive heat Always wear eye protection and a dust mask for dusty applications and when sanding overhead Sanding particles can be absorbed by your...

Page 8: ...fety guard return springs may be improperly mounted Certain cleaning agents such as gasoline carbon tetrachloride ammonia etc may damage plastic parts Risk of injury to user The power cord must only b...

Page 9: ...9 PACKAGE CONTENTS PARTS DESCRIPTION A ON OFF switch B Clamping wire C Pad D Dust port E Dust extraction bag F Clamping lever G Punch plate H Dust extraction tube I Abrasive sheet 60 grits 6 80 grits...

Page 10: ...240 or more Very fine Final finishing 2 Attaching Abrasive Sheet WARNING Always ensure the tool is switched off and the plug is removed before making any adjustments or maintenance procedures a To ope...

Page 11: ...the paper with the use of the punch plate provided with your sander Align sander base with punch plate and push down on sander until punch plate pierces the paper Then remove punch plate from sander 4...

Page 12: ...the grain using some lateral motion so the main strokes are overlapped as much as 75 If the surface is rough start sanding with a coarse grit sheet then medium and then finish with a fine or extra fi...

Page 13: ...to the rain If the carbon brushes need to be replaced have this done by a qualified repair person always replace the two brushes at the same time 1 Cleaning Avoid using solvents when cleaning plastic...

Page 14: ...ools must use 3 wire extension cords that have 3 prong plugs and receptacles NOTICE The smaller the gauge number the heavier the cord RECOMMENDED SIZES OF EXTENSION CORDS 120 VOLT ALTERNATING CURRENT...

Page 15: ...es not start Not connected to power supply Connect to power supply Power cord or plug is defective Have the tool serviced by an Authorized Service Center Other electrical defect to the product Have th...

Page 16: ...cts in material and workmanship If you believe that the Palm sander is defective at any time during the specified warranty period call HAMMERHEAD support at 1 877 888 1880 to speak with a customer ser...

Reviews: