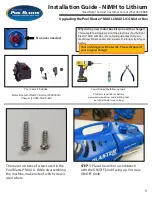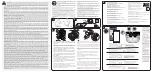


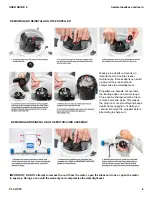


VEHICLE MOUNT
TRAILER MOUNT
12”-16”
12”-16”
Make sure to tighten the hardware sufficiently to avoid slippage.
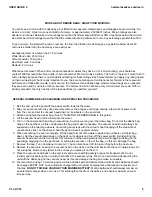
Check all hardware and mount components regularly for tightness, corrosion, and wear
.
Do not transport your Hammer-Head unit with chemicals in the accessory tray
.
Secure all loose items on your Hammer-Head unit before driving.
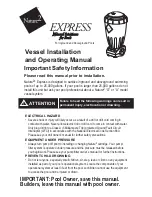
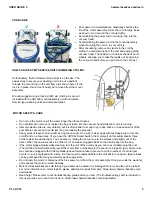
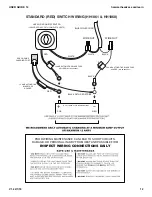
Refer to the clamp latch adjustment detail (at right) to properly adjust the clamp latch. Do not use the clamp latch without first adjusting the fit and checking all four safety points.
WARNING!
WARNING!
WARNING!
Se
tti
ng
up
th
e
Hammer-H
ead
HH130
0
M
O
UNT
ASS
EM
BL
Y
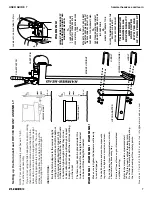
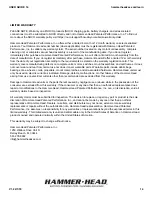
NOTE:
Your vehicle (or trailer) must have a 2” hitch
to use the mount assembly
.
If you are not using the hitch adapter for trailer mounting, then U-bolt the Hammer-Head mount directly to the trailer wall in an area that can support the total weight suf
ficiently (approximately 130-140 lbs).
The use of
straps or braces from the vehicle to the top of the mount upright can provide additional support.
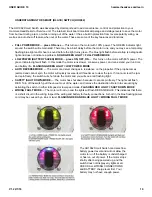
CHECK THESE FOUR SAFETY POINTS BEFORE USING THIS
MOUNTING DEVICE:
1.
CLAMP
LA
TCH MUST BE PUSHED
COMPLETEL
Y FOR
W
ARD UNTIL
IT
LOCKS INT
O PLACE
AND SPRING POPS
OPEN
2.
BOTH NUTS ON THE LA
TCH BOL
T MUST
BE TIGHTENED DOWN
AND THE BOL
T
PIN SHOULD MAKE CONT
ACT WITH
CART MOUNT LOOP
WHEN LA
TCHING
3.
CART FRAME MUST MAKE CONT
ACT
WITH MOUNT CHANNEL
WHEN CLAMP
IS LOCKED DOWN
4.
AL
W
AYS USE THE SAFETY
PIN
FAILURE T
O MAINT
AIN OR CHECK THIS
DEVICE COULD LEAD T
O
SERIOUS
ACCIDENT OR INJUR
Y
CLAMP
LA
TCH
ADJUSTMENT DET
AIL
WARNING!
HITCH ADAPTER
U-BOL
T
MOUNT UPRIGHT
LOWER U-CHANNEL
CLAMP
LA
TCH
SAFETY
PIN
U-BOL
T
INSTRUCTIONS:
Bolt the hitch adapter to the mount upright using the included u-bolts so that the bottom of the mount upright will be at least 12-16
inches from the road surface. The cart wheels should be high enough so that they do not
make contact with steep driveways or speed bumps. Do not set up with the cart tires rolling on the road.
The lower u-bolt can be placed under the lower u-channel if more height is needed or above it if less height is needed.
THE OPERA
T
OR
ASSUMES ALL
RESPONSIBILITY
AND RISK
ASSOCIA
TED
WITH THE USE
OF THIS PR
ODUCT
Q
u
e
st
io
n
s?
C
a
ll
5
6
1
-
2
7
8
-8
9
9
2
o
r
e
m
a
il
u
s:
i
n
fo
@
h
a
m
m
e
rh
e
a
d
va
c.
co
m
V1.2 02/01/18
USER GUIDE 7
hammerheadvac.com/learn
V1.2 2/1/18
7