38
39
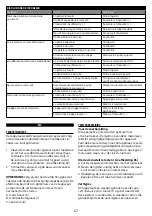
When the material needs to be diluted:
To choose the right thinner, check if the material is
water- or oil-based. For water-based paints, use a
water-based thinner. For oil-based paints, use an
oil-based thinner.
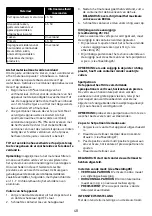
1. Start with a 10% dilution of the paint material.
To do this, fill the device‘s container with the
required amount of paint or varnish. The supplied
funnel has a capacity of 1 dl. Block the hole,
and fill it with the required amount of paint or
material.
2. Add thinner to paint and shake. Then measure
the viscosity again. If the spray material needs
more thinning, add an additional 5% (5% equals
half the funnel) of the appropriate thinner, and
measure the viscosity again. If necessary, dilute
the paint further, and repeat the process until the
correct viscosity is achieved.
TIP: Set aside a small amount of paint to add back
to the paint you have already prepared in case you
over-dilute it.
Note: You may need to filter the material to remove
any contaminants from the paint that could
potentially enter and block the system. Impurities in
the paint will result in poor performance and a poor
result. Never use halogenated hydrocarbon solvents
such as bleach, fungicides, methylene chloride or
1.1.1-trichloroethane when painting aluminium.
Filling the device
1. Make sure the device is unplugged and the switch
is in the OFF position.
2. Unscrew the container from the device.
3. After properly diluting the material, fill the
container to the top of the neck.
IMPORTANT: Never exceed the maximum level
of 800 ml.
4. Then carefully screw the container back on.
Alignment of the suction tube
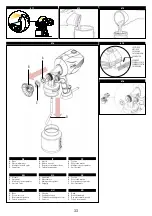
(see Figures #5 + #6)
The suction tube inside the tank must be positioned
every time the paint sprayer is used.
• When spraying downward, the angled end of the
suction tube must be pointed forward. (see Figure
#5)
• When spraying upward, the angled end of the
suction tube must be pointed toward the back end
of the spray gun. (see Figure #6)
NOTE: If you place the suction tube in the correct
direction, you will not have to refill the container
so often.
Spray pattern
The device has three different spray patterns:
vertical, horizontal and precise.
The vertical and horizontal patterns are
recommended for large areas, while the precision
pattern is used for small objects or for hard-to-reach
areas (like corners).
TIP: Try each spray pattern to determine which
works best for your purposes.
To customize the pattern/mode:
1. Make sure that the device is turned off.
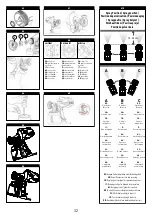
2. Loosen the union nut by turning it anti-clockwise.
(see Figure #7)
3. Adjust the position of the multi-position
regulator to spray a vertical, horizontal or
precision pattern.
4. Tighten the union nut.
WICHTIG: Do not begin without having adjusted the
union nut.
Setting the modes: (see Figure #8)
•
VERTICAL PATTERN / Vertical mode: makes a
lateral movement.
•
HORIZONTAL PATTERN / Horizontal mode: makes
an up and down movement.
•
PRECISION POINT / Precision mode: for detailed
work.
INTENSITY ADJUSTMENT
The intensity adjustment allows you to increase or
decrease the flow of paint coming out of the nozzle.
Turn the intensity control knob clockwise to tighten
it for a greater paint flow, or anti-clockwise to
decrease the paint output pressure. (see Figure #9)
USE
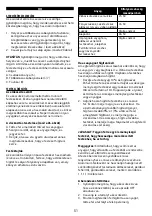
If you are new to or unfamiliar with painting/
varnishing with a paint spray system, it is advisable
to practice on a wooden or cardboard surface before
beginning work on the desired surface.
IMPORTANT: All items and surfaces that you wish to
paint should be cleaned before spraying. Any areas
you do NOT wish to be painted should be covered.
How to spray
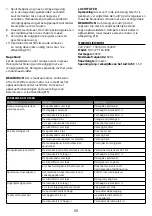
• First perform a spray test, and then adjust the
mode and quantity of material to be sprayed.
• Be sure to hold the device perpendicular and
parallel to the application area at a distance of 25
to 30 cm.
• Always start spraying outside the desired area so
that paint can be drawn in.

