38
39
• Move the device smoothly, from top to bottom or
side to side, depending on the mode.
NOTE: Keep your wrist straight and parallel to the
surface for smooth work. If you bend your wrist or
arm while spraying, the spray angle can cause paint
spatter in some areas, leading to an uneven result.
Tips
• Avoid spraying surfaces where the device requires
a spray angle greater than 45°.
• Never tilt the device upwards at an angle of more
than 45°. Material could enter the turbine and
damage the spraying device.
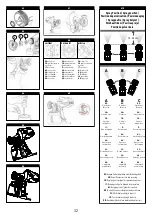
Spray position (see Figure #10)
• Uneven area - Flat area - Uneven area
• Do not bend your wrist while spraying.
For outdoor use:
IMPORTANT: When using the device outdoors, be
aware of the wind direction and wear appropriate
eye and respiratory protection and clothing. The
desired surface must be clean and dust-free, so that
no unwanted material comes into contact with the
painted surface.
NOTE: Follow all applicable environmental
guidelines in your country when spraying outdoors.
Respect the environment and properly dispose of
unconsumed materials.
LED LIGHT (see Figure #11)
The LED light ensures more precise work in hard-
to-reach or poorly lit corners. The LED light stays
illuminated while you use the device.
CLEANING THE PRODUCT
Proper cleaning is required for trouble-free
operation of the device. Improper cleaning or failure
to clean will void the warranty.
IMPORTANT:
• Do not clean the device with flammable solvents.
• Always clean the device and the container with a
suitable cleaning solution (soapy water for latex
materials, alcohols and solvents for oil-based
materials).
• Do not use cleaning agents, thinners or lubricants
containing silicone as these are not compatible
with the spray gun of the device.
• Do not use materials that contain bleach or chlorine.
• Never immerse the device in water.
• Always clean the device in a safe area.
IMPORTANT: Never clean the air filters or nozzle air
inlets with sharp metal objects. Do not use silicone-
based solvents or lubricants.
CLEANING INSTRUCTIONS
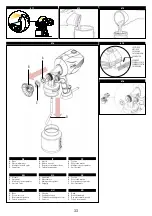
(see Figures #12 + #13)
1. Turn off the device, unplug the power cord and
press the trigger to remove excess material from
inside.
2. Unscrew the container. Empty the remaining
paint into the original container.
NOTE: Do not return diluted paint to its original
container; dispose of it in a proper manner or
keep it in a separate sealed container. (see
Figure #12)
3. Pour a small amount of a suitable cleaning
solution into the paint spray tank.
4. Clean the container and dispose of the cleaning
solution in a proper manner.
5. Fill the container with a small amount of NEW
cleaning solution. (see Figure #13)
6. Put the container back on the device, plug in the
device and switch it on.
7. In a safe area, spray the solution into an empty
can for 2 seconds. Release the trigger and spray
again for another 2 seconds. Repeat this process
until the cleaning solution comes out of the
device without any traces of paint.
8. Unscrew the union nut, multi-position regulator
and nozzle to clean them.
9. Remove the suction tube, and clean it with a
suitable solution.
10. Check the container for leaks, and clean it with
water if necessary. (see Figure #14)
After use
Reassemble the parts after you have finished
cleaning. Clean the suction tube air hose with a
cleaning brush. Clean the spray nozzle with an
appropriate cleaning solution.
IMPORTANT: It is advisable to check whether the
motor air filter is dirty. Never operate the device
without an air filter. Dirt can enter the device and
impair its function. (see Figure #15)
AIR FILTER
Note: If paint enters the air hose, remove the multi-
position regulator and clean the inside with a damp
cloth.
IMPORTANT: The air hose and multi-position
regulator are only partially resistant to solvents.
Never immerse them in solvents, only lightly clean
them. (see Figure #16)


