background image

34

        Prese ts

Hammond XPK-100 Quick Features  Guide

Current Parameter

Current Preset

Preset Saving

Your Selected Value

Ë


 Saving to a Preset

After you have made changes to the instrument using the Advanced Features in EDIT 

Mode, 

you 

can 

save

your 

changes 

to 

Preset 

for 

later 

use.

TRY 

THIS:

1.

From 

PLAY 

Mode, 

press 

the 

PLAY/EDIT 

Switch 

once 

to 

enter 

EDIT 

Mode.

2.

Make 

whatever 

changes 

you 

wish 

to 

the 

XPK-100 

by 

using 

the 

Advanced 

Features.

3.

When 

you 

have 

finished 

editing, 

then 

press 

the 

Hi 

“C” 

Pedal 

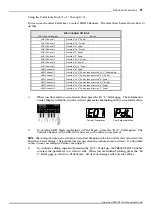
once.  The Information

Center Display will show you the current parameter alternating with your selected value.
For example if “CONTROL Sw Function”  was  the  last  parameter  you  edited,  the
Information  Center  Display  would  look  similar  to  this:

4.

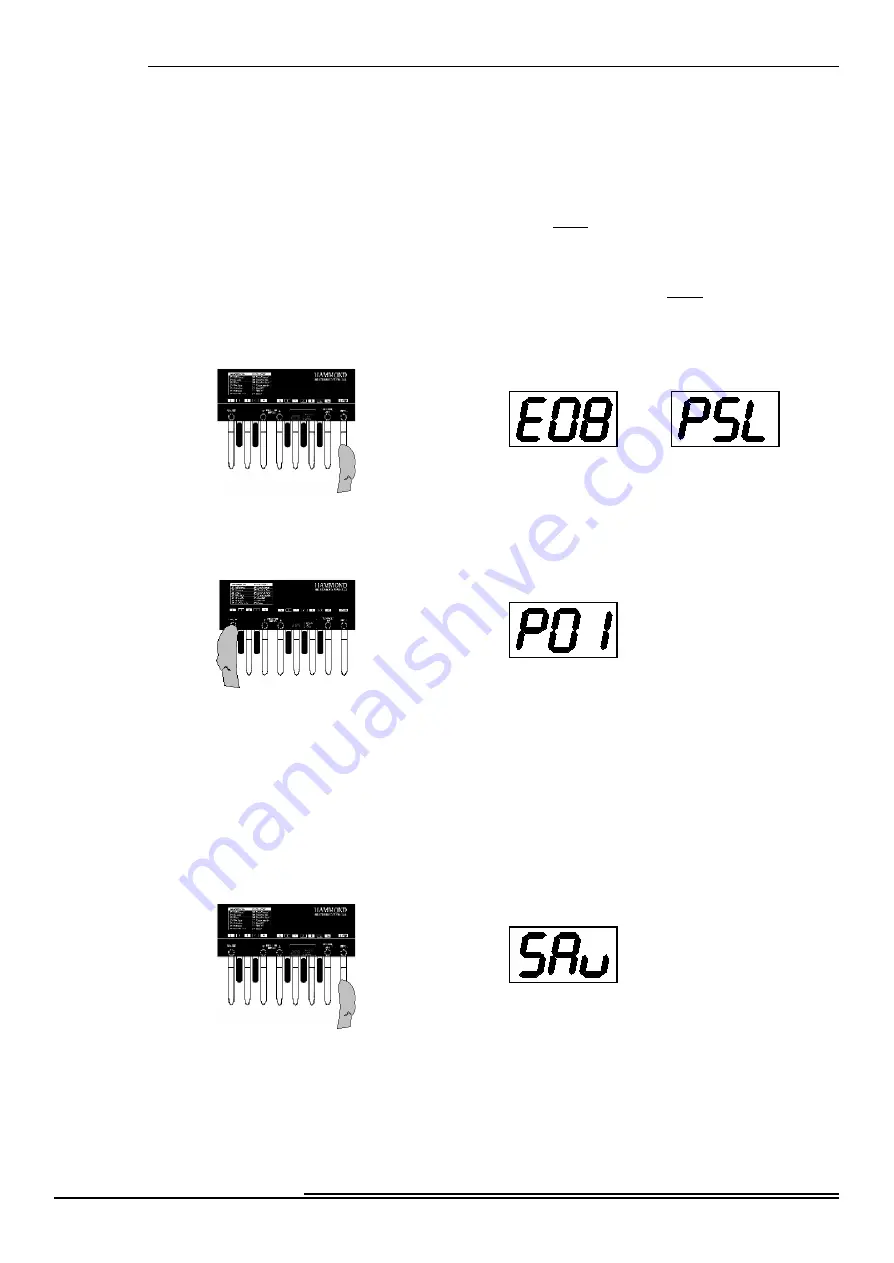
Press  and  Hold  the  PLAY/EDIT Switch.  The Information Center Display should now flash
a Preset Number similar to this:

5.

You can now select which Preset Number to save your edits to.  If you wish to select a
different Preset Number, use the PRESET/EDIT “

•

” and “

–

” Switches to make your

selection.  You can select from “1" through “15,” or you may select “ALL” if you want to
save your edits to all of the Presets.

NOTE:  

If at this point DO NOT wish to 

save 

your 

edited 

parameters 

to 

Preset, 

press 

the 

PLAY/EDIT 

Switch.  The

Information Center Display will show, “Can,” meaning that the Save operation is 

canceled.

6.

After you have made your selection, press the Hi “C” Pedal again.  The Information
Center Display should now flash the following message:

After the above message is finished flashing, the Information Center Display will return to PLAY
Mode.  Your parameters are now saved to the Preset you selected.

Summary of Contents for XPK-100

Page 1: ...HA O XPK 100 MIDI PEDALBOARD Quick Features Guide HAMMOND SUZUKI LTD Hamamatsu Japan...

Page 2: ...NTRODUCTION 1 Basic Hook Up 1 A C Power 1 MIDI Connections 1 A Word About MIDI 1 Connecting the XPK 100 to a Hammond Drawbar Keyboard 2 Connecting the XPK 100 to another keyboard instrument 2 MIDI Mer...

Page 3: ...acle This is used to secure the AC cord so that it will not accidentally come unplugged MIDI Connections In order to use the XPK 100 the unit must be connected via MIDI to a keyboard or other MIDI com...

Page 4: ...cting the XPK 100 to another keyboard instrument The XPK 100 can also interface with other keyboard instruments simply connect the MIDI OUT of the XPK 100 into the MIDI IN of the other keyboard NOTE S...

Page 5: ...tyle i e two manuals and pedals Below is an example of how to connect multiple keyboards and the XPK 100 together with the Hammond XM 1 Drawbar Module to create a virtual B 3 Channel 1 Upper Manual Ch...

Page 6: ...SOFT THRU function so that all the parts can be recorded When you are ready to play back your Sequence be sure to 1 Turn MIDI SOFT THRU OFF on your Hammond Drawbar Keyboard 2 Disconnect the MIDI cable...

Page 7: ...ese two Switches are located to the left of the Information Center Display They function in two ways PLAY Mode The two Switches allow you to scroll through and select the Preset number you want EDIT M...

Page 8: ...will display The Information Center Display should look similar to this The designation P01 indicates that Preset 1 is active Presets are predefined combinations of the various parameters on the XPK...

Page 9: ...power to it NOTE Doing the following procedure will erase all parameters settings and registrations returning the XPK 100 to the original Hammond factory default settings To ensure that important data...

Page 10: ...ctable way such as Controller 64 for Sustain etc The following is a brief explanation of each of the Advanced Feature functions E00 PK MIDI Channel Allows you to select the MIDI Channel on which the X...

Page 11: ...Please refer to the documentation for your module to determine the Bank numbers for specific voices E13 System Allows you to perform certain functions associated with the basic system or setup of the...

Page 12: ...two messages as shown below NOTE You can also press the PRESET EDIT Switch to arrive at the same Advanced Feature selection NOTE After resetting the XPK 100 E00 is normally the first Advanced Feature...

Page 13: ...l 15 Press the Lo C Pedal then press the E Pedal MIDI Channel 16 Press the Lo C Pedal then press the F Pedal 4 When you have selected the proper MIDI Channel then press the Hi C Pedal once The Informa...

Page 14: ...This indicated that the XPK 100 is ready to be transposed 2 Now select the Transposition interval you want by using the Pedal keys That data chart below shows how to do this TRANSPOSE OPTIONS Transpos...

Page 15: ...s the E Pedal Up 5 half steps Press the F Pedal Up 6 half steps Press the F Pedal Down 5 half steps Press the G Pedal Down 4 half steps Press the G Pedal Down 3 half steps Press the A Pedal Down 2 hal...

Page 16: ...ss the PRESET EDIT Switch repeatedly until the Information Center Display alternates between two messages as shown below NOTE You can also press the PRESET EDIT Switch to arrive at the same Advanced F...

Page 17: ...is now set to the value you selected NOTE After doing the above you will notice a small red dot between the first and second characters of the Information Center Display This indicates that your new...

Page 18: ...ction 3 Now use the Pedal keys to select between Poly and Mono Mode Use the WHITE Pedal keys Lo C D E F G A and B to select Poly Mode Use the BLACK Pedal keys C D F G and A to select Mono Mode 4 When...

Page 19: ...old ON or OFF Use the WHITE Pedal keys Lo C D E F G A and B to turn PK Hold ON Use the BLACK Pedal keys C D F G and A to turn PK Hold OFF 4 When you have made your selection then press the Hi C Pedal...

Page 20: ...want Using the DEC INC Pedal keys Use the DEC A Pedal key to decrease the Volume setting Use the INC B Pedal key to increase the Volume setting 4 When you have made your selection then press the Hi C...

Page 21: ...Advanced Feature selection 3 Now use the Pedal keys to select the Velocity setting you want Using the DEC INC Pedal keys Use the DEC A Pedal key to decrease the Velocity setting Use the INC B Pedal ke...

Page 22: ...THIS 1 From PLAY Mode press the PLAY EDIT Switch once The Information Center Display should alternate between two messages as shown below 2 Press the PRESET EDIT Switch repeatedly until the Informatio...

Page 23: ...I Channel 14 Press the Lo C Pedal then press the D Pedal MIDI Channel 15 Press the Lo C Pedal then press the E Pedal MIDI Channel 16 Press the Lo C Pedal then press the F Pedal 4 When you have made yo...

Page 24: ...nce The Information Center Display should alternate between two messages as shown below 2 Press the PRESET EDIT Switch repeatedly until the Information Center Display alternates between two messages a...

Page 25: ...ation Minimum Transmits a Modulation value of 48 30h Modulation Mid Transmits a Modulation value of 65 41h Modulation Maximum Transmits a Modulation value of 96 7Fh V1 C1 Turns on the V1 C1 Touch Tab...

Page 26: ...ill now control the function you have selected NOTE After doing the above you will notice a small red dot between the first and second characters of the Information Center Display This indicates that...

Page 27: ...so press the PRESET EDIT Switch to arrive at the same Advanced Feature selection 3 Now use the Pedal keys to select between Alternate and Momentary Mode Use the WHITE Pedal keys Lo C D E F G A and B t...

Page 28: ...Program number you want Using the DEC INC Pedal keys Use the DEC A Pedal key to scroll down through the Program numbers Use the INC B Pedal key to scroll up through the Program numbers 4 When you hav...

Page 29: ...te between two messages as shown below 2 Press the PRESET EDIT Switch repeatedly until the Information Center Display alternates between two messages as shown below NOTE You can also press the PRESET...

Page 30: ...splay will show you the current parameter alternating with your selected value 5 To exit the EDIT Mode and return to PLAY Mode press the Hi C Pedal again NOTE After doing the above you will notice a s...

Page 31: ...Display should alternate between two messages as shown below 2 Press the PRESET EDIT Switch repeatedly until the Information Center Display alternates between two messages as shown below NOTE You can...

Page 32: ...splay will show you the current parameter alternating with your selected value 5 To exit the EDIT Mode and return to PLAY Mode press the Hi C Pedal again NOTE After doing the above you will notice a s...

Page 33: ...ction you want Using the DEC INC Pedal keys Use the DEC A Pedal key to scroll down through the selections Use the INC B Pedal key to scroll up through the selections Using the Pedal keys from Lo C thr...

Page 34: ...from operating any of their assigned functions If you accidentally strike a Switch during performance your settings will not be disrupted When the LOCK Feature is OFF the Switches will all work normal...

Page 35: ...he Information Center Display should look similar to this The designation P01 indicates that Preset 1 is selected TRY THIS 1 From the above screen touch the PRESET EDIT Switch once The Information Cen...

Page 36: ...d look similar to this 4 Press and Hold the PLAY EDIT Switch The Information Center Display should now flash a Preset Number similar to this 5 You can now select which Preset Number to save your edits...

Page 37: ...E05 PK Volume 1 127 E06 Fixed Vel Value 1 127 E07 Control Channel 1 16 Pedal E08 CONTROL Sw Func See page 23 E09 CONTROL Sw Mode Alternate Momentary E10 Program Change OFF 1 128 E11 Bank Select MSB 0...

Page 38: ...l Change Bank Select 0 32 Modulation 1 Data Entry 6 38 Main Volume 7 16 17 18 19 64 65 66 67 91 92 93 94 95 96 97 98 99 Bank Select Modulation Data Entry Main Volume General Purpose 1 4 Pedal Switches...

Page 39: ...r countries contact HAMMOND SUZUKI Ltd 25 12 Ryoke 2 Chome Hamamatsu 430 Shizuoka JAPAN Technical materials are available and can be obtained by mailing a request to the appropriate address listed abo...

Page 40: ...HAMMOND SUZUKI LTD Hamamatsu Japan...

Page 41: ...is OFF the Swicthes will all work normally The display of the Accessory Panel has been changed as shown below and the Adaptor AD1 1508 or AD3 1508 is possible to use New Accessory Panel Old Accessory...

Reviews: