


8
time
Level
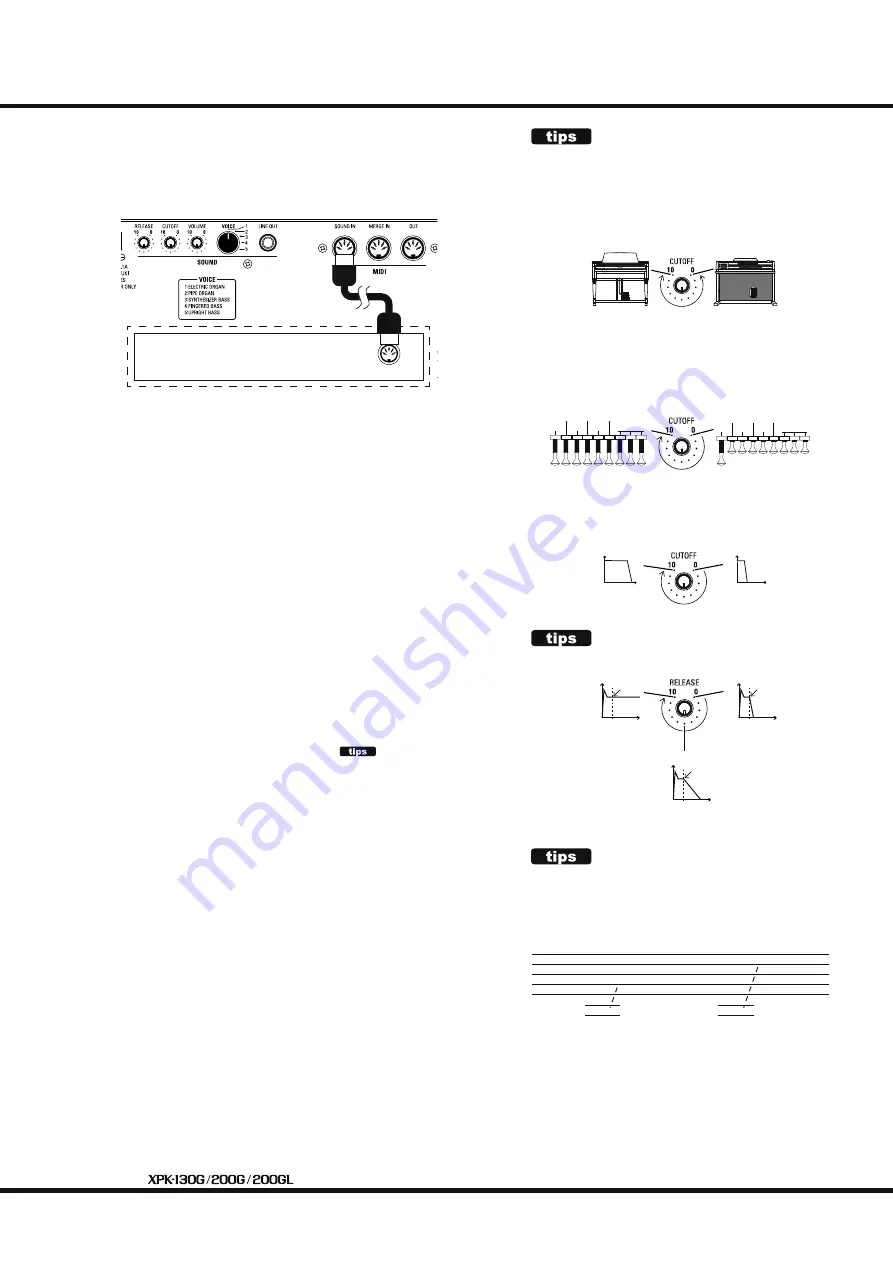
ADJUSTING CUTOFF
The CUTOFF control will aff ect diff erent sounds in diff er-
ent ways. This is explained more fully below.
ELECTRIC ORGAN
Maximum value will give a "tone wheel" sound, while
minimum value will give an "LSI" organ sound (see be-
low).
PIPE ORGAN
As the value is raised, you will hear sounds being added
from low to high. The eff ect is that of stops gradually be-
ing added on a pipe organ (see the illustration below).
Other voices
Adjust the Cutoff Frequency. The more the value is
raised, the higher the Cutoff Frequency will be.
USING THE INTERNAL SOUND GENERATOR
As mentioned previously, this unit has a built-in Sound Generator. Th
e
LINE OUT jack allows you to hear the audio from the built-in Pedal
Voices. Th
e following paragraphs explain each control on the unit re-
lated to the built-in Pedal Voices.
ADJUSTING RELEASE
The RELEASE knob works as follows.
Selecting a Pedal Voice
❿
VOICE selector
Allows you to select one of the following 5 built-in Pedal Voices.
1. ELECTRIC ORGAN
electric
organ.
2. PIPE ORGAN
traditional pipe organ Pedal registration.
3. SYNTHESIZER BASS
portamento & sweeping synth bass.
4. FINGERED BASS
electric bass guitar.
5. UPRIGHT BASS
acoustic or uplight bass (double bass).
Adjusting the Sound
❾
VOLUME knob
Allows you to controls the volume of the built-in Pedal Voices (LINE
OUT). Turn this control to the right to increase the Volume, and to
the left to decrease the Volume.
❽
CUTOFF knob
Allows you to adjust the Cutoff Frequency. As the value is increased,
the Cutoff Frequency becomes higher and the sound becomes
brighter. Maximum is “10,” minimum at “0.”
NOTE: For details on how the cutoff works, see
"ADJUSTING CUTOFF" on
the right.
❼
RELEASE knob (Pedal Sustain)
Allows you to determine how long a pedal note will continue to
sound aft er a pedal is released. As the value is increased, the release
time becomes longer. At “0,” the tone will stop immediately when a
pedal is released.
How to control the parameters by MIDI
You can also select Pedal Voices and control parameters from an exter-
nal MIDI controller.
VOICE
program change #1 to 5
CUTOFF
control code #74
RELEASE
control code #72
EXPRESSION
control code #11 (crescendo and decrescendo)
NOTE: The [VOLUME] is not digitally controlled.
Connect the MIDI controller to this unit as shown above, and set the
MIDI channel of the unit to the same channel as the MIDI controller.
You can then send the above MIDI messages from your controller.
NOTE: You can change the MIDI channel of this unit. See P.9.
Please consult the Manual for your MIDI controller to learn how to send
MIDI parameters.
RANGE OF EACH PEDAL VOICE
As shown in the diagram below, the Note Ranges of the
Pedal Voices are the same in all units; however, both the
XPK-200G and the XPK-200GL will sound seven (7) more
notes than the XPK-130G because of the expanded
number of pedal notes.
"
X
X
X
X
NOTE: Actual sound range is 1 octave lower than the
notes written in the diagram above.
NOTE: Although this unit has only 13 or 20 notes,
the built-in Pedal Voices can sound 4 full
octaves (Note numbers 36 through 84) via
SOUND IN.
Range of Voices 1 to 5
on XPK-130G
Range of Voices 1 to 5
on XPK-200G/200GL
Tone wheel organ
16
2
8
16
1
2
8
16
1
8
8
16
2
8
16
1
2
8
16
1
2
8
16
1
2
8
16
1
State of the stop levers
frequency
Level
frequency
Level
Cutoff Frequency
:maximum
LSI organ
16´
51⁄3´
8´
4´
22⁄3´
2´
Mixture
Ⅲ
16´
51⁄3´
8´
4´
22⁄3´
2´
Mixture
Ⅲ
State of the stop levers
Cutoff Frequency
:minimum
Release time
:maximum
(continuous)
Release time
:minimum
Release time
:long
key off
key off
key off
MIDI OUT
External MIDI instrument
(e.g. MIDI controller, optional)
time
Level
time
Level
❼ ❽ ❾ ❿


