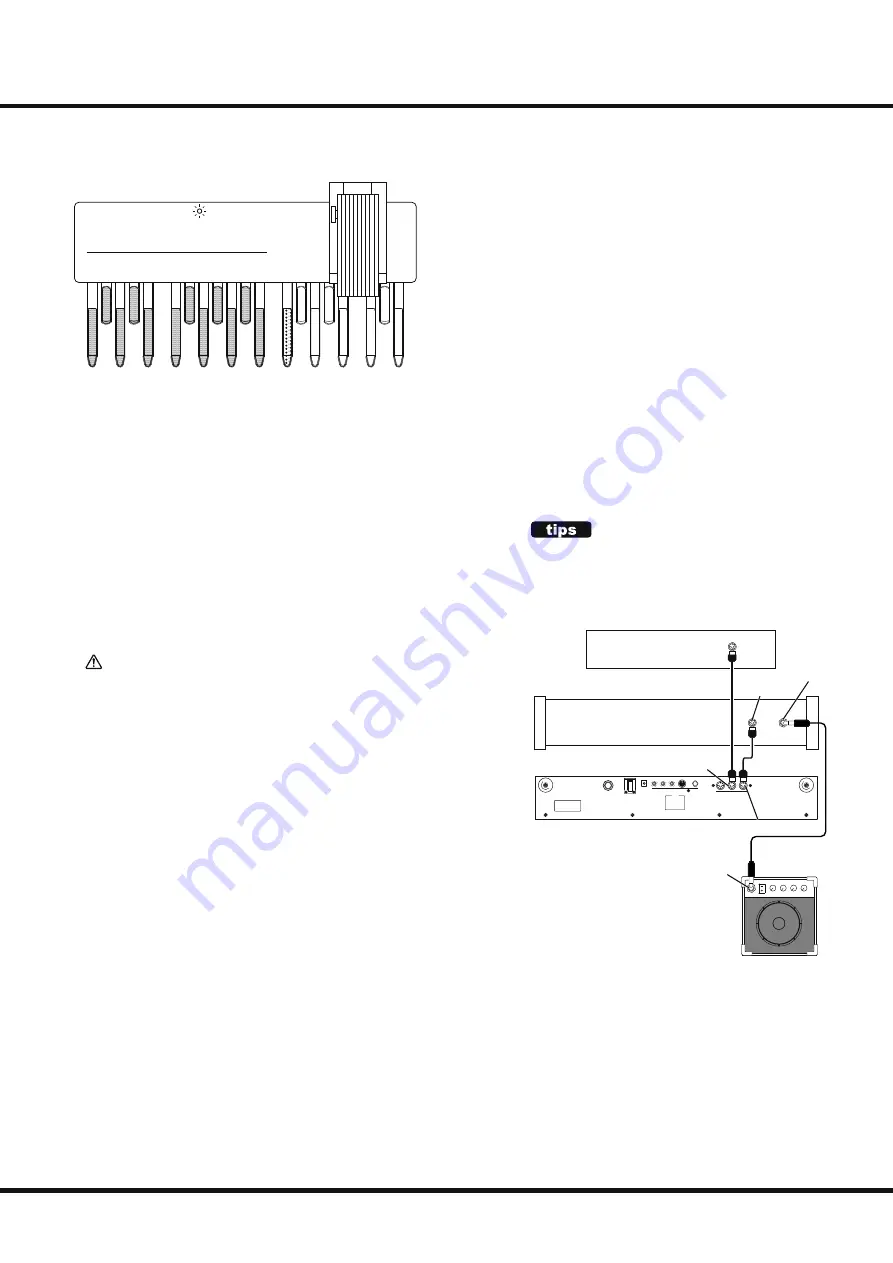
background image

9

Owner’s Manual

 MIDI CHANNEL, MERGE

 Setting the MIDI channel

C

LED

1

2

3

4

5

6

7

8

9

10

11

12

MIDI Channel

Th

  is Advanced Feature allows you to change the MIDI Chan-

nel on which the unit transmits and receives. You can select 
from “1” through “12.” Th

  e default setting is Channel “3.”

To change the MIDI Channel, do the following:

NOTE:  Doing the procedure below will set both the transmitting and 

receiving MIDI Channel of the unit - in other words, you can-

not set diff erent MIDI IN and MIDI OUT Channels.

Press and Hold the high “C” pedal and the pedal corre-
sponding with the MIDI channel you want (see the dia-
gram on the left ).

Continue to hold the pedal keys and turn the power to
the unit “ON.”

Th

  e LED light on this unit will blink the same number of 

times as the number of the MIDI channel selected, indicating 
that the MIDI channel has been changed.

NOTE:  This setting will be remembered even if the power to the unit 

is turned “OFF.”

The MIDI MERGE function

Th

  is unit is equipped with the MIDI MERGE function. Th

  is feature al-

lows MIDI playing information received at the MERGE IN jack to be 
merged (blended) with the MIDI information from this unit and sent 
out from the MIDI OUT jack. 

Important notes on MIDI Merge

When you use the MIDI MERGE function, PLEASE NOTE several 
points.

The MIDI messages to be merged

Th

  e MIDI MERGE function of this unit will only merge the channel 

messages. It does not merge system messages such as System Exclusive 
(SysEx) data or MIDI Clock data.

Duplication of the MIDI channel

Th

  e Channels assigned to the MERGE IN must be diff erent than the 

channel of the Pedalboard in order to provide correct data to the host 
keyboard.

 The MIDI loop

If the MIDI information sent out the MIDI OUT jack of this unit re-
turns to the MERGE IN jack or SOUND IN jack, a MIDI information 
loop occurs, causing a malfunction.

If the MERGE IN (or SOUND IN)/MIDI OUT of this unit and MIDI 
OUT/MIDI IN of the external equipment are connected, set the MIDI 
Echo function or the Local Control function of the external equipment 
to “OFF” to correct the problem.

0

10

0

10

0

10

3 KEYBOARDS USING MIDI MERGE

To connect 3 keyboards (Upper and Lower Manuals plus 
Pedals), connect both this unit and another MIDI key-
board to the mother keyboard using the MIDI MERGE 
function, even if the mother keyboard has only one MIDI 
IN jack. See the diagram below. 

mother keyboard
(e.g. electronic organ
/ arranger keyboard)

MIDI keyboard

XPK

MIDI OUT jack

MERGE IN jack

MIDI IN jack

MIDI OUT jack

LINE OUT jack

amplifi er

LINE IN jack
(INPUT)

Summary of Contents for XPK-130G

Page 1: ...und pedalboard The XPK 130G has 13 pedals C to C while the XPK 200G and XPK 200GL both have 20 pedals C to G In addition the XPK 200GL has wooden naturals of extended length to make heel and toe playi...

Page 2: ...ist or bend the power cord nor place heavy objects on it Doing so can damage the cord producing severed elements and short circuits Damaged cords are fire and shock hazards Do not allow any objects e...

Page 3: ...to prevent cords and cables from becoming en tangled Also all cords and cables should be placed so they are out of the reach of children Never climb on the top of nor place heavy objects on the unit...

Page 4: ...ifier or powered speak er Connect an audio cable from LINE OUT to the input connectors of an external amplifier or powered speaker SOUND IN jack Use this MIDI IN jack to play the built in Pedal Voices...

Page 5: ...efore playing this unit or damage may result Place the Expression Pedal on top of the Expression Bracket 1 and route the cord through the hole in the Bracket as shown Place the Bracket Spacer on the E...

Page 6: ...ord on the cord hook Connect the AC plug into an AC outlet MIDI Instrument e g electronic organ arranger keyboard MIDI IN jack MIDI OUT jack DC IN jack Set the Tx MIDI channel P 9 MIDI Instrument soun...

Page 7: ...X IN jack of a keyboard instrument Use the cable types described in the figure below Set both the VOLUME of this unit and the equipment to which you have connected to 0 Turn the power to this unit ON...

Page 8: ...llows you to determine how long a pedal note will continue to sound after a pedal is released As the value is increased the release time becomes longer At 0 the tone will stop immediately when a pedal...

Page 9: ...from the MIDI OUT jack Important notes on MIDI Merge When you use the MIDI MERGE function PLEASE NOTE several points The MIDI messages to be merged The MIDI MERGE function of this unit will only merge...

Page 10: ...Curve 3 Curve 4 VELOCITY CURVE A graphic of each Velocity Curve is shown below Curve 1 is the most faithful to the actual pressing velocity while at Curve 5 or 6 you can play with fixed velocity Curv...

Page 11: ...s do the following Press and HOLD the G pedal key and the pedal cor responding to the brightness level you want see the dia gram on the left Continue to hold the pedal keys and turn the power to the u...

Page 12: ...Voice Velocity Note ON O O Note OFF X X After Touch Key s X X Ch s X X Pitch Bend X X Control Change 11 X O Expression 72 O O Release 74 O O Cutoff Program Change O O True 0 4 0 4 Voice 1 5 System Ex...

Page 13: ...his equipment generates uses and can radiate radio frequency energy and if not installed and used in accor dance with the instructions may cause harmful interference to radio communications However th...

Page 14: ...e descriptive contents of this Manual total accuracy cannot be guaranteed Should the owner require further assistance inquiries should first be made to your Authorized Hammond Dealer If you still need...

Reviews: