background image

Assembly (continued)


7

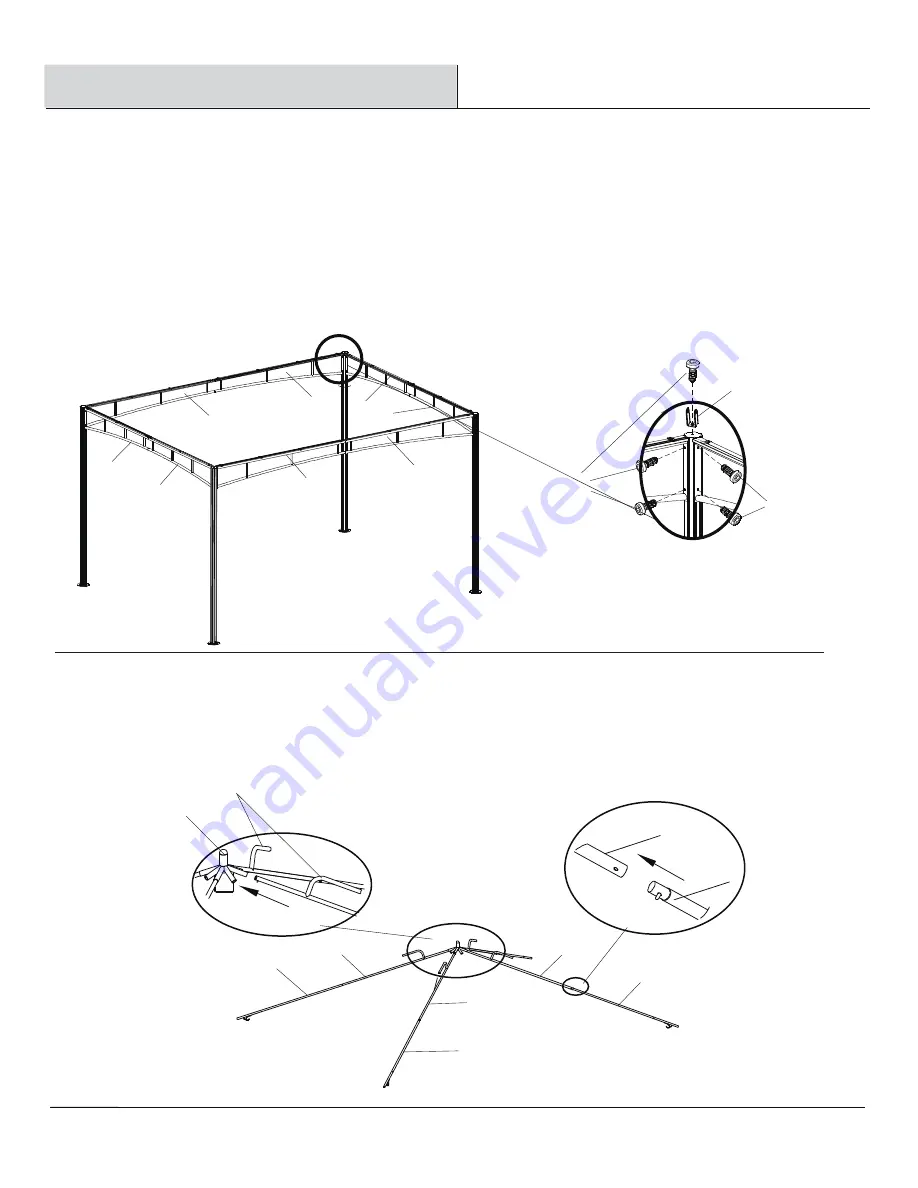
Assembling the corner roof tube


Snap one lower corner roof tube (L) into each upper corner roof tube (M). 
Snap the other end of each corner roof tube (M) into the receivers M of vent hub (P). 

Setting up the main frame


Please have a free standing ladder ready for ease of assembly.

HAMPTONBAY.COM

Please contact 1-855-HD-HAMPTON for further assistance. 


Use two bolts (AA) to attach the B side of the assembled long beams to the outside right corner post (A) and two bolts (AA) to attach the
C side of the assembled long beams to the outside left corner post (A). (See illustration below)


Use two bolts (AA) to attach the D side of the assembled short beams to the outside right corner post (A) and two bolts (AA) to attach the
E side of the assembled long beams to the outside left corner post (A). (See illustration below)


Repeat the above procedures until the frame is up.


Attach one bracket (O) onto the top of each post (A) with one bolt (AA) using hex wrench (II).


B

C

E

B

C

E

D

D

AA

AA

O

M

L

L

M

P

L

M

M

M

L

Summary of Contents for 5LGZ6526-V4

Page 1: ...sing parts Before returning to the store call Hampton Bay Customer Service 8 00 a m 6 00 p m EST Monday Friday 1 855 HD HAMPTON HAMPTONBAY COM Model 5LGZ6526 V4 to continually create quality products...

Page 2: ...ce It is not fire proof The fabric will burn if left in continuous contact with any flame source The application of any foreign substance to the tent fabric may render the flame resistance properties...

Page 3: ...wn to actual size Part Description Quantity AA Bolt M6x16 52 BB Bolt M6x35 8 CC 4 DD 12 FF GG Bolt cap Nut EE HH Hex wrench It will take two people about 30 minutes to complete the assembly process AA...

Page 4: ...2 Right long beam G 2 Long middle roof tube 2 H B A B C D E F G H I L M N Part Description Quantity I Vent hub 2 4 K 1 L 4 M Post base N Bracket 4 Lower corner roof tube 4 J Left long netting rail O...

Page 5: ...COM Please contact 1 855 HD HAMPTON for further assistance Assembly 1 Attaching the post bases Attach one post base N to each post A with one bolt CC and one nut DD using hex wrench II and wrench JJ...

Page 6: ...s D E B F C G AA AA AA AA D E B C I H BB D E DD Attach neting rail F to beam B netting rail G to beam C netting rail H to beam D netting rail I to beam E with bolts AA using hex wrench II AA BB DD AA...

Page 7: ...side of the assembled long beams to the outside right corner post A and two bolts AA to attach the C side of the assembled long beams to the outside left corner post A See illustration below Use two...

Page 8: ...f each post A Secure them with bolt BB and nut DD using hex wrench II and wrench JJ L O DD BB Snap long middle roof tubes J into the receivers J of vent hub P and secure the other end to the right sho...

Page 9: ...er roof frame Pull the canopy down to each corner until all corner roof tubes L and middle roof tubes J K fit well into the pockets on canopy From under the main canopy Q gently place vent cover R ove...

Page 10: ...ting panel to the plastic clips KK from the inside corners of the main frame Secure each netting panel S to the posts A using the small tie back on the outside of the netting panels With netting panel...

Page 11: ...ound stakes FF through the holes on each post base N into the ground 11 Measure out from post to the longest possible distance to best use the length of the guy rope GG and secure anchor HH to ground...

Page 12: ...Questions problems missing parts Before returning to the store call Hampton Bay Customer Service 8 00 a m 6 00 p m EST Monday Friday 1 855 HD HAMPTON HAMPTONBAY COM Retain this manual for future use...

Reviews: