background image

 17 HAMPTONBAY.COM


Please contact 1-855-HD-HAMPTON for further assistance.

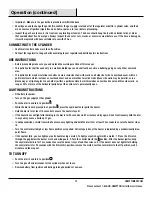
FLAME CHARACTERISTIC


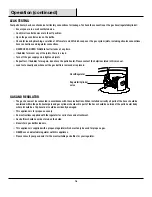
The flame pattern at the burner mesh should be visually checked whenever the heater is operated.


Normally, the burner flame is blue with yellow flame at the top. The burner mesh will become red hot.


If flames extend beyond the surface of the burner mesh, or there is the phenomena of flame lift or light back, or a black spot is 
accumulating on the burner mesh or reflector, the heater should be turned off immediately.


The heater should not be operated again until the unit is serviced or repaired.

SCREW AND BOLT CONNECTIONS


All screws and bolts, etc, should be checked and tightened on a regular basis.

STORAGE


Do not leave the patio heater exposed to outside weather conditions or stored in damp moist conditions.


To save space during long-term storage, the reflector can be removed. Take care to ensure the shape of the reflector is not 
damaged or deformed, as this will affect performance.


When using the heater after extended periods of storage, re-attach the reflector.


The heater should never be operated without the reflector in place.


If the heater is to be stored indoors, the gas bottle must be disconnected and left outside in a dry, well-ventilated area, away from 
any sources of heat or ignition.


Do not let children tamper with the bottle.

SERVICE


We recommend that servicing of this appliance should be performed either after every 100 hours of use or annually, which ever is 
achieved soonest. 


If your heater needs maintenance or is not working properly, please contact your local authorized agent for service. 


It is a necessity to contact an authorized source for replacement of parts and/or servicing.


This work must be carried out by a qualified gas technician. 


Spare parts may be obtained by contacting Hampton Bay Customer Service at 1-855-HD-HAMPTON.  


Manufactured by Universal Innovations. Kilcoole Industrial Estate, Kilcoole, Co. Wicklow, Ireland.

Care & Cleaning


Regularly clean your patio heater between uses and especially after extended periods of storage.


Ensure the heater control is turned fully to the off position, the gas supply is shut off at the regulator or bottle / cylinder valve, and 
the heater and its components are sufficiently cool before cleaning.


Never douse the heater with water when its surfaces are hot.

5010527

Yellow Tip
Primary blue flame

Maintenance

Summary of Contents for 882731

Page 1: ...t us online to see our full line of products available for your home improvement needs Thank you for choosing Hampton Bay USE AND CARE GUIDE 38 200 BTU BRONZE HEAT FOCUSING PROPANE GAS PATIO HEATER Qu...

Page 2: ...onnected for use shall not be stored in the vicinity of this or any other appliance WARNING For Outdoor Use Only WARNING Improper installation adjustment alteration service or maintenance can cause pr...

Page 3: ...icular attention must be taken Store the unit away or ensure it is at a safe distance from other items in the event that the unit is blown over WARNING Only use with gazebo s specifically designed to...

Page 4: ...s receipt WHAT IS NOT COVERED Defects or damage caused by the use of other genuine parts are not covered by this warranty This warranty is valid for the original customer only and excludes product da...

Page 5: ...ARDWARE INCLUDED NOTE Hardware not shown to actual size Part Description Quantity AA 1 4 in dome head bolt 27 BB 1 4 in nut 33 CC 1 4 in hex bolt 19 DD 1 4 in washer 7 EE 5 16 in washer 3 FF 5 16 in b...

Page 6: ...hamber Supports A B C Lower Support Pole Cylinder Chamber Wall Cylinder Chamber Door Cylinder Chamber Top A B D C G H E I K L Quantity 1 3 1 1 1 1 Part G H I J K L Description Upper Support Pole Lante...

Page 7: ...ght Overall Width Heater Heat Input Qn Heater Gas Consumption Heater Injector Size Setting Pressure Regulator Outlet Pressure Standard Gas Supply Pressure 95 in approx 82 6 lbs 34 in 38 200 Btu h 1 77...

Page 8: ...corresponding section on the base A with six of the bolts CC Finger tighten only at this stage 2 Attaching the lower support pole Attach the lower support pole C to the cylinder chamber supports B usi...

Page 9: ...amber wall Using six of the bolts AA and nuts BB attach the cylinder chamber wall D to the cylinder chamber supports B Finger tighten only at this stage 4 Attaching the cylinder chamber door Hang the...

Page 10: ...the lower support pole C as shown and secure to the cylinder chamber supports B using three bolts AA and three nuts BB 6 Attaching the upper support pole Attach the upper support pole G to the lower s...

Page 11: ...as cylinder turn clockwise to tighten it securely Position the gas cylinder inside the cylinder chamber as shown securing with the chain Perform a Leak Test see page 16 NOTE THE CYLINDER MUST BE POSIT...

Page 12: ...the assembled side panels L using six bolts AA and nuts BB and then fully tighten all bolts WARNING While every precaution has been made in the manufacture of this product care must be taken during a...

Page 13: ...her assistance 11 Attaching the reflector to the lantern Fit the reflector to the lantern H using three bolts FF and washers EE Assembly continued 12 Fitting the battery Unscrew sparker button 1 and i...

Page 14: ...nstructed and marked in accordance with the specifications for LP gas cylinders of the U S Department of Transportation DOT or the Standard for cylinders Spheres and Tubes for Transportation of Danger...

Page 15: ...s an overhead cover and three side walls as long as 30 or more of the horizontal periphery of the enclosure is permanently open LIGHTING INSTRUCTIONS Fit battery to sparker Turn on the gas supply at t...

Page 16: ...in this manual Leak test annually and whenever the gas bottle is removed or replaced GAS AND REGULATOR The gas hose must be connected in accordance with these instructions When installed correctly al...

Page 17: ...be operated without the reflector in place If the heater is to be stored indoors the gas bottle must be disconnected and left outside in a dry well ventilated area away from any sources of heat or ig...

Page 18: ...Page intentionally left blank...

Page 19: ...Page intentionally left blank...

Page 20: ...problems missing parts Before returning to the store call Hampton Bay Customer Service 8 a m 7 p m EST Monday Friday 9 a m 6 p m EST Saturday 1 855 HD HAMPTON HAMPTONBAY COM Retain this manual for fu...

Reviews: