background image

7

3

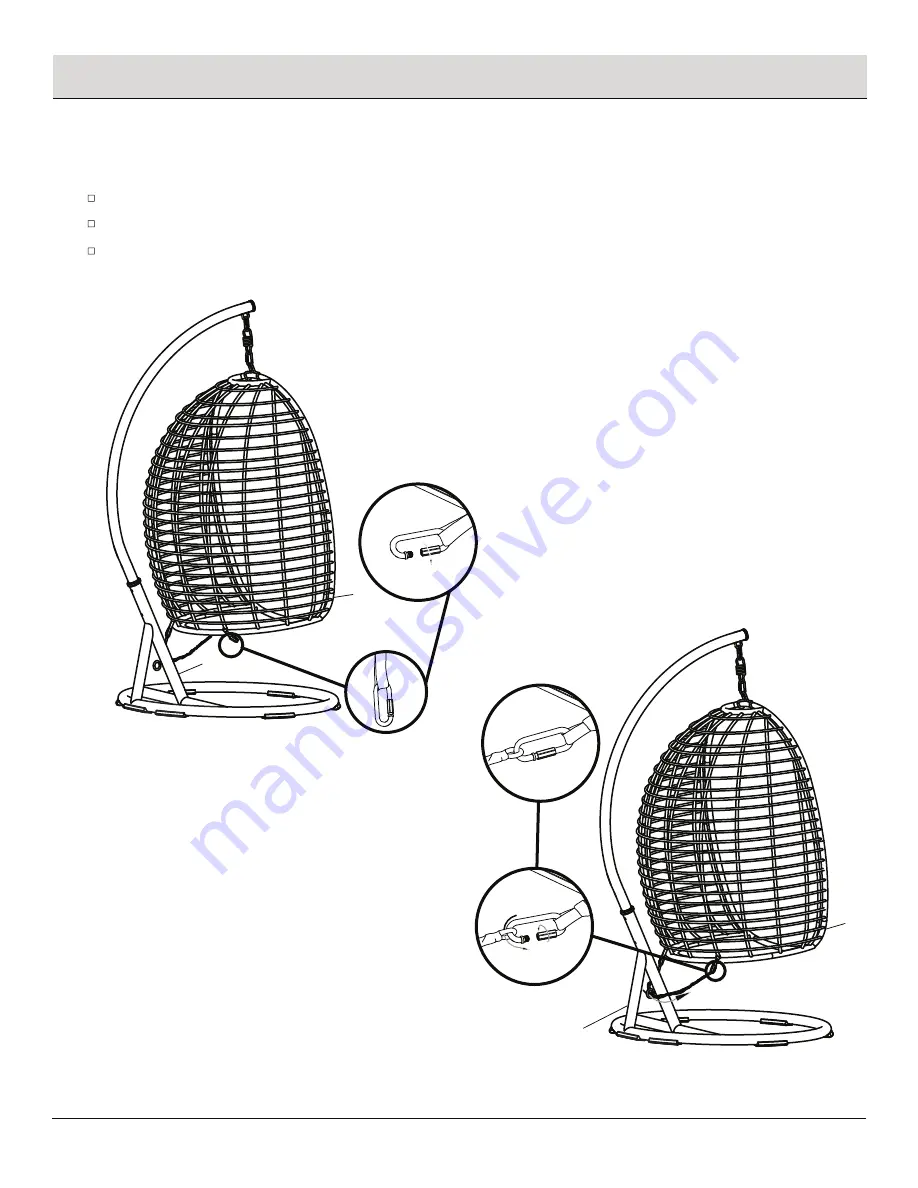
CONNECTING THE SWING FRAME TO THE BASE

Open the locked carabiner on the swing frame in the clockwise direction and take the safety strap out from the locked caraniner.


Connect the swing frame to the base by placing the safety strap around the base and through the ring on the base.

Place the safety strap to the locked carabiner on the swing frame and close in the counterclockwise direction. 

 Assembly (continued)


HOMEDEPOT.CA

Please contact 1-855-HD-HAMPTON for further assistance.

C

A


Step 2

Step 1

A

C

Summary of Contents for GCS09061K

Page 1: ...Customer Service 8 a m 7 p m EST Monday Friday 9 a m 6 p m EST Saturday 1 855 HD HAMPTON HOMEDEPOT CA THANK YOU y through the purchase of this swing We strive to continually create quality products d...

Page 2: ...NS WARNING This swing was as made for the explicit purpose of providing outdoor functions and is not to be used as a toy This product is intended for normal outdoor use however the manufacturer recomm...

Page 3: ...er assistance Warranty 1 YEAR FRAME AND 1 YEAR FABRIC LIMITED WARRANTY WHAT IS COVERED We warrant the frames to be free of manufacturing defects to the original purchaser for one year and a one year l...

Page 4: ...4 PACKAGE CONTENTS Pre Assembly continued A B C D E F 1 Swing frame 1 Pole stand 1 Base 1 Seat cushion 1 Armrest pillow 2 Back cushion Part Description Quantity A B C F E D...

Page 5: ...nto the base A align the holes and using M8x60 bolts AA M8 washers BB M8 nuts CC and nut cap DD Once all of the bolts are in place fully tighten the bolts using the hex wrench FF and the wrench GG Ass...

Page 6: ...to the pole stand B by hooking the spring with carabiners EE to the swing frame C and the pole stand B Close the spring with carabiners EE in the counterclockwise direction as shown in step 3 HANGING...

Page 7: ...he locked caraniner Connect the swing frame to the base by placing the safety strap around the base and through the ring on the base Place the safety strap to the locked carabiner on the swing frame a...

Page 8: ...NG THE CUSHIONS AND THE PILLOWS Placing the seat cushion E the back cushion D and the armrest pillows F to finish the assembly of the swing Ensure all connections are secure before use Assembly contin...

Page 9: ...oroughly This will help prevent mildew by removingdirt particles that may accumulate Do not clean with abrasive materials bleach or solvents Store the swing and chairs in a dry sheltered place when no...

Page 10: ...Before returning to the store call Hampton Bay Customer Service 8 a m 7 p m EST Monday Friday 9 a m 6 p m EST Saturday 1 855 HD HAMPTON HOMEDEPOT CA Retain this manual for future use For certificatio...

Reviews: