background image

Routine Cleaning and Maintenance

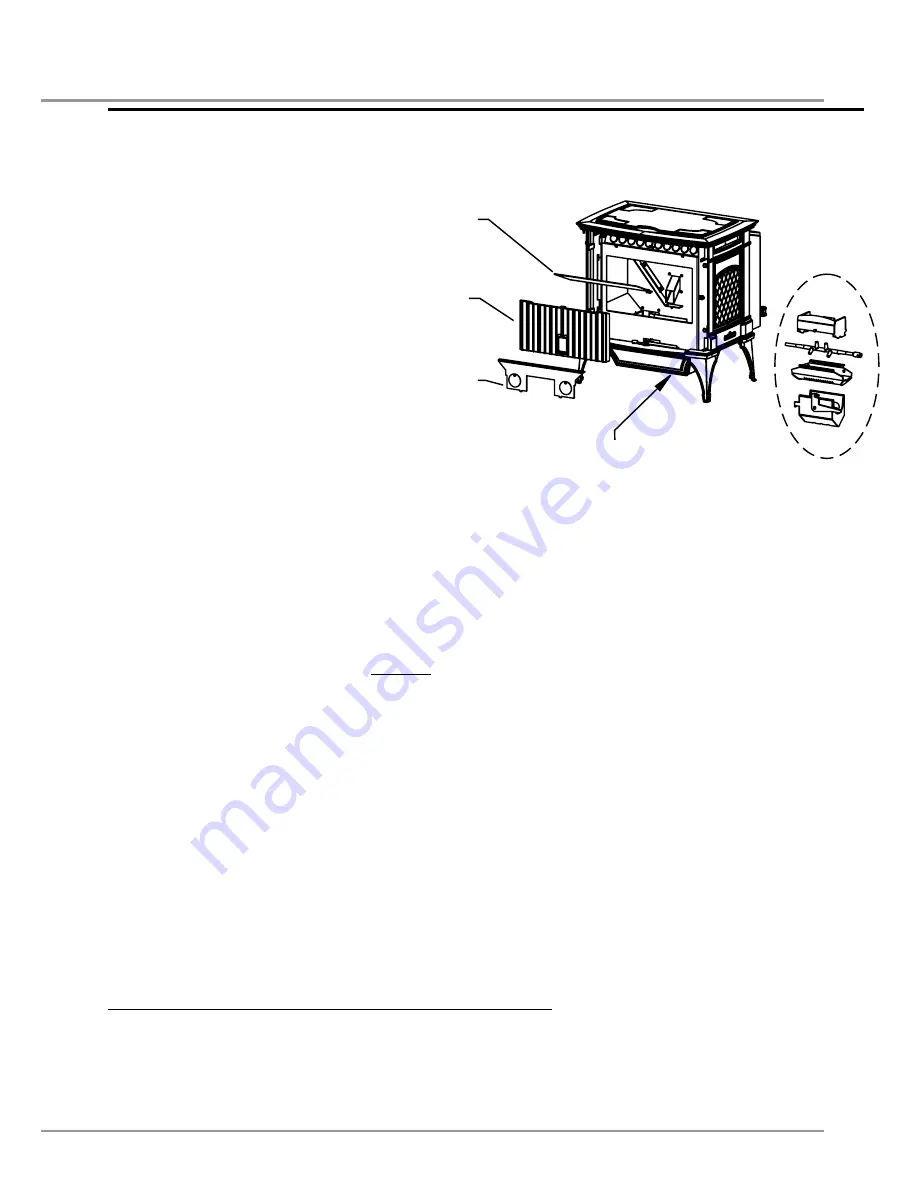
figure 10: Gc60 exhaust passages.

EXHAUST PASSAGES 

(Biannually)

1. Open  the  firebox  door  by  lifting 

the handle.

2. Remove  the  burn  pot  assembly 

and clean all the parts.

3. Lubricate 

all 

screws 

with 

penetrating oil.

4. Lift the baffle, remove the firebox 

liner,  and  lift  out  the  firebox 

lower.    Vacuum  the  firebox  and 

firebox liner thoroughly.

5. Open the ash box door; remove 

the  ash  box  and  cleanout  the 

cavity.

6. Re-install  the  ash  box,  firebox 

lower,  baffle,  firebox  liner,  burn 

pot, and burn pot liner

7.  Close  the  firebox  and  ash  pan 

doors and secure.

BLOWER MECHANISMS

 (Annually)

Unplug the stove then open the right and left side panels to access the two blowers. Remove the T-20 

torx Screws located on the top and bottom of the rear access panels.. Vacuum all dust from motors. The 

blower motors has sealed bearings, DO NOT lubricate this motor. Check gaskets and replace if needed.

poSt SeaSon cLean-up
Once you are finished using the pellet appliance for the season, unplug the stove for added electrical 

protection.  It is very important that the stove be cleaned and serviced as stated above. 

CLEANING PAINTED SURFACES

Please clean surfaces with a soft damp cloth.

CLEANING ENAMEL SURFACES

Enamel Finishes and painted surfaces can be wiped down with a soft damp cloth. Wd/40 oil can be 

used to clean enameled casting if necessary. 

FIREBOX LINER 

The paint on the Firebox Liner may peel. This is due to extreme conditions applied to the paint and is in 

no way covered by warranty.

DOOR GLASS REPLACEMENT

It is recommended that your dealer replace the glass if broken. The door glass is made of high temperature 

PYRO CERAMIC and must be purchased through your dealer. To replace the glass, unscrew and remove 

the six (6) retainer nuts using a 

5

/

16

” socket.   Remove the glass and any broken pieces. High temperature 

fiberglass tape should be used around the glass in the same location as the original fiberglass. Insert 

the glass into the retainer, screw the door to the retainer, and gently tighten nuts. Ensure that edge 

clearances are maintained. The use of substitute materials is prohibited: #50-2119.

Firebox Baffle

Firebox Liner

Firebox Lower

Ashpan

Burner System

Hampton GC60 Cast Pellet Stove Owner’s Manual

13

Summary of Contents for Greenfire GC60

Page 1: ...oline or other flammable vapoursandliquidsinthevicinityofthisoranyother appliance Installation and service must be performed by an authorized installer or service agency Tested by IMPORTANT SAVE THESE...

Page 2: ...e any questions about your product that are not covered in this manual please contact the HAMPTON DEALER in your area Safety Note If this stove is not properly installed a house fire may result For yo...

Page 3: ...uctions 6 Dimensions Specifications 6 Control Board Functions 7 Automatic Safety Features of Your Pellet Stove 7 Operating Your Pellet Stove 7 Turning Your Pellet Stove Off 9 Slider Damper Set Up 9 Ro...

Page 4: ...l may allow longer intervals between cleaning CLINKERING clinkers are silica sand or other impurities in the fuel that will form a hard mass during the burning process This hard mass will block the ai...

Page 5: ...or and ash drawer must be kept closed when the unit is in operation to prevent fume spillage and for proper and safe operation of the pellet stove Also ensure all gaskets on the door are checked and r...

Page 6: ...ruction doesn t meet load capacity suitable measures e g load distributing plate must be taken to achieve it DO NOT INSTALL A FLUE DAMPER IN THE EXHAUST VENTING SYSTEM OF THIS UNIT DO NOT CONNECT THIS...

Page 7: ...ge Current Max Power 110 120 V 4 2 Amps 504 Watts Frequency Hopper Capacity Consumption on Low 60 Hz up to 60 lb 36 3 Kg 1 5 lb hr 0 68 Kg hr Testing Standard Weight with full hopper Consumption on Hi...

Page 8: ...DOWN Heat Level Arrow to adjust setting 3 Light is the default setting Depending on Fuel quality Ignition problems may occur at higher altitudes this can be resolved by trimming the Combustion Fan to...

Page 9: ...he ON button has been pressed After the ten 10 minutes it will pulse at the same interval as the feed auger When the start up sequence is complete the unit will ramp up in two 2 minute intervals until...

Page 10: ...Plate in Unit This unit is designed to operate within a negative pressure range of 0 15 0 17 inches of water column 37 42 Pa This can be measured using a Magnahelic pressure gauge once the unit has be...

Page 11: ...The agitator locks at the right rotate the top of the agitator towards the back of the firebox to unlock it slide it to the left and lift it out of the burn pot liner 4 Lift the burn pot liner out of...

Page 12: ...tended use the gasketing may come loose To repair this glue the gasketing on using high temperature fiberglass gasket glue available from your local dealer This is important to maintain an airtight as...

Page 13: ...electrical protection It is very important that the stove be cleaned and serviced as stated above CLEANING PAINTED SURFACES Please clean surfaces with a soft damp cloth CLEANING ENAMEL SURFACES Ename...

Page 14: ...fects in materials and workmanship for part repair or replacement for the first three 3 years and limited labour for the first two 2 years to the original purchaser Please see the exclusions and limit...

Page 15: ...y the Limited Warranty on this stove If unsure as to the extent of this Limited Warranty contact your authorized Hampton dealer before installation 10 FPI will not be responsible for inadequate perfor...

Page 16: ...stallation of the stove hearth facing mantels venting or other components 26 Labour to replace or repair items under this Limited Warranty will be covered per our warranty service fee reimbursement sc...

Page 17: ..._________________ ___________________________________________________ ___________________________________________________ ___________________________________________________ __________________________...

Page 18: ...______ Installer ____________________________________________________________ Phone ____________________________________________________________ Date Installed ________________________________________...

Reviews: