background image


5 HAMPTONBAY.com


 Please contact 1-855-HD-HAMPTON for further assistance.

Pre-Installation (continued)

MOUNTING LOCATIONS


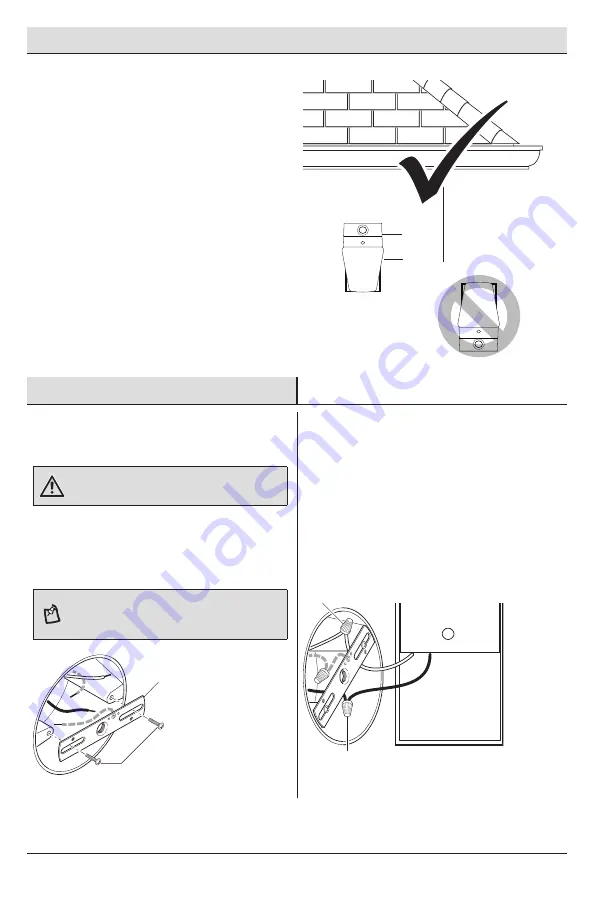
Determine the wall mounting location.


The light fixture should be mounted 
approximately 7 ft. (2.1 m) above the ground. 
If the light fixture is mounted higher than 
recommended, the coverage area will be 
reduced.

Wall Mount 

Only

Installation

Installing the Mounting 

Bracket

WARNING:

 Turn the power off at the circuit breaker or 

fuse. Place tape over the circuit breaker switch and verify 
power is off at the light fixture.


Remove the existing light fixture.


Install the mounting bracket (EE) to the 
junction box using the mounting bracket 
screws (DD).

NOTE:

 Firmly pull on the mounting bracket (EE) to verify 

it is securely mounted to the junction box. If necessary, 
use the screws that were removed from the existing light 
fixture.

Wiring the Light Fixture


Connect the light fixture wires to the junction 
box wires with wire connectors (AA):


White to white


Black to black


Green ground mounting bracket wire to 
the house ground wire or grounded metal 
junction box.

A

B

DD

EE

AA

AA

Summary of Contents for HB-5610-WH

Page 1: ...ance your home Visit us online to see our full line of products available for your home improvement needs Thank you for choosing Hampton Bay USE AND CARE GUIDE MOTION SECURITY LIGHT Questions problems...

Page 2: ...low the light fixture and the bulb to cool before touching NOTICE When using a CFL bulb it is recommended to use the maximum ON TIME setting Frequent ON OFF cycling of the bulb will reduce its life NO...

Page 3: ...20 VAC 60 Hz Operating modes Test Auto Manual Time delay 1 5 10 minutes Pre Installation PLANNING INSTALLATION Before installing the light fixture ensure that all parts are present see Hardware Includ...

Page 4: ...hown to actual size AA BB CC DD EE Part Description Quantity AA Wire connector 3 BB Mounting nut 1 CC Threaded stem 1 DD Mounting bracket screw 2 EE Mounting bracket not to scale 1 PACKAGE CONTENTS Pa...

Page 5: ...fuse Place tape over the circuit breaker switch and verify power is off at the light fixture Remove the existing light fixture Install the mounting bracket EE to the junction box using the mounting b...

Page 6: ...ke sure all the wires are inside the junction box before attaching the light fixture A to the junction box 4 Caulking Around the Light Fixture Caulk around the light fixture A and mounting surface wit...

Page 7: ...Watch the light The light will come on when motion has been detected Stop wait for the light to turn off and then begin walking again Continue this process until the detection zone has been establish...

Page 8: ...t night and only for one night at a time The motion sensor will reset to motion sensing mode after 6 hours or sunrise whichever comes first Manual mode can be toggled on and off using a wall switch To...

Page 9: ...ct if this is a new installation Verify the wiring is correct The motion sensor is aimed in the wrong direction Re aim the motion sensor to cover the desired area The outside air temperature is close...

Page 10: ...mer to control the light fixture Replace the dimmer or timer with a standard on off wall switch The light fixture is on the same circuit as a motor transformer or fluorescent bulb Install the light fi...

Page 11: ...11 HAMPTONBAY com Please contact 1 855 HD HAMPTON for further assistance...

Page 12: ...lems missing parts Before returning to the store call Hampton Bay Customer Service 8 a m 7 p m EST Monday Friday 9 a m 6 p m EST Saturday 1 855 HD HAMPTON HAMPTONBAY COM Retain this manual for future...

Page 13: ...ra ver nuestra l nea completa de productos disponibles que necesita para el mejoramiento de su hogar Gracias por escoger Hampton Bay GU A PARA EL USO Y CUIDADO LUZ DE SEGURIDAD POR MOVIMIENTO Tiene pr...

Page 14: ...RECAUCI N Peligro de quemaduras Deje que el aparato de luz y la bombilla se enfr en antes de tocarlos AVISO Cuando est usando un foco CFL se recomienda configurar al m ximo el interruptor de ON TIME D...

Page 15: ...es de operaci n Prueba autom tica manual Retardo de tiempo 1 5 10 minutos Antes de la instalaci n PLANIFICACI N DE LA INSTALACI N Antes de instalar el aparato de luz est seguro que est n todas las pie...

Page 16: ...en su tama o real AA BB CC DD EE Pieza Descripci n Cantidad AA Capuch n para cable 3 BB Tuerca de montaje 1 CC Espiga roscada 1 DD Tornillo del soporte de montaje 2 EE Soporte de montaje no est a esca...

Page 17: ...interruptor disyuntor y compruebe que no haya energ a el ctrica en el aparato de luz Retire el aparato de luz existente Instale el soporte de montaje EE a la caja de conexiones con los tornillos del s...

Page 18: ...bres est n dentro de la caja de conexiones antes de conectar la l mpara A a la caja de conexiones 4 Calafatee alrededor del aparato de luz Calafatee alrededor de la l mpara A y de la superficie de mon...

Page 19: ...ndo la trayectoria de un arco Observe la luz La luz se encender cuando el movimiento es detectado Det ngase espere que la luz se apague y luego empiece a caminar de nuevo Contin e este proceso hasta q...

Page 20: ...oche a la vez El detector de movimiento C se reiniciar en la modalidad de detecci n de movimiento despu s de 6 horas o cuando salga el sol lo que ocurra primero La fase manual puede tambi n alternar e...

Page 21: ...do a la direcci n incorrecta Vuelva a enfocar el detector de movimiento para que cubra el rea deseada La temperatura del aire exterior est cercana al calor corporal de una persona Aumente la calibraci...

Page 22: ...temporizador para controlar el aparato de luz Cambie el reductor de luz o el temporizador por un in terruptor de pared est ndar de encendido apagado El aparato de luz est en el mismo circuito que un...

Page 23: ...23 HAMPTONBAY com Por favor p ngase en contacto al 1 855 HD HAMPTON para obtener m s ayuda...

Page 24: ...piezas faltantes Antes de devolverlo a la tienda llame a Servicio al Cliente de Hampton Bay de 08 a m 7 p m EST Lunes Viernes 09 a m 6 p m EST s bado 1 855 HD HAMPTON HAMPTONBAY COM Guarde este manua...

Reviews: