HAMPTONBAY.COM
Please contact 1-855-HD-HAMPTON for further assistance.
11
Assembly — Hanging the Fan (continued)
7
Making the electrical connections
WARNING:
Check to see that all connections are tight,
including ground, and that no bare wire is visible at the wire
nuts (except for the ground wire).
WARNING:
To reduce the risk of electric shock, this fan must
be installed with an isolating wall control/switch.
If you feel you do not have enough electrical wiring knowledge
or experience, have your fan installed by a licensed electrician.
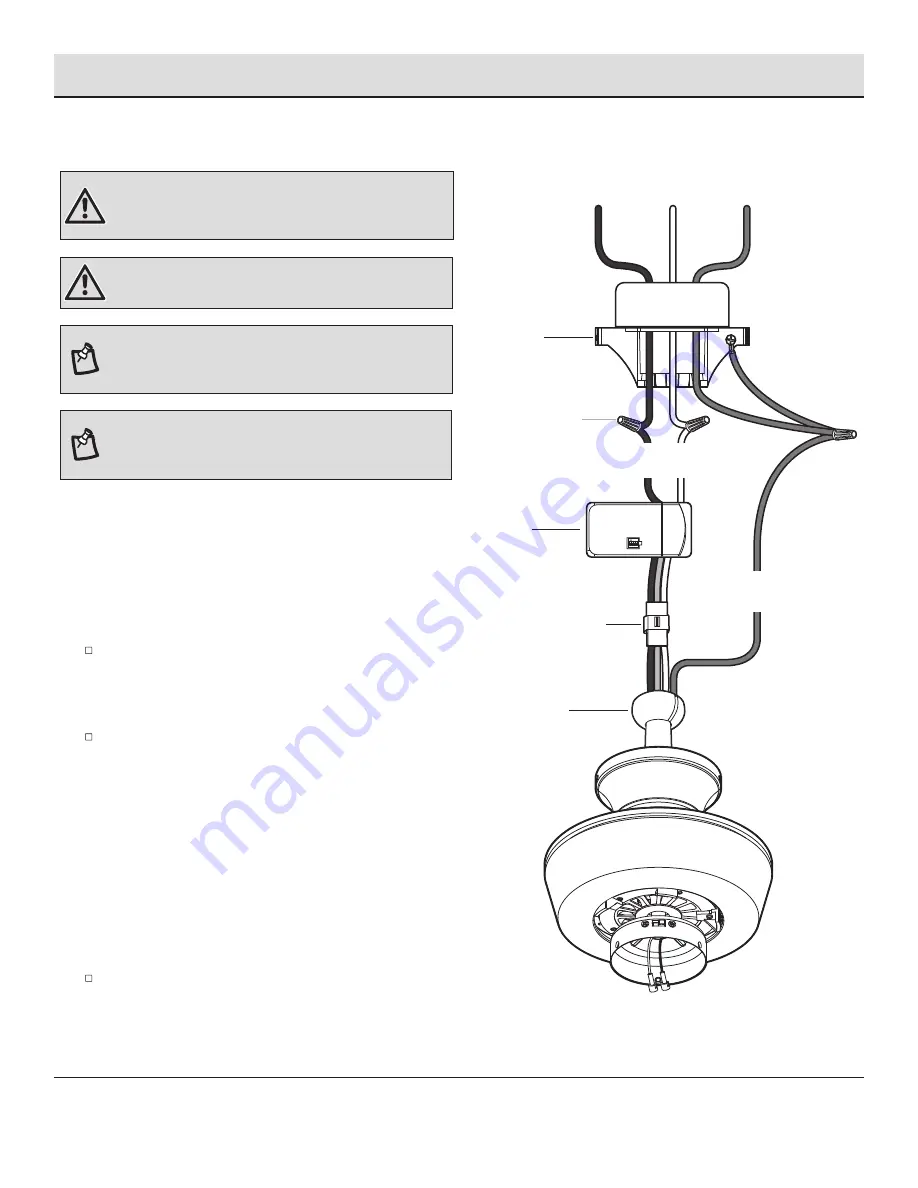
Follow the steps below to connect the fan to your household
wiring. Use the plastic wire nuts (AA) with your fan. Secure the
plastic wire nuts (AA) with electrical tape. Make sure there are
no loose strands or connections.
Make wire connections from the fan to the receiver (I).
From Fan
To Receiver
3-Pin Connector ------------- 3-Pin Connector
Make wire connections from the receiver (I) and fan to the
outlet box as follows, using the wire nuts (AA).
From Receiver
To Outlet Box
Black wire "AC in L" -------- Black wire (Hot)
White wire "AC in N" -------- White wire (Neutral)
From Fan
To Outlet Box
Green wires* ---------------- Green or bare wire (Ground)
* There are two green grounding leads: one from the mounting
bracket (A) and one from the hanger ball/downrod assembly (D) if
installed.
Turn the wire nut connections upward, spreading them
apart so the green (ground) and white wires will be on one
side of the outlet box and the black and blue wires will be
on the other side. Carefully tuck the connections up into the
outlet box.
NOTE:
The fan must be installed at a maximum distance of
20 ft. from the remote control for proper signal transmission
between the remote control and the fan's receiving unit.
NOTE:
If a longer downrod (not included) is needed, use the
extension cord (EE) to connect with the motor wires and
receiver.
3-Pin connectors
AA
Black
Ground
conductor
White
A
D
I
White
Black
Green
Outlet Box
3 4
1 2
DIP


