background image

Artículo núm. 1002 555 064

Modelo Núm. 91153

Modelo Núm. EF200-36

GUÍA DE USO Y MANTENIMIENTO

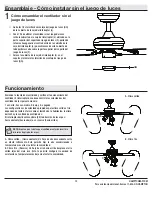
VENTILADOR DE TECHO SAN MARINO, DE 91.4 cm

GRACIAS POR TU COMPRA

Apreciamos la confianza que has depositado en Hampton Bay al comprar este ventilador de techo. Nos esforzamos en crear continuamente 

productos de calidad diseñados para mejorar tu hogar. Visítanos por Internet para ver nuestra línea completa de productos disponibles 

a fin de satisfacer tus necesidades de mejoras del hogar. 

¡Gracias por elegir Hampton Bay!

¿Preguntas, problemas o piezas faltantes? Antes de regresar a la tienda, 

llama al servicio al cliente de Hampton Bay,

de lunes a viernes, entre 8:00 a.m. y 6:00 p.m. (hora del Este).

1-855-HD-HAMPTON

HAMPTONBAY.COM

Summary of Contents for SAN MARINO 91153

Page 1: ...purchase of this ceiling fan We strive to continually create quality products designed to enhance your home Visit us online to see our full line of products available for your home improvement needs Thank you for choosing Hampton Bay Questions problems missing parts Before returning to the store call Hampton Bay Customer Service 8 a m 6 p m EST Monday Friday 1 855 HD HAMPTON HAMPTONBAY COM ...

Page 2: ...y up into the outlet box The wires should be spread apart with the grounded conductor and the equipment grounding conductor on one side of the outlet box 8 All setscrews must be checked and retightened where necessary before installation WARNING To reduce the risk of personal injury do not bend the blade brackets also referred to as flanges during assembly or after installation Do not insert objec...

Page 3: ...s shall render the warranty invalid There is no other express warranty Hampton Bay hereby disclaims any and all warranties including but not limited to those of merchantability and fitness for a particular purpose to the extent permitted by law The duration of any implied warranty which cannot be disclaimed is limited to the time period as specified in the express warranty Some states do not allow...

Page 4: ...er Gasket 1 BB Pull Chain 2 CC Plastic Wire Connector 3 Part Description Quantity DD Hanging Pin 1 EE Locking Pin 1 FF Blade Screws 15 Pre Installation continued HARDWARE INCLUDED NOTE Hardware not shown to actual size AA CC DD BB EE FF ...

Page 5: ...6 416 6 210 117 and other patents pending Pre Installation continued PACKAGE CONTENTS Part Description Quantity A Slide on mounting bracket inside canopy 1 B Ball downrod assembly 1 C Canopy 1 D Coupling cover 1 E Fan motor assembly 1 F Light kit fitter assembly 1 Part Description Quantity G Lamp shade 3 H Blade 5 I Blade bracket 5 J Switch cup cover 1 K LED light bulb 9 Watt max 3 A B C D E F H G...

Page 6: ...tructure Use the appropriate fasteners and materials The outlet box and its bracing must be able to fully support the weight of the moving fan at least 35 lbs Do not use a plastic outlet box The illustrations below show three different ways to mount the outlet box If the canopy touches the downrod then remove the canopy bottom cover and turn the canopy 180 before attaching the canopy to the mounti...

Page 7: ...ole near the end of the hanger pin DD until it snaps into its locked position Re tighten the two setscrews RR on the collar TT on top of the motor housing Remove the mounting bracket A from the canopy C by loosening the two canopy screws HH located in the L shaped slots Remove and save the two canopy screws HH and lockwashers GG in the round holes This will enable you to remove the mounting bracke...

Page 8: ...port of 35 lbs 15 9 Kg or less and use screws provided with the outlet box LL LL A Close to Ceiling Mounting Routing the wires 1 2 Remove the mounting bracket A from the canopy C by loosening the two canopy screws HH located in the L shaped slots Remove and save the two canopy screws HH in the round holes This will enable you to remove the mounting bracket A Remove the canopy bottom cover M from t...

Page 9: ... shown may result in the hook OO breaking causing the fan to fall The hook must pass from the inside to the outside of the canopy WARNING When hanging the fan on the hook OO it is critical that you use one of the non slotted round holes in the canopy C The fan comes with 30 in lead wires for use with an extended ball downrod assembly If using the 4 5 in ball downrod assembly B provided you can cut...

Page 10: ...mounting the tab in the ring at the bottom of the mounting bracket must rest in the groove of the hanger ball Failure to properly seat the tab in the groove could cause damage to the wiring Assembly Hanging the Fan continued Wrapping the extra wire Gently wrap the excess wire around the mounting bracket Secure with electrical tape 4 NOTE Follow this step ONLY if you did not cut the extra length of...

Page 11: ...opy are provided only as an aid to mounting Do not leave the fan assembly unattended until all four canopy screws are engaged and firmly tightened 6 A C E GG HH Assembly Attaching the Fan Blades Attaching the fan blades 1 Mount the fan blades H to the blade bracket I by aligning the three key slot holes in the blade H Insert and tighten the three blade screws FF in the blade bracket holes Repeat f...

Page 12: ...s and attaching the lamp shade 2 Gently slide the lamp shade G over the lamp holder Make sure the lamp shade G is fully inserted into the socket for a secure fit Repeat for the remaining lamp shades G With the power off insert and tighten the light bulbs K included into light kit sockets Use 9W LED bulbs Attach the pull chain extensions BB CAUTION Over lamping the fan will result in the fan lights...

Page 13: ...setting without affecting your comfort B Cool weather Reverse An upward airflow moves warm air off of the ceiling This allows you to set your heating unit on a cooler setting without affecting your comfort NOTE Wait for the fan to stop before reversing the direction of blade rotation XX A Warm weather B Cool weather Assembling the fan without light kit 1 Remove the three light kit mounting screws ...

Page 14: ...bove the tip of one of the blades Measure from a point on the center of each blade to the point on the ceiling Measure this distance Rotate the fan until the next blade is positioned for measurement Repeat for each blade Any measurement deviation should be within 1 8 in Run the fan for ten minutes Use the enclosed blade balancing kit if the blade wobble is still noticeable Because of the fan s nat...

Page 15: ...PTON HAMPTONBAY COM Retain this manual for future use The appliance is not to be used by persons including children with reduced physical sensory or mental capabilities or lack of experience and knowledge unless they have been given supervision or instruction Children should be supervised to ensure that they do not play with the appliance ...

Page 16: ...forzamos en crear continuamente productos de calidad diseñados para mejorar tu hogar Visítanos por Internet para ver nuestra línea completa de productos disponibles a fin de satisfacer tus necesidades de mejoras del hogar Gracias por elegir Hampton Bay Preguntas problemas o piezas faltantes Antes de regresar a la tienda llama al servicio al cliente de Hampton Bay de lunes a viernes entre 8 00 a m ...

Page 17: ...samente hacia adentro de la caja eléctrica Los cables deben separarse con el conductor a tierra y el conductor a tierra del equipo a un lado de la caja eléctrica 8 Todos los tornillos de fijación tienen que ser verificados y reajustados donde sea necesario antes de la instalación Información de seguridad Tabla de contenido PRECAUCIÓN Para reducir el riesgo de lesiones personales usa sólo los torni...

Page 18: ...izado invalidará la garantía No hay ninguna otra garantía expresa Por este medio Hampton Bay queda exonerado de todas y cada una de las garantías incluyendo pero sin limitarse a aquellas de comercialización e idoneidad para un fin particular en el alcance establecido por la ley La duración de cualquier garantía implícita que no se pueda eximir está limitada al plazo especificado en la garantía exp...

Page 19: ...interruptor 2 CC Conector plástico de cables 3 Pieza Descripción Cantidad DD Pasador de soporte 1 EE Pasador de cierre 1 FF Tornillos de aspa 15 Preinstalación continuación SE INCLUYEN LOS HERRAJES NOTA Los herrajes no se muestran en tamaño real AA CC DD BB EE FF ...

Page 20: ...entes Preinstalación continuación CONTENIDO DEL PAQUETE Pieza Descripción Cantidad A Soporte de montaje deslizante dentro de la cubierta 1 B Conjunto de tubo bajante bola 1 C Cubierta 1 D Cubierta del acoplamiento 1 E Conjunto del motor del ventilador 1 F Conjunto de instalación del kit de luces 1 Pieza Descripción Cantidad G Pantalla de la lámpara 3 H Aspa 5 I Soporte de aspa 5 J Cubierta de la c...

Page 21: ...os sujetadores y materiales apropiados La caja eléctrica y su soporte tienen que sostener el peso completo del ventilador en movimiento al menos 15 9 kg No uses una caja eléctrica de plástico Las ilustraciones más abajo muestran tres formas distintas de montar la caja eléctrica Si la cubierta toca el tubo bajante retira la tapa inferior de aquella y gira la cubierta 180º antes de fijarla a la plac...

Page 22: ... cercano al extremo del pasador de soporte DD hasta que quede encajado en su posición Vuelve a ajustar los dos tornillos de fijación RR del collarín TT ubicados en la parte superior de la carcasa del motor Retira el soporte de montaje A de la cubierta C aflojando los dos tornillos de esta HH ubicados en las ranuras en forma de L Quita y guarda los dos tornillos de la cubierta HH y las arandelas de...

Page 23: ...de ventilador de 35 lb 15 9kg o menos y usa los tornillos que vienen con ella LL LL A Montaje cerca del techo Disposición de los cables 1 2 Retira el soporte de montaje A de la cubierta C aflojando los dos tornillos de esta HH ubicados en las ranuras en forma de L Quita y guarda los dos tornillos de la cubierta HH en los orificios redondos Esto permitirá retirar el soporte de montaje A Retira la t...

Page 24: ...de romperse y provocar que el ventilador caiga El gancho tiene que pasar de dentro hacia fuera de la cubierta ADVERTENCIA Al colgar el ventilador en el gancho OO es decisivo que uses uno de los orificios sin ranura redondos de la cubierta C NOTA El ventilador viene con cables terminales de 76 2 cm para usar con conjunto extendido de tubo bajante bola Si usas el conjunto extendido tubo bajante bola...

Page 25: ... del conjunto tubo bajante bola la pestaña en el aro de la parte inferior del soporte de montaje tiene que encajar en la ranura de la bola de soporte Si la pestaña no se asienta correctamente en la ranura se puede dañar el cableado Ensamblaje Cómo colgar el ventilador continuación Cómo enrollar el cable sobrante Con cuidado enrolla el exceso de cable alrededor del soporte de montaje Asegura con ci...

Page 26: ...da para el montaje No dejes de vigilar el ensamblaje del ventilador hasta que los cuatro tornillos de la cubierta estén fijos y firmemente ajustados 6 A C E GG HH Ensamblaje Cómo fijar las aspas del ventilador Cómo fijar las aspas del ventilador 1 Monta las aspas del ventilador H al soporte correspondiente I alineando los tres orificios tipo ojo de cerradura en cada aspa H Inserta y aprieta los tr...

Page 27: ... la pantalla de la lámpara G sobre el soporte de esta Asegúrate de que la pantalla de la lámpara G esté totalmente insertada en el portafoco para un ajuste seguro Repite para las restantes pantallas de lámpara G Con la electricidad desconectada inserta y ajusta los focos incluidos en los portafocos del juego de luces Usa focos LED de 9 W Instala las extensiones de cadena del interruptor BB PRECAUC...

Page 28: ...ectar tu comodidad B Clima frío Reversa Un flujo de aire hacia arriba desplaza el aire cálido lejos del cielo raso Esto te permite configurar la unidad de calefacción a temperatura más baja sin afectar tu comodidad NOTA Espera a que se detenga el ventilador antes de invertir la dirección de giro de las aspas XX A Clima cálido B Clima frío Cómo ensamblar el ventilador sin el juego de luces 1 Quita ...

Page 29: ... al mismo nivel Verifica este nivel seleccionando un punto en el techo sobre la punta de una de las aspas Mide desde un punto en el centro de cada aspa al otro en el cielo raso Mide esta distancia Para medir gira el ventilador hasta que la siguiente aspa quede bien colocada Repite para cada aspa Las desviaciones de la medición no deben pasar de 0 3 cm Deja que el ventilador funcione durante diez m...

Page 30: ... HAMPTON HAMPTONBAY COM Conserva este manual para uso futuro Este electrodoméstico no está diseñado para uso por niños o personas con capacidades físicas sensoriales o mentales limitadas ni por personas sin conocimientos o experiencia a menos que hayan recibido instrucción o estén bajo supervisión Los niños deben estar bajo supervisión para garantizar que no jueguen con el equipo ...

Reviews: