background image


HAMWORTHY HEATING LTD 


41 

PUREWELL


Vari

Heat c


500001169/T 


11.0 REPLACEMENT OF FAILED COMPONENTS


There are a number of components listed below which can be replaced simply and quickly by following the 
given procedure.  In each case carry out the appropriate part of the commissioning procedure & check the 
operation of each component replaced.  See 

Section


7.3:Commissioning and Testing  

 
NOTE: Isolate electrical supply to the boiler and turn off the gas supply after removing controls cover 
and before commencing any servicing or component exchange procedure. 
 
11.1 Igniter and Flame Probe Assembly 
 
Both Igniter and flame probe are secured in the same manner.

 Reference to Figure 11.1 shows position of 

igniter assembly.  To remove assembly disconnect the plug/socket on the supply lead and remove the screw 
securing the igniter to the burner front panel. Figure 11.1 shows diagram of igniter assembly and relevant 
components. Generally remove any loose sooty deposits and clean as required. Before renewing the Hot Surface 
Igniter ensure the protective sleeve is removed from the new Igniter 

(care is required as the Igniter element is 

Fragile)

. Ensure positions of components are as recommended in Figure 11.1. 

 
11.2 Safety Temperature Limiter (Limit Stat)  
 

With the boiler front cover removed, the Limit Stat is situated on the rear of the control panel fascia bracket to the 
left hand side of the main PCB. Remove the 'push on' spade connections from the temperature limiter body noting 
position of coloured cables.  Remove plastic cover (if fitted) and unscrew holding nut to detach temperature limiter 
from housing.  Gently feed the capillary back through the controls bulkhead.  Re-set temperature limiter to 95°C.  
Check the operation of the device by carefully applying a heat source to the bulb. Re-assemble temperature 
limiter into controls housing ensuring correct cable notation.  Refer to  Figure 9.0. 
 

11.3 Main Gas Valve.  
 
NOTE!

 Hamworthy Heating strongly recommend that a new gas valve assembly is fitted to ensure safe, 

reliable operation of the boiler. 

The gas valve is supplied as a factory set component & must not be tampered 

with. 


1) 

Disconnect the gas valve electrical plug.  

Remove the four socket head screws securing the gas valve inlet flange. Take the weight of the gas valve and 
remove the four socket head screws securing the gas valve to the airbox lid (PV70c/90c/110c), welded bracket 
with pipe (PV140c/PV180c) . Withdraw the gas valve. 

2) 

Always fit new ‘O’ rings to both inlet and outlet when replacing the gas valve. 

Always test for gas soundness after replacement parts have been fitted. 
Refer to 

Section 7.1,

 if necessary for valve integrity check procedure. 

3)

  Re-light the boiler using instructions on the inside of the door.  Check for correct operation. If necessary, refer 

to 

Section 7.4 Commissioning the Boiler

, for correct procedures. 


11.4 Combustion Fan 

 
NOTE! To remove the fan, it is necessary to remove the gas valve &  airbox  (PV70c/90c/110c), or remove the 
metal bracket fixing the venturi to the fan (PV140/PV180c). 


Replacement on Models PV70c/PV95c/PV110c 

1) 

Disconnect the gas valve plug assembly from the gas valve. Disconnect the gas valve inlet flange from the gas 

valve. Disconnect the 3 & 5 way electrical plugs from the fan body. 

2) 

Disconnect the fan/gas valve assembly from the burner body by removing the 4 M8 nuts securing the transition 

duct to the burner. 

3) 

Remove the screws securing the airbox lid to the airbox and carefully store the lid & gas valve assembly. 

4) Note correct orientation of the venturi with baffle 

& remove the screws of the venturi. Remove the 

screws securing the airbox to the fan. Carefully store all of the air inlet box components. 

5) 

Remove the screws securing the fan outlet to the burner transition duct. Beware there is a non return valve 

fitted between these components. 

6) 

Re-assemble in reverse order using new gaskets where appropriate. After assembly and prior to re-fitting the 

assembly to the burner, check for correct and free operation of the non return valve in the burner transition duct. 
 
Replacement on Models PV140c - PV180c  
1) 

Repeat Steps 1 & 2 above.  

2) 

Unscrew the metal bracket from the gas valve & fan. See Figure 11.4. 

Summary of Contents for Purewell VariHeat 70c

Page 1: ...ic Ignition for Heating and Domestic Hot Water Installations Installation Commissioning and Servicing Instructions MODELS 70c 95c 110c 140c 180c NATURAL GAS I2H IMPORTANT NOTE THESE INSTRUCTIONS MUST BE READ AND UNDERSTOOD BEFORE INSTALLING COMMISSIONING OPERATING OR SERVICING EQUIPMENT ...

Page 2: ......

Page 3: ...S 2ND FAMILY I2H PLEASE ENSURE RELEVANT INFORMATION REQUIRED WITHIN DOCUMENT IS FOUND BEFORE FIRING BOILER COUNTRY OF DESTINATION UNITED KINGDOM REPUBLIC OF IRELAND THIS BOILER COMPLIES WITH ALL RELEVANT EUROPEAN DIRECTIVES PRODUCT IDENTIFICATION No 86CN70 PUBLICATION NO 500001169 ISSUE T MARCH 2015 Purewell VariHeat c Boilers Cast Iron Pre mix Condensing Modular Boilers with Automatic Ignition fo...

Page 4: ...SSIONING 13 6 1 Gas Supply 6 2 Ventilation 6 3 Pipework Valves and Pump 6 4 Flue 6 5 Electrical 7 0 CHECKS PRIOR TO LIGHTING 14 7 1 Boiler Gas System Leak Check 7 2 Checks Prior to Lighting the Boiler 7 3 Initial Lighting 7 4 Combustion Checks 7 5 User Instructions 7 7 Burner Resistance Check 8 0 BOILER CONTROLS 21 8 1 Controls Overview 8 2 Controls Operation 8 3 Functions 8 4 LMU Fault Log 9 0 FA...

Page 5: ...of Sample Point Plug 18 Figure 7 4 2 Combustion Analyser Probe setting 18 Figure 7 4 5 Burner Pressure Test Point 19 Figure 7 4 3 Fan Assembly PV70 95 110c High fire Low Fire Adjustment 20 Figure 7 4 4 Fan Assembly PV140 180c High Fire Low Fire Adjustment 20 Figure 8 1 General Overview Of Boiler Fascia Panel 21 Figure 8 1 2 General Overview Of Boiler Controls 22 Figure 8 2 System Configuration Of ...

Page 6: ...Figure C1 Flue Data 50 Figure C1 1 Flue Resistance 52 Figure C1 2 Open Flue Natural Draught B23 Flue System 52 Figure D1 Mechanical Ventilation Flow Rates 53 Figure E1 Water Data 54 Figure E1 1 Cold Feed and Vent Pipe Sizes 54 Figure E1 2 Typical Piping Layouts 55 Figure E1 3 1 Schematic for Single Boiler System 57 Figure E1 3 2 Schematic for Single Boiler Primary Circuit System 57 Figure E1 3 3 S...

Page 7: ... should a high or low pressure fault occur The pressurisation unit must also incorporate a low level water switch which protects the water pumps and will directly or indirectly shut down the boiler plant should a low water condition occur Consideration should also be given to the maximum working pressure of the boiler as per Appendix E Consult Hamworthy Heating Technical Department for help or ass...

Page 8: ...ler is designed to pass through a standard doorway where access is restricted Figure 2 1 Boiler Delivery NOTE The boiler is supplied with cardboard corner protection and shrink wrapped for protection during handling However when manoeuvring the boiler care must be taken to avoid damage to the casing The boiler must be kept upright during handling Care must be exercised to avoid toppling the boiler...

Page 9: ...er sales service team Please provide details of your order such as order number and contract number as well as a detailed description of the missing item Reverse Return Header Sets Where reverse return header sets are used these are packaged separately from the boilers Ancillary items such as isolation valves and flexible boiler connectors are packaged in a cardboard box on the same pallet The who...

Page 10: ...allowance for sufficient access at front sides and rear of boiler for flue and pipework connections Ensure a minimum height of 150mm above the boiler for removal of the covers Do not run cabling through the top or display covers See Figure 3 1 below 3 2 The Hamworthy Heating Ltd water manifold kit is designed to provide a compact solution for connecting the boilers to the gas supply and flow and r...

Page 11: ... installation Safety Valve As each kit is provided with a 3 port isolating valve for use on the flow pipe individual safety valves are not required on each module and a common valve can be fitted in the combined flow pipe However each boiler has a Rp1 connection plugged in the rear of the boiler heat exchanger assembly for use on applications where module isolating valves are not of the 3 port typ...

Page 12: ...on of boilers manifold kits pipework pumps controls flues ventilation access and servicing and other items of plant 4 2 Gas Supply Gas supply pipes must be in accordance with BS 6891 or IGE UP 2 Gas supply connection to the boiler must not be smaller than the connection on the boiler R1 Gas installation must be soundness tested to BS 6891 or IGE UP 1 IGE UP 1A Gas installation must be purged to BS...

Page 13: ...must be designed to limit the max suction cold to 30Pa negative measured at the connection to the boiler If the suction is greater than 30Pa refer to HHL Technical This condition must then be checked hot and with all boilers firing the max pressure at the connection to the boiler should be 100Pa positive In the event that the flue system when hot does generate a suction the max suction is 100Pa An...

Page 14: ...HAMWORTHY HEATING LTD 8 PUREWELL VariHeat c 500001169 T Figure 4 3 Flue Connection Point Flue Connection as delivered Flue Connection fitted Flue fixing bracket Flue Pipe Elbow ...

Page 15: ...he system pipework is flushed twice before water treatment In hard water areas 180mg CaCO3 litre precautions such as water treatment are strongly recommended to prevent the build up of sludge and scale and also to control the system water pH to between 7 0 8 0 Leaks in the system pipe work should be fixed to prevent dilution of water treatment Maximum working water pressure is 6 bar For minimum wa...

Page 16: ...nd not copper Hamworthy recommend 32mm dia Plastic waste pipe Condense may be discharged to a standard drain subject to National or Local regulations Boiler Condensate Connection 32mm o d Figure 4 5 1 Boiler Condensate Pipework Connection Location of condense pipework should prevent freezing within tundishes traps and pipework Do not allow blockage or damage to the condensate trap The connection t...

Page 17: ...isolation Electrical isolators must have contact separation of minimum 3mm in all poles Electrical isolators must be installed in readily accessible locations Electrical supplies to boiler modules should only serve the boiler Where volt free contacts are used these too must be individually isolatable Time clock control should be via the boiler modules Remote On Off circuit 30V DC Any circuit conne...

Page 18: ...t Remote On Off 0 10v Analogue Control Signal Input External sensors Cascade Management of Multiple Boiler Installations with Merley sequence controller 5 0 BOILER ASSEMBLY General Boilers are despatched to site as fully assembled units The flue pipe chimney condensate drain connection and pipework manifold set where applicable are the only items that will need assembling on site During assembly i...

Page 19: ...Hamworthy Heating recommendations Circulating system is full of water vented and pressurised appropriately Circulation pump is fitted working and interlocked where required Pipework connections to boiler are fitted correctly All necessary isolation valves are open Safety valve is correctly sized and located Condense connections on boiler and flue are connected and piped to drain Heat load is avail...

Page 20: ...f the electrical power and gas to the appliance 2 By unscrewing screw at Position X of Figure 7 1 1 remove the red gas pressure switch L H S picture or loosen the test point valve plug R H S picture 3 Connect the manometer to gas valve test point 4 With A B closed open C and monitor manometer over a 2 minute period a rise indicates a leak on valve B 5 Reinstall red gas pressure switch or shut valv...

Page 21: ...screws visible on the outside of the moulding anti clockwise a 1 4 turn Then unscrew the screws securing the thermostat from its mounting plate found on the rear of the bridging piece of the metal control bracket The control thermostat is factory set to a flow temperature of 80 C and must be re set to suit the application Use button 4 on the fascia as detailed in section 8 1 1 Controls Operation 4...

Page 22: ...f the boiler At this point no gas is present in the boiler so no ignition occurs 8 On failure to sense presence of a flame the boiler will display a flashing Error code of 133 before making a second ignition attempt The boiler will then go to lockout The boiler will display the screen of Fig 7 3 3 9 Carefully reconnect the electrical plug to the gas valve and secure with the appropriate screw s 10...

Page 23: ...oth up down keys together for 5 seconds To bring you into the Extended Info Mode 7 3 3 3 Using up down arrow keys scroll through B C or D modes select Mode C 7 3 3 4 Using the keys scroll through the options presented select C1 to show the flame signal 7 3 3 5 The value of the flame signal visible is set to read dc μA 7 3 3 6 To return to the default fascia display press the Mode button again 7 3 ...

Page 24: ...n the required range the boiler is set and operating correctly 8 Remove the combustion analyser probe replace the sample point plug in the front of the base of the boiler 9 If the combustion is outside of the ranges defined below the factory sealed valves may be adjusted using the following procedure Flue Gas Sampling Point Figure 7 4 1 Removal of Sample Point Plug Figure 7 4 2 Combustion Analyser...

Page 25: ...ombustion readings are outside target range use Torx Bit to make adjustments To increase the CO2 level turn the adjustment clock wise Figure 7 4 4 1 Adjusting gas valve offset Low Fire Target Nat Gas 8 5 0 25 CO2 If combustion readings are outside target range use Torx Bit to make adjustments To increase the CO2 level turn the adjustment clockwise Figure 7 4 4 1 Adjusting gas valve offset 95c 110c...

Page 26: ...er s In structions should then be handed over kept in a safe place for easy reference Figure 7 4 5 Burner pressure test point Burner pressure test point 7 7 Burner Resistance Check The burner pressure can be measured via a test point located on the gas inlet manifold as shown in figure 7 4 5 Typical burner pressures measured for a new clean burner are listed in the table below Model Typical Burner...

Page 27: ...re 7 4 3 Example Fan Assembly PV70c High Fire Gas Adjustment Factory Sealed Pressure Feed Back Tube Outlet Gas Pressure Test Point Low Fire Gas Adjustment Factory Sealed Pressure Switch Pressure Switch Low Fire Gas Adjustment Factory Sealed High Fire Gas Adjustment Factory Sealed Outlet Gas Pressure Test Point ...

Page 28: ...upplied by Hamworthy Heating Ltd to ensure safe and reliable opera tion The system provides as standard 2 volt free contacts for external fault indication Normal Run General Fault The Siemens LMU64 control system allows the connection of multiple boilers to a Merley cascade controller to enable control of up to 12 multiple boilers Note To ensure safe and reliable operation all wiring between senso...

Page 29: ... Overview of Controls 533901438 Clip in Module Vfc 0 10v 533901441 Igniter Transformer 532496004 Air Pressure Switch 533901179 Safety Temperature Limiter 533901437 Display Screen 533926116 IEC Mains Outlet Socket 530801029 Perspex Cover LMU64 Controller For Part No s See Page 44 ...

Page 30: ...ormation level can be made at any time by pressing the Info button Additional pushes of the Info button will deliver the following data sequence provided by the information level dhw temperature not used Water Pressure Operating phase refer to section 8 2 15 Outside temperature Error code refer to section 8 2 14 Boiler temperature Press one of these buttons to return to the default display X Ex RV...

Page 31: ...election down up Selection of operating parameter Adjustment of settings Adjustment of parameter settings Information Select information display screens Enable Maintenance mode Press buttons simultaneously to select Extended Info mode when on the information level extended info mode levels b c d can be displayed Refer to Figure 8 2 2 Press both line selection buttons simultaneously for at least 3 ...

Page 32: ... PWM C 4 RelModLevel Relative output C 5 Pumpe_PWM Pump setpoint PWM Not used C 6 ek0 Control differential C 7 C8 C9 Reserved Setpoints Service level d 0 Reserved d 1 Tsoll Setpoint of 2 position or modulating controller PID d 2 TkSoll Current boiler temperature setpoint d 3 TsRaum Room temperature setpoint d 4 TbwSoll DHW temperature setpoint Not used d 5 PhzMax Maximum degree of modulation in he...

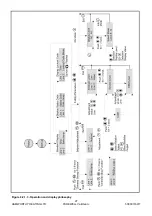
Page 33: ...HAMWORTHY HEATING LTD 27 PUREWELL VariHeat c 500001169 T Figure 8 2 1 3 Operation and display philosophy ...

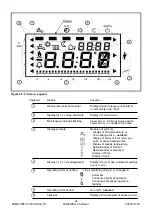
Page 34: ...eaning of symbols Display of dhw temperature or dhw heating active not used Display of boiler or room temp set point or space heating active Display of outside temperature Operational level Normal Operational level Reduced Display of flame Display of fault 5 Display 1 4 x 7 small segments Display of time of day parameter settings or error code 6 Operating mode of heating circuit Operating mode is ...

Page 35: ...o button is pressed for about 8 minutes the screen will automatically return to the default display Figure 8 2 3 2 Display of Status Code When a status code is displayed the display 1 shows alternatively the time of day and the error code Press the Info button for the display of the error code Press simultaneously both line selection buttons for 3 seconds The internal error code will be displayed ...

Page 36: ...he fault press the reset button 0 6 seconds to reset the LMU Figure 8 2 4 Display of lockout code 8 2 5 Adjusting the heating circuit setpoint temperature Press the flow temperature button to adjust the heating circuit setpoint Press to adjust the required setpoint Press to return to the default value Changes will be stored Figure 8 2 5 Heating circuit setpoint temperature The room temperature set...

Page 37: ...y 1 Time of day 0 23 59 h min 1 min Setpoints 5 Reduced room temperature setpoint TrSollRed or reduced boiler temperature setpoint TvSollRed When using an additional room unit line 5 will be hidden TRF TRN C 0 5 16 0 Time program HK1 heating circuit 1 11 Time program HC1 switch on time 1st period 00 00 24 00 hh mm 10 min 06 00 12 Time program HC1 switch off time 1st period 00 00 24 00 hh mm 10 min...

Page 38: ...ction serves for making measurements on the boiler and allows the boiler output to be increased decreased by pressing buttons Minimum and maximum output can be selected by pressing the line selection buttons Note If the controller stop function is triggered via PC tool ACS420 the current setpoint of burner output will appear on the display but the settings are locked To close the function press bu...

Page 39: ...at Investigate cause of overheating see section 9 3 113 Flue gas supervision equipment has cut out 117 Water pressure too high 118 Water pressure too low 119 Water pressure switch has cut out 128 Loss of flame during operation Check connections to flame probe Investigate flame probe condition Check combustion when boiler is firing 130 Flue gas limit temperature exceeded 132 Safety shutdown Check g...

Page 40: ...LATION DHW mode 12 Parallel operation of space heating and DHW heating PH_TI PH_MODULATION Heating and DHW mode 20 Postpurging with the last control of operation PH_THL2_1 PH_TN_1 21 Postpurging with control of prepurging PH_THL2_2 PH_TN_2 22 Home run PH_TNB PH_TLO PH_TNN 99 Lockout position display of the current error code PH_STOER Note If operating phases are passed very quickly or skipped the ...

Page 41: ... selector valve kick If either the heating circuit pump or dhw selector valve have not been activated for more than 24hours then dur ing an off period the pump or valve is activated for 5 seconds 8 3 5 Boiler overheat protection The boiler flow sensor in combination with the return sensor provide overheat protection as follows If the first level temperature is exceeded a fault code is displayed If...

Page 42: ...boiler temperature set point change the setting by using the or key and set value to 4 Press mode button to store change and return to home screen Press and hold both up and down arrow keys for at least five seconds to enter advanced parameter list H90 displayed top right of HMI screen Use either up or down arrow key to scroll through the parameter list and stop at H622 Default value is 80 Change ...

Page 43: ...HAMWORTHY HEATING LTD 37 PUREWELL VariHeat c 500001169 T Figure 8 3 11 Operating phases ...

Page 44: ...HAMWORTHY HEATING LTD 38 PUREWELL VariHeat c 500001169 T Figure 9 0 Boiler Wiring Schematic ...

Page 45: ...require a manual re set on off button situated on the controls fascia to re start the control sequence 9 2 Fault Finding Procedures General error messages are detailed in section 8 to assist with fault finding If the boiler still cannot be operated satisfactorily after following the instructions consult your Hamworthy Heating for assistance 9 3 Possible Causes of Boiler Lockout 1 Ignition failure ...

Page 46: ...ing a soft brush compressed air is as follows I For model PV70c 95c 110c Refer to Figures 11 2 11 3 for parts assembled between the gas valve fan A Disconnect the silicon tube attached to the gas valve B Disconnect the gas valve from the air box lid by removing the screws in the square flange of the lid C Remove the screws securing the air box from it s lid D Unscrew the screws fixing the venturi ...

Page 47: ... assembly is fitted to ensure safe reliable operation of the boiler The gas valve is supplied as a factory set component must not be tampered with 1 Disconnect the gas valve electrical plug Remove the four socket head screws securing the gas valve inlet flange Take the weight of the gas valve and remove the four socket head screws securing the gas valve to the airbox lid PV70c 90c 110c welded brac...

Page 48: ...EWELL VariHeat c 500001169 T Figure 11 1 Hot Surface Igniter and Flame Sensing Probe Positions Figure 11 2 Gas Valve Assembly Models PV70c 531201067 Venturi Seal 532418005 Venturi 533901497 Gas Pressure Switch 533903037 Gas Valve ...

Page 49: ...ustion System Assembly Model PV70c 53301016 Burner 563007023 Flapper Valve 531201071 Burner Elbow Gasket 533901376 Fan Elbow Seal 533901376 Fan 563801016 HSI 533805021 Flame Probe 532418005 Gas Air Mixer Venturi 533903037 Gas Valve 533901376 Fan 748010342 M5x 12 Screw 748010342 M8x20 Screw 533901497 Gas Pressure Switch ...

Page 50: ...21238 Venturi Seal 532418007 Venturi 533901497 Gas Pressure Switch 533903044 Gas Valve 533704003 Fan 533925004 Gas Pressure Switch 533903036 Gas Valve 741083676 M5x 12 Screw 532403170 Gas Valve Mounting Bracket 532418004 Gas Air Mixer Venturi 748520218 M8x20 Screw Figure 11 4 1 Combustion System Assembly Models PV180c ...

Page 51: ...re 11 4 2 Combustion System Assembly Model PV 95c 110c 140c 53301016 Burner 563007023 Flapper Valve 531201071 Burner Elbow Gasket 531201069 Fan Elbow Seal 533901376 Fan 563801016 HSI 533805021 Flame Probe 532418007 Gas Air Mixer Venturi 533903044 Gas Valve 533706076 Fan 74813870 M6x16 Screw 533901497 Gas Pressure Switch ...

Page 52: ...Clip 530650355 Front Cover Brace 530650358 LHS Panel 530650359 RHS 748551001 1 4 Turn Screw 530650351 Side Rail 530650204 Back Panel Figure 11 6 Casing Assembly 748551010 1 4 Turn Screw 532403172 Gas Pipe 339012158 1 Ball Valve 330502041 Test Point 530350001 QA Label Gas Hose 532403168 PV70c PV110c 532403172 PV140c PV180c 533706037 M8 Flange Nut 531601024 M8x16 Screw Figure 11 5 Gas Train Assembly...

Page 53: ...3 Distribution Screen 531201119 Tube Flange Seal 531201119 Tube Flange Seal 530105095 Condensate 531201118 Flue Spigot Gasket 530650335 Variheat Skid 524120041 Base Top 524120049 Section Clamp 531050013 Thermostat Pocket 531201121 Burner Gasket 524120042 Combustion Chamber 5324120043 Heat Exchanger 531050011 R1 4 Sensor Pocket 531201122 Water Connection Gasket 532403214 Outlet Connection 533901431...

Page 54: ...c shown for illustration 532012014 Tie Rod 5324120044 Heat Exchanger 532403166 Tube 742121186 O Ring 532403167 Elbow 742121238 O ring 562403166 3 Section Flexible Connector 5324120043 Heat Exchanger 524120042 Combustion Chamber 531201122 Water Connection Gasket 531201120 Section Seal 531201121 Burner Gasket ...

Page 55: ...516 AGU2 310A109 Display PCB 533901437 Flow Return Sensor 533901431 Temperature Limiter 533901179 Hot Surface Igniter HSI Replacement Kit 563605626 Flame Sensing Probe 533805015 T2A 5x20 Fuse 533922002 T1A 5x20 Fuse 533922013 MECHANICAL ITEMS Burner 533301016 Gas Valve 70c 533903040 Gas Valve 95c 110c 533903044 Gas Valve O Ring 70c 539001117 Gas Valve O Ring 95c 140c 531299037 Gas Valve 180c 53390...

Page 56: ...6 3 99 8 134 4 172 8 Boiler Output minimum 80 60 C kW 21 2 28 8 33 3 44 8 57 6 Natural Gas GAS DATA Gas Inlet Connection Pipe Thread Size R1 Nominal Gas Inlet Pressure mbar 20 Maximum Gas Inlet Pressure mbar 25 Gas Flow Rate maximum m3 h 6 9 9 4 10 9 14 4 18 5 Target CO2 at High Low fire 0 25 9 5 9 5 9 5 8 5 GENERAL DATA Purewell VariHeat condensing BOILER MODEL Model 70c 95c 110c 140c 180c Boiler...

Page 57: ...lose proximity to each other MUST NOT be supplied from different phases of a 3 phase supply The method of connection to the mains electricity supply must facilitate complete electrical isolation of the single boiler with a separation of at least 3mm in all poles 1 3 A mains isolator must be provided adjacent to each boiler in a readily accessible position The supply should only serve the boiler 1 ...

Page 58: ...HAMWORTHY HEATING LTD 52 PUREWELL VariHeat c 500001169 T Figure B1 2 External Control Wiring for Multiple Module Installation ...

Page 59: ... fuse has been introduced on the power supply between the ignition transformer and the main LMU The fuse is rated at T1A slow blow and can be located on the control panel as in fig B2 0 below The condition of the fuse should be checked when investigating a possible LMU malfunction HHL part number for spare T1A 5x20 fuse 533922013 In line Fuse Figure B2 0 ...

Page 60: ...lations b Care should be taken to ensure that the flue is installed such that any condensation is continuously drained All flues should have a maximum slope of 2 upwards in the direction of the exhaust gas flow no horizontal sections All joints should be such that any condensation is directed back down the slope to an open drain connection in the flue The drain pipe must be manufactured from a cor...

Page 61: ... terminal or grille to stop ingress of birds etc C1 7 Surface Temperatures Combustible materials in the vicinity of the boiler and flue shall not exceed 65 C during boiler operation The flue shall not be closer than 50mm to any combustible material except where it passes through such material with a non combustible sleeve when the air gap may not be less than 25mm C1 8 Location The flue system mus...

Page 62: ...c 110c 140c 180c Straight tube ø150mm maximum length m 131 114 114 79 57 45 bend ø150mm Equivalent tube length m 1 6 1 7 1 7 1 8 1 8 90 bend ø150mm Equivalent tube length m 2 1 2 2 2 2 2 3 2 3 Model Figure C1 2 Open Natural Draught B23 Flue System Figure C1 1 Flue Resistance ...

Page 63: ...entilation shall be such that the maximum temperatures within the boiler house shall be as follows 1 At floor level or 100mm above floor level 25 C 2 At mid level 1 5m above floor level 32 C 3 At ceiling level or 100mm below ceiling level 40 C Where both low and high level openings are used the grilles shall have a total minimum free area of Low level inlet 4 0 cm per kilowatt of total rated net h...

Page 64: ... 4 Each boiler module has R2 male flow indicated with a red spot and return indicated with a blue spot connections Boilers should be connected by flow and return headers Headers should be connected to the system in a reverse return arrangement the water flow in each header is in the same direction to ensure equal flow in each module or with a single pipe header system Figure E1 2 on the following ...

Page 65: ...HAMWORTHY HEATING LTD 59 PUREWELL VariHeat c 500001169 T Figure E1 2 Typical Piping Layouts ...

Page 66: ...ensure that the minimum flow rate can be obtained It is also important that the existing system be flushed through twice to remove any loose matter which may have accumulated If in any doubt regarding the cleanliness of the system a coarse filter should be fitted in the return pipework to the boilers If boiler system pump s are not controlled by the boiler a pump overrun not Hamworthy Heating Ltd ...

Page 67: ... vessel required Care must be taken in sizing expansion vessels to ensure maximum acceptance factors are not exceeded Normally manufacturers of vessels impose a limit of 0 5 This value must not be exceeded at any time during the operation of the boiler this includes the over pressure condition should a safety valve lift Consideration should also be given to sizing of the safety valve s in the syst...

Page 68: ...Figure E 1 3 4 Schematic for Multiple Boiler Cascade Primary Circuit System Figure E 1 3 3 Schematic for Single Boiler External 0 10V Multi Circuit System SENSOR B1 533901593 SENSOR B3 533901593 QAC34 HHL 533901457 MERLEY CONTROLLER 533901457 533901593 MERLEY ...

Page 69: ...HAMWORTHY HEATING LTD 63 PUREWELL VariHeat c 500001169 T INSTALLER SITE ADDRESS BOILER TYPE BOILER SIZE S UNIT NO S SERIAL NO S FLUE USEFUL USER INFORMATION NOTES ...

Page 70: ...HAMWORTHY HEATING LTD 64 PUREWELL VariHeat c 500001169 T NOTES ...

Page 71: ......

Page 72: ... Road Glasgow Scotland G33 4AG tel 0141 336 8795 fax 0141 771 9635 North East England Service Allison Heating Products 12 Sunnyside Lane Cleadon Village Sunderland SR6 7XB tel 0191 536 8833 fax 0191 536 9933 Hamworthy Heating Customer Service Centre Sales tel 0845 450 2865 Technical Enquiries tel 0845 450 2865 Servicing tel 01202 662555 Spares tel 0845 450 2866 Customer Service Centre Hamworthy He...

Reviews: