ITX-D255R Mini-ITX Mother Board Manual
18 / 31
2.8 SerialATA (SATA) / Serial ATA2(SATA2) Hard Disks Installation
This motherboard adopts Intel® NM10 Express chipset that supports Serial ATA (SATA) / Serial ATA2 (SATA2) hard disks. You may
install SATA / SATA2 hard disks on this motherboard for internal storage devices. This section will guide you to install the SATA / SATA2
hard disks.
Step#1] Install the SATA / SATA2 hard disks into the drive bays of your chassis.
Step#2] Connect the SATA power cable to the SATA / SATA2 hard disk.
Step#3] Connect one end of the SATA data cable to the motherboard’s SATA2 connector.
Step#4] Connect the other end of the SATA data cable to the SATA / SATA2 hard disk.
2.9 Hot Plug Function for SATA / SATA2 HDDs
This motherboard supports Hot Plug function for SATA / SATA2 in AHCI mode. Intel® NM10 Express chipset provides hardware support
for Advanced Host controller Interface (AHCI), a new programming interface for SATA host controllers developed through a joint
industry effort.
What is Hot Plug Function?
If the SATA / SATA2 HDDs are NOT set for RAID configuration, it is called “Hot Plug” for the action to insert and remove
the SATA / SATA2 HDDs while the system is still power-on and in working condition. However, please note that it
cannot perform Hot Plug if the OS has been installed into the SATA / SATA2 HDD.
2.10 Driver Installation Guide
To install the drivers to your system, please insert the support CD to your optical drive first. Then, the drivers compatible to your system
can be auto-detected and listed on the support CD driver page. Please follow the order from top to bottom to install those required
drivers. Therefore, the drivers you install can work properly.
2.11 Installing Window7 on SATA / SATA2 HDDs
If you want to install Windows 7 OS on your SATA / SATA2 HDDs, please follow the steps below.
2.10.1 Using SATA/SATA2 HDDs with NCQ Function
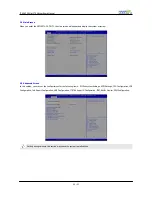
Step#1] Set up UEFI.
1) Enter UEFI SETUP UTILIT
→
Advanced screen
→
Storage Configuration.
2) Set the option “SATA Mode” to [AHCI].
Step#2] Install Windows® 7 OS on your system.
2.10.2 Using SATA/SATA2 HDDs without NCQ Function
Step#1] Set up UEFI.
1) Enter UEFI SETUP UTILIT
→
Advanced screen
→
Storage Configuration.
2) Set the option “SATA Mode” to [IDE].
Step#2] Install Windows® 7 OS on your system.


