background image

28 

COMPRESSOR INSTALLATION & START-UP GUIDE 

REVISION M 


13.2. 

Infinite Capacity (Stepless) Minimum (50-100%) 


UNLOAD


LOAD


START UNLOAD


Summary of Contents for RC2-100

Page 1: ...tain Hanbell Warranty a Motor Module Trip INT69HBY Open for 1 second b Low Oil Level Float Trip Open for 30 60 seconds c Unsafe Suction Less than 5 psi for 3 seconds d Low Differential Pressure Less than 65 psi for 60 seconds Oil Psi Suction Psi e Unsafe Differential Pressure Less than 35 psi for 5 seconds Oil Psi SuctionPsi f Low Discharge Superheat Less than 25 F for 300 seconds Revision 10 02 1...

Page 2: ...document Revision Date Author Description of Changes 12 03 12 M Schreiber X Beltran Update Manual to REV H Updated Hanbell Liquid Injection Piping ATTENTION Step Control Loading Plate Design In RC2Series Added Revision Chart Updated Added Solenoid Installation AlignmentPictures 12 06 12 M Schreiber Update Manual to REV I Added Hanbell Compressor Picture 05 24 13 M Schreiber Update Manual to REV J ...

Page 3: ... 5 Recommended Liquid Injection Piping 6 Screw Compressor Wiring Procedures 7 INT69HBY 12 Maintenance Area Requirement 18 Compressor Piping 20 Electrical Wiring 20 Pre Start up Procedure 21 Start up Procedure 25 Recommended Safety Settings 25 Hanbell with VFD 26 Solenoids 27 Slide Amp Calculation 34 Handling POE Oil Information 39 Warranty Maintenance Information 40 ...

Page 4: ...lift the compressor make sure that the cable rope has the proper strength to lift the compressor Keep the compressor horizontal while lifting 1 4 Check compressor nameplate for correct model and voltage designation 1 5 To facilitate customer installation requirements the parts listed in Table 1 are factory supplied in separate boxes located in the compressor terminal box or packed in the compresso...

Page 5: ...ader connection fitting and depressing the internal Schrader stem CAUTION This compressor may contain trace amounts of oil Do not relieve the holding charge or open the compressor pots until it is ready to be connected to a closed dry system Excessive moisture may shorten compressor life 3 2 Installation of the Compressor Electrical Terminal Box Four bolts located on the top of the electrical term...

Page 6: ...e in the following section for connection points 3 7 PTC Discharge Temperature Protection Each compressor comes standard with three PTC sensors in the motor windings and one located at the discharge port A motor module INT69HBY is installed in the electrical terminal box Refer to Figure 4 B showing the connection of motor and discharge PTCs in series to the motor module corresponding terminal bloc...

Page 7: ...OMPRESSOR INSTALLATION START UP GUIDE REVISION M 7 5 Screw Compressor Wiring Procedures Following the diagrams below will prevent damage to the electrical terminals and the possibility of personal injury ...

Page 8: ...ART UP GUIDE REVISION M 8 Terminal V2 The method to tell the terminals V Phase 1 By alphabet Refer to the alphabet beside each terminal bolt in a star delta motor 2 By numbers Refer to the number beside each bolt in a PWS motor ...

Page 9: ...COMPRESSOR INSTALLATION START UP GUIDE REVISION M 9 Figure 5 A Motor Wiring ...

Page 10: ...insulation of the power terminal could be degraded Follow the drawing shown below for the wiring to prevent the power terminal from being damaged The setting of the torque wrench for tightening the copper nut of the terminal bolts should be set less than 500 kg cm 36 pound inch The insulation of the ceramic power terminals are very easily degraded by water so DO NOT take the leakage test by immers...

Page 11: ...ALLATION START UP GUIDE REVISION M 11 5 2 Across the Line Jumper Bar Installation Photo shows extra nuts installed under jumper bar for clearance of power bolt Insulation Connect line voltage directly on Terminal post ...

Page 12: ...minal response temperature of the respective PTC thermistor 230 F 4 5 ohms 20 the sensor resistance increases and the module trips M1 and M2 open The failure results in a lockout The module resets when the response temperature drops 3kΩ when temp decreases below 212 F 2 75 ohms 20 5 min delay for the first PTC failure 60 min delay for the 2nd fail ure latching lockout for the 3rd within 24 hour pe...

Page 13: ...detected open circuit or short circuit 2 1 Motor voltage Incorrect phasesequence 2 Motor voltage Phase failure asymmetry 3 1 General Supply voltage too low 5 General Reset delay after General error Error Active Condition Time delay Motor temperature static trip Always Rtrip 4 5kΩ 20 Rreset 2 75kΩ 20 1 24h 5min 2 24h 60min 3 24h locked out Time delay starts after cooling down Operation cycle limita...

Page 14: ...re INT69HBY Diagnose The following diagram shows the proper wiring connections for the module The module is connected to L1 L2 and L3 for phase monitoring Stake on connectors at terminal A are connected in series with the discharge PTC and wired back to S1 and S2 ...

Page 15: ...15 COMPRESSOR INSTALLATION START UP GUIDE REVISION M ...

Page 16: ...16 COMPRESSOR INSTALLATION START UP GUIDE REVISION M ...

Page 17: ...17 COMPRESSOR INSTALLATION START UP GUIDE REVISION M ...

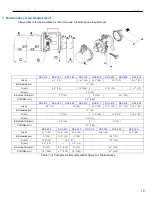
Page 18: ...mm 7 8 200 RC2 310 RC2 320 RC2 340 RC2 370 RC2 410 RC2 470 RC2 510 RC2 550 A cm 20 51 22 56 21 3 54 23 3 59 21 7 55 23 3 59 B Outwards cm 11 28 C cm 13 33 11 8 30 13 8 35 14 6 37 D cm 5 9 15 E Suction filter mm 5 6 143 6 153 F Oil filter mm 7 8 200 RC2 580 RC2 610 RC2 620 RC2 710 RC2 790 RC2 830 RC2 930 A cm 21 7 55 23 6 60 23 6 60 25 6 65 31 5 80 B Outwards cm 11 28 13 8 35 11 28 13 8 35 C cm 13 ...

Page 19: ...of piston rings and bearings should be performed by Hanbell authorized technicians When counts of piston loading and unloading motion are higher than 10 000 times piston rings should be replaced immediately Oil change 1 Break in period it is recommended to change oil and clean oil filter after running 2 00 hours 2 Check the lubrication oil condition every 10 000 hours of continuous running It s a ...

Page 20: ...r will be clogged resulting in the lubrication system bearings and capacity control system malfunctioning 8 7 The suction and discharge flanges are forged steel that can be welded directly with piping connectors standard size for copper piping if connecting to steel piping contact your Hanbell representative After welding the flanges and pipes they should be cooled down by ambient air water quench...

Page 21: ...essor the motor rotates counter clockwise 9 Pre Start up Procedure 9 1 Oil Charging Only lubricants listed in Hanbell s Technical Manual are to be used NO SUBSTITUTES Make sure the oil level is to the middle of the high side sight glass which is the terminal box side of the compressor For compressors with internal oil separators 9 2 Oil Heater The heater needs to be energized for 8 hours prior to ...

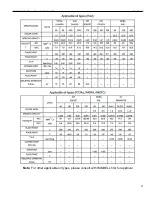
Page 22: ...22 COMPRESSOR INSTALLATION START UP GUIDE REVISION M Note For other applicable oil types please consult with HANBELL first for approval ...

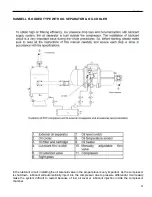
Page 23: ...ter oil level switch or heater Therefore you must have an external oil separator with an oil sump and oil level float Also on the return line from the oil sump to the compressor you must have an oil filter and oil flow switch Please follow the piping diagram below Please ensure there is oil charged in the piping feeding the compressor to avoid a dry start up HANBELL FLOODED TYPE WITH OIL SEPARATOR...

Page 24: ...ircuit installing the oil solenoid valve in the proper place is very important As the compressor is shut down lubricant will automatically inject into the compressor due to pressure differential It will easily make the system difficult to restart because of low oil level or lubricant injection inside the compressor chamber ...

Page 25: ...Hanbell recommends suction superheat 10 F to 20 F discharge superheat 30 F and a pressure differential of at least 70 psig 11 Recommended Safety Settings Motor Module Trip INT69HBY Open for 1 second Low Oil Level Float Trip Open for 30 60 seconds Unsafe Suction Less than 5 psi for 3 seconds High Discharge Temperature Greater than 215 F for 2 seconds Low Differential Pressure Less than 65 psi for 6...

Page 26: ... the red white and Blue wires from the INT69HBY motor module Place the amp sensor s on the line side of the VFD Select only a constant torque VFD type to use Set for no Direct Current DC braking Set Acceleration Time to 3 5 second 12 2 Compressor Set Up Remove the 50 load solenoid coil 50 is no longer used The 25 load solenoid is used as the Fast Unload Remove the Load solenoid stem and install a ...

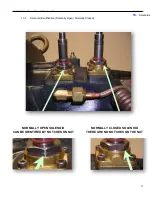
Page 27: ...LLATION START UP GUIDE REVISION M 13 Solenoids 13 1 Solenoid Identification Normally Open Normally Closed NORMALLY OPEN SOLENOID CAN BE IDENTIFIED BY NOTCHES ON NUT NORMALLY CLOSED SOLENOID THERE ARE NO NOTCHES ON THE NUT ...

Page 28: ...28 COMPRESSOR INSTALLATION START UP GUIDE REVISION M 13 2 Infinite Capacity Stepless Minimum 50 100 UNLOAD LOAD START UNLOAD ...

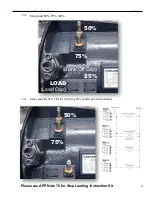
Page 29: ...ATION START UP GUIDE REVISION M 13 3 Step Load 50 75 100 50 75 Blank Off Cap 25 LOAD Load Cap 13 4 Step Load 25 50 75 100 Only 25 at Start Up and Shut Down 50 75 Please see APP Note 76 for Step Loading Instruction Kit 29 ...

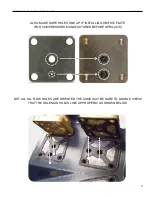
Page 30: ... SOLENOID ALIGNMENT IS CRITICAL TO PROPER FUNCTIONING OF COMPRESSOR WHEN INSTALLING SOLENOIDS ON THE COMPRESSOR ENSURE THAT THE HOLES MATCH FOR PROPER OIL FLOW TO OCCUR WHEN INSTALLING A LOAD CAP MAKE SURE THAT THE CIRCULAR HOLE IN THE GASKET COVERS BOTH OF THE COMPRESSOR OIL FLOW HOLES ...

Page 31: ...ISION M 31 ALSO MAKE SURE HOLES LINE UP IF INSTALLING ORIFICE PLATE FOR COMPRESSORS MANUFACTURED BEFORE APRIL 2013 NOT ALL OIL FLOW HOLES ARE ORIENTED THE SAME WAY BE SURE TO DOUBLE CHECK THAT THE SOLENOID HOLES LINE UP PROPERLY AS SHOWN BELOW ...

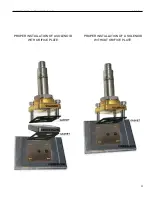
Page 32: ...COMPRESSOR INSTALLATION START UP GUIDE REVISION M 32 PROPER INSTALLATION OF A SOLENOID WITH ORIFICE PLATE PROPER INSTALLATION OF A SOLENOID WITHOUT ORIFICE PLATE ...

Page 33: ...COMPRESSOR INSTALLATION START UP GUIDE REVISION M 33 ATTENTION ORIFICE PLATES WERE REPLACED BY ORIFICE PLUGS IN COMPRESSORS MANUFACTURED AFTER APRIL 2013 ...

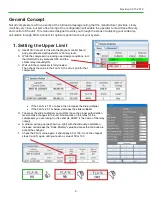
Page 34: ...you need to follow these steps when commissioning the compressor to ensure correct operation Any questions regarding this release contact support mcscontrols com Micro Control Systems Inc 5580 Enterprise Parkway Fort Myers Florida 33905 239 694 0089 FAX 239 694 0031 www mcscontrols com Information contained in this document has been prepared by Micro Control Systems Inc and is copyright protected ...

Page 35: ...ns turn the UNLOAD relay manually OFF and the LOAD relay manually ON c Wait until the compressor is fully loaded Then check the value in the FLA in the circuit grid for that compressor If the FLA is 101 or above then increase the slide multiplier If the FLA is 97 or below decrease the slide multiplier d To access the slide multiplier you must first have the proper authorization level to make chang...

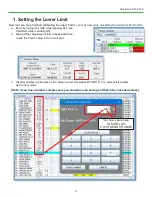
Page 36: ...ually OFF and UNLOAD relay manually ON b Wait until the compressor is fully unloaded and then check the FLA value in the circuit grid c Take this number double click on the Value column for setpoint 31 MIN FLA and set this number as the new value Note if you have multiple compressors you should use an average of their fully unloaded values Set new value here for MIN FLA CLICK SEND CHANGE ...

Page 37: ...ttempting any maintenance on the unit Periodical check and regular maintenance are very important for the long and trouble free compressor life and for maintaining the warranty The content here is to help the operator and service people to know how theregu lar maintenance can be done and when the suitable time is for each item Operators and service people should follow the instructions on these pa...

Page 38: ...ine checks Daily check for operation conditions is also very important to have a stable operating system Please refer to the recommended maintenance schedule found on the following pages This schedule is only for the technician s reference and should be considered as the minimum guideline to maintain the system s nor mal operation Technicians still can do any examination by their own that will ens...

Page 39: ...d to package oils are permeable to moisture It is also important to keep compressors and systems closed except when work is actually being done on the equipment and to filter out undesirable contaminants This can be achieved with proper installation and service techniques as well as the use of correct filters and driers Once moisture is in the oil it is extremely difficult to remove even under a h...

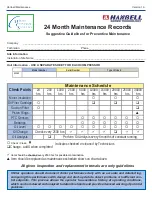
Page 40: ...Oil Filter Cartridge Suction Filter Piston Rings PTC Sensors Bearings Oil Level Oil Change Check every 2500 hrs Oil Analysis Perform Oil Analysis every 6 months of constant running Check Clean X Change add X when completed Indicates checked or cleaned by Technicians Item should be checked every 2500 hrs for possiblecontamination Item should be replaced as maintenance schedule shows on chart above ...

Page 41: ... COMP 4 COMP 2 COMP 5 COMP 3 COMP 6 Temperature Readings Volt Pressure Amp Readings For Unit Information please see description above Ambient Temp Cond Approach Temp Cond In Temp Cond Out Temp Evap In Temp Evap Out Temp Oil Sump Temp Cond Sat Temp Evap Sat Temp Sub Cooling Temp Suction Superheat Temp Discharge Superheat Temp Discharge Temp Suction Temp Liquid Line Temp Motor Temp Evaporator Approa...

Reviews: