Technical Manual
VERSION 2.0 -10-18-2018
22
4.2 Mounting the compressor
The installation of the compressor in the refrigeration system should be accessible and make sure that the chiller base
or site is far enough from the heat source to prevent heat radiation. The compressor should also be installed as close
as possible to the electrical power supply for easier connection and must keep good ventilation and low humidity
condition in the site. Make sure that the frame or supporter is strong enough to prevent excessive vibration and noise
while the compressor is running and must reserve enough space for compressors’ future overhauling work.
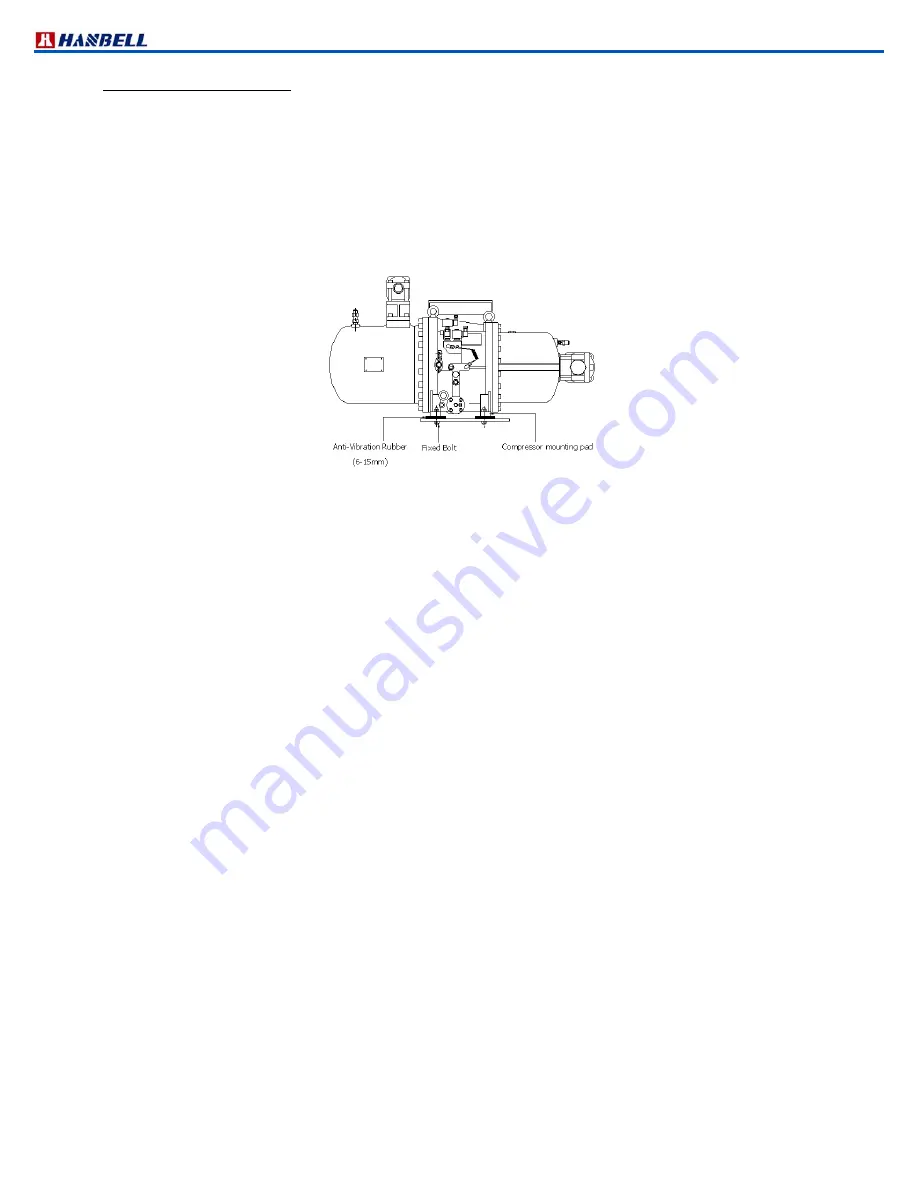
The compressor must be installed horizontally and in order to prevent excessive vibration transferred by the structure
and piping of the chiller while in operation, the cushion or antivibration pad should be installed. The installation of the
antivibration pad is shown in Figure 22. The screws should only be tightened until slight deformation of the rubber pad
is visible.
※
It is strongly recommended to position the compressor higher than the evaporator
Suggestions on piping works
The unsuitable piping works done to the compressor could cause abnormal vibration and noise that might damage the
compressor. Take notice of the following pointers to prevent this situation from happening:
1. Cleanliness of the system should be kept after welding the piping to avoid any swarf or debris contained inside the
system as it may cause serious damage to the compressor during operation.
2. In order to reduce the vibration on the piping tubes, it is recommended to use copper tube to be the suction and
discharge piping tubes. Copper tubes are better to minimize the vibration in the piping while the compressor is in
operation. In case steel tubes are used in piping system, the suitable welding works are very important to avoid any
stress in the piping. This inner stress can cause harmonic vibration and noise that can reduce the life of the
compressor. If a largecaliber copper tube is not easily accessible and a steel tube is used instead in suction port,
Hanbell also recommends the use of a copper tube in discharge port to best minimize abnormal vibration and noise.
3. Remove the oxidized impurities, swarf or debris caused by welding in the piping tubes. If these materials fall into the
compressor, the oil filter might be clogged and result in the malfunction of lubrication system, bearings and capacity
control system.
4. The material of suction and discharge flange bushing is forged steel and it can be welded directly with piping
connectors. After welding the flange bushing and pipes, it must be cooled down by ambient air. Do not use water to
cool it down because water quenching is prohibited.
Installing the compressor in a sloping position
Figure 23 shows a 15° limit of oblique angle for installation of compressor. In case the oblique angle is higher than the
limit, compressor will be shut down easily. For special applications like the installation in ships, fishing boats, etc,
where the oblique angle might exceed the limit, external oil separators, oil tanks and related accessories are
recommended to be installed. Please contact HANBELL or local distributors for further layout recommendation.
Figure 22 Installation of antivibration pad
Summary of Contents for RC2 Series
Page 24: ...Technical Manual VERSION 2 0 10 18 2018 24 UNIT SI mm Imperial in UNIT SI mm Imperial in ...
Page 25: ...Technical Manual VERSION 2 0 10 18 2018 25 SI mm Imperial in UNIT UNIT SI mm Imperial in ...
Page 26: ...Technical Manual VERSION 2 0 10 18 2018 26 SI mm Imperial in UNIT UNIT SI mm Imperial in ...
Page 27: ...Technical Manual VERSION 2 0 10 18 2018 27 UNIT SI mm Imperial in ...
Page 28: ...Technical Manual VERSION 2 0 10 18 2018 28 ...
Page 29: ...Technical Manual VERSION 2 0 10 18 2018 29 UNIT SI mm Imperial in ...
Page 30: ...Technical Manual VERSION 2 0 10 18 2018 30 ...
Page 31: ...Technical Manual VERSION 2 0 10 18 2018 31 ...
Page 32: ...Technical Manual VERSION 2 0 10 18 2018 32 ...
Page 33: ...Technical Manual VERSION 2 0 10 18 2018 33 ...
Page 34: ...Technical Manual VERSION 2 0 10 18 2018 34 UNIT SI mm Imperial in ...
Page 35: ...Technical Manual VERSION 2 0 10 18 2018 35 2 RC2 B outline drawings ...
Page 36: ...Technical Manual VERSION 2 0 10 18 2018 36 ...
Page 37: ...Technical Manual VERSION 2 0 10 18 2018 37 ...
Page 38: ...Technical Manual VERSION 2 0 10 18 2018 38 ...
Page 39: ...Technical Manual VERSION 2 0 10 18 2018 39 ...
Page 40: ...Technical Manual VERSION 2 0 10 18 2018 40 ...
Page 41: ...Technical Manual VERSION 2 0 10 18 2018 41 ...
Page 42: ...Technical Manual VERSION 2 0 10 18 2018 42 ...
Page 43: ...Technical Manual VERSION 2 0 10 18 2018 43 ...
Page 44: ...Technical Manual VERSION 2 0 10 18 2018 44 SI mm Imperial in UNIT ...
Page 60: ...Technical Manual VERSION 2 0 10 18 2018 60 ...
Page 83: ...Technical Manual VERSION 2 0 10 18 2018 83 NOTES ...


