background image

Dolphin® 9500 Series Mobile Computer User’s Guide - Preliminary Draft Rev (c)

5 - 31

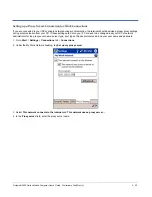
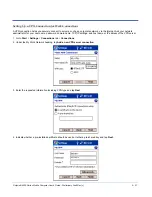
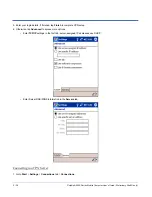
5. Tap OK to confirm. Enter the appropriate information on the next screen.

6. Tap Dialing Patterns to change how dialing occurs.

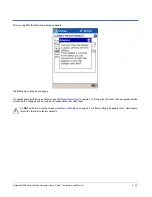
7. Following the format of "e" represents country code, "f" represents area code, and "g" represents the number, enter how 

local, long distance, and international calls should be dialed. Tap OK to save your changes.

Summary of Contents for Dolphin 9500

Page 1: ... User s Guide Dolphin 9500 Series Mobile Computer Windows Mobile Software for Pocket PCs 2003 ...

Page 2: ...arks Dolphin HomeBase Mobile Base and QuadCharger are trademarks or registered trademarks of Hand Held Products Inc Windows Mobile Windows Windows NT Windows 2000 Windows ME Windows XP ActiveSync Outlook and the Windows logo are trademarks or registered trademarks of Microsoft Corporation Intel is a registered trademark of Intel Corporation Chapter 7 pages 7 1 7 11 contains copyrighted information...

Page 3: ...liance Statement 1 8 Dolphin 9500 Terminal GSM R TTE Compliance Statement 1 9 Pacemakers Hearing Aids and Other Electrically Powered Devices 1 9 Microwaves 1 9 Care and Cleaning of Dolphin 9500 Series Terminals 1 9 Chapter 2 Getting Started Overview 2 1 Dolphin 9500 Series Terminals 2 2 Dolphin 9500 Series Models and Options 2 2 Dolphin 9500 Series Peripherals 2 3 Dolphin 9500 Series Accessories 2...

Page 4: ...Decoding 4 6 Capturing Images 4 8 Using the Keyboards 4 9 Using the Function Keys 4 10 Using the Navigation Keys 4 10 Using the Modifier Keys 4 11 35 Key Numeric Alpha Keyboard 4 12 43 Key Alpha Numeric Keyboard 4 13 56 Key Full Alpha Numeric Keyboard 4 14 Key Combinations 4 14 Adjusting the Backlight 4 15 Color Display 4 15 Monochrome Display 4 16 Communication Media Options 4 17 Radio Options 4 ...

Page 5: ...P 5 20 Creating an External Modem Connection to Your Work 5 24 Establishing Dialing Rules 5 30 Configuring Network Cards 5 32 Chapter 6 Communications Overview 6 1 Connecting 6 1 Installing Additional Software 6 1 Using ActiveSync 6 2 Additional Capabilities 6 2 Requirements 6 2 Synchronizing from Your Desktop Computer 6 2 Synchronizing from the Terminal 6 3 Exploring Your Terminal from the Deskto...

Page 6: ...th CertAdd 7 41 Advice and Workarounds 7 42 Chapter 8 Wireless PAN Communications with Bluetooth Overview 8 1 Powering Up the Bluetooth Radio Driver 8 1 Setting Up Your Bluetooth Card 8 1 Assign COM Ports 8 2 Discover Bluetooth Device s 8 3 Bond With Discovered Device s 8 3 View Device Properties 8 5 Set Up Your Favorite Device 8 6 Change Views 8 6 Delete a Device From the Folder 8 7 Turn Radio Tr...

Page 7: ...s 9 10 Volume Control 9 10 Phonebook 9 11 Tools Menu 9 12 Settings Menu 9 12 Audio Modes 9 13 Handset 9 13 Headset 9 13 Hands Free 9 13 Ringtone Configuration 9 14 Call Log 9 15 SMS Manager 9 17 Opening the SMS Manager 9 17 Sending an SMS Message 9 19 Icons at the Top of the Screen 9 19 Online Help 9 20 uPhone Configuration 9 21 Accessing 9 21 Requirements 9 21 General Tab 9 22 Network Tab 9 23 Di...

Page 8: ...el 11 4 Dolphin 9501 11 5 Side Panel 11 5 Back Panel 11 6 Hand Strap and Stylus 11 7 Bottom Panel Features 11 7 Chapter 12 Dolphin 9500 Series HomeBase Overview 12 1 Dolphin 9500 Series HomeBase Parts and Functions 12 2 Front Panel 12 2 Rear Panel 12 4 Powering the HomeBase 12 5 HomeBase Serial Connector 12 6 Charging the Main Battery 12 7 To Power a Terminal and Charge its Main Battery 12 7 Charg...

Page 9: ...view 14 1 Dolphin ChargeBase Parts and Functions 14 2 Front Panel 14 2 Back Panel 14 2 Power Supply 14 3 Supplying Power to the ChargeBase 14 3 Inserting and Removing Terminals 14 4 Charging Terminals in the ChargeBase 14 4 Mounting the ChargeBase 14 5 Bottom Panel 14 5 Using the DIN Rail 14 6 Using the Wall Mount Kit 14 7 Chapter 15 Dolphin 9500 Series QuadCharger Overview 15 1 Dolphin QuadCharge...

Page 10: ...pha Numeric Keyboard A 2 Blue Key Combinations A 2 Red Key Combinations A 3 Num Lock Key Combinations A 3 35 Key Numeric Alpha Keyboard A 4 Blue Key Combinations A 4 Alpha Mode Key Combinations A 5 56 Key Full Alpha Numeric A 6 Blue Key Combinations A 6 Red Key Combinations A 7 SFT Key Combinations A 8 Com Port Assignment Table A 9 ...

Page 11: ... Bar Code Symbologies Supported on page 2 5 Co located and integrated 802 11b GSM GPRS and Bluetooth wireless radios for real time data collection applications Intel X Scale 400MHz RISC microprocessor for fast processing Microsoft Windows Mobile 2003 Software for Pocket PC platform easily programmable with standard programming tools 64 MB RAM and 32 MB Flash memory configuration for ample and secu...

Page 12: ...01 and the Dolphin 9551 contain the following laser safety information Embedded safety information text The Dolphin 9501 Dolphin 9550 and Dolphin 9551 all have safety information embedded in the plastic Regardless of the location on the terminal this information is as follows Safety labels Safety information embedded in the plastic Safety labels Laser safety labels Laser safety labels Safety infor...

Page 13: ...ation U S A Canada European Community FCC Part 15 Class B ICES 003 EN 55022 CISPR 22 Class B EN60950 EN60825 1 EN55024 1998 Tested to Comply With FCC Standards This Class B Digital apparatus complies with FOR HOME OR OFFICE USE Canadian ICES 003 Cet appariel numerique de la Classe B est conforme a la norme NMB 003 du Canada N10410 Hand Held Products Inc Skaneateles Falls NY Made in USA of US impor...

Page 14: ...anadian ICES 003 Cet appariel numerique de la Classe B est conforme a la norme NMB 003 du Canada Hand Held Products Inc www hhp com Made in USA of US imported parts No user serviceable parts Opening Voids Warranty 0681 Canada 1693B9503 FCC ID HD5950003 Canada 1693B9503 FCC ID HD5950003 0681 N10410 Hand Held Products Inc www hhp com Canada 1693B9503 FCC ID HD5950003 0681 N10410 Hand Held Products I...

Page 15: ...1 1994 A11 A2 CLASS 2 LASER PRODUCT 0681 N10410 Canada 1693B9504 Socket Radio FCC ID LUBBTM 1 Hand Held Products Inc Skaneateles Falls NY www hhp com Complies with 21 CFR 1040 10 and 1040 11 except for deviations pursuant to Laser Notice No 50 dated July 26 2001 LASER LIGHT DO NOT STARE INTO BEAM 1 0 mW MAX OUTPUT 650nM EN60825 1 1994 A11 A2 CLASS 2 LASER PRODUCT N10410 Tested to Comply With FCC S...

Page 16: ...ith FCC Standards This Class B Digital apparatus complies with FOR HOME OR OFFICE USE Canadian ICES 003 Cet appariel numerique de la Classe B est conforme a la norme NMB 003 du Canada Hand Held Products Inc www hhp com Made in USA of US imported parts No user serviceable parts Opening Voids Warranty 0168 Canada 1693B9505 FCC ID HD5950005 N10410 Tested to Comply With FCC Standards This Class B Digi...

Page 17: ...erent from that to which the receiver is connected Consult the dealer or an experienced radio TV technician for help If necessary the user should consult the dealer or an experienced radio television technician for additional suggestions The user may find the following booklet helpful Something About Interference This is available at FCC local regional offices Our company is not responsible for an...

Page 18: ...ecified in the R TTE Directive 1999 5 EC The equipment is intended for use throughout the European Community Its authorization for use in France is restricted as follows PAN European Frequency Range 2 402 2 480 GHz Restrictions in France are as follows Indoor use Maximum power EIRP of 100 mW for the entire 2400 2483 5 MHz Outdoor use Maximum power EIRP of 100 mW for the 2400 2454 MHz band and maxi...

Page 19: ...hin is 0 3V m according to Subpart B of Part 1 of the FCC rules Therefore the Dolphin RF has no effect on medical devices that meet the IEC specification Microwaves The radio in the Dolphin RF terminal operates on the same frequency band as a microwave oven Therefore if you use a microwave within range of the Dolphin RF terminal you may notice performance degradation in your wireless network Howev...

Page 20: ...1 10 Dolphin 9500 Series Mobile Computer User s Guide ...

Page 21: ... data collection Each mobile computer is equipped with an Intel PXA255 400MHz RISC processor for fast processing that is built for Windows Mobile based Pocket PCs The Dolphin 9500 Series is available with different types of 2D imagers and wireless radios to meet most any enterprise mobile data collection requirement Data Input Options There are three keyboard options and a 240 x 320 pixel backlit ...

Page 22: ...ries WLAN 802 11b These terminals integrate the functionality of the Batch terminals with an integrated IEEE 802 11b direct sequence radio that enable communication with a host computer through a wireless local area network WLAN Dolphin 9500 Series WPAN Bluetooth These terminals allow Bluetooth communications to Bluetooth enabled devices such as printers mobile phones access points Bluetooth enabl...

Page 23: ...bile Base its main battery pack charges in less that four hours The serial connector supports RS 232 communication and power out to peripheral devices such as hand held scanners For more information see Dolphin 9500 Series Mobile Base on page 13 1 Dolphin ChargeBase The Dolphin ChargeBase is a four slot charging cradle that holds powers and charges a terminal in each slot For more information see ...

Page 24: ...able kits are an all in one solution for mobile applications Each cable kit powers the terminal charges its main battery and communicates with host or peripheral devices without the need for a cradle Cable kits can support RS 232 or USB communications and are available with U K or European power cords Protective Holster Holsters provide convenient storage for terminals and protect them from damage...

Page 25: ...e Laser Engine Options on page 11 1 Bar Code Symbologies Supported Symbology type Symbologies supported 1D Symbologies Codabar Code 3 of 9 Code 11 Code 32 Pharmaceutical PARAF Code 93 Code 128 EAN with Add On and EAN with Extended Coupon Code EAN 13 Interleaved 2 or 5 Matrix 2 of 5 Plessey PosiCode RSS Straight 2 of 5 IATA Straight 2 of 5 Industrial Telepen Trioptic Code UCC EAN 128 UPC and UPC A ...

Page 26: ...er The Dolphin 9500 Hand Strap The Dolphin 9500 ships with the hand strap installed and fastened to the bottom panel with a clip see Bottom Panel Features on page 3 9 To install the battery pack you must detach the hand strap To detach the hand strap push the hand strap clip down and away from the terminal Move the strap up and away from the bottom panel To re attach the hand strap slide the clip ...

Page 27: ...HP will void the warranty and may damage the terminal Using the Dolphin HomeBase 1 Connect the HomeBase to the power supply provided by HHP 2 Slide the terminal with installed battery pack into the terminal well until the Dock LED lights solid green to indicate that the terminal is properly seated 3 The battery pack begins charging Using the Mobile Base 1 Connect the Mobile Base to the appropriate...

Page 28: ...mber 3 The system performs a hard reset When the display activates again follow the instructions that appear Step 5 Align the Screen You are prompted to align the screen by tapping the target five times Use the stylus provided by HHP Alignment should always be performed with a stylus designed for touch screen applications The small point is required for accurate calibration Press the stylus firmly...

Page 29: ...prevent damage to the touch screen and are easily installed Screen protectors can be purchased at any major computer retail store or directly from HHP Inc Please contact HHP directly for part numbers and pricing Step 7 Set the Time Zone After completing the screens the Location screen shown below displays Use the drop down list to select your time zone and tap Next This does not necessarily set th...

Page 30: ... is configured with a wireless radio the appropriate radio drivers and utilities for each radio install After Autoinstall is complete the terminal performs a soft reset automatically When it finishes booting up after the soft reset the Today screen appears see Today Screen on page 4 2 Setting the Time and Date You need to re set the time and date after every hard reset of the terminal It is a good...

Page 31: ...le Save As and select a new location 4 Press the ESC key to close the demo For more information about taking an image see Using the Imager on page 4 6 Verify Decoding The Scan Demo enables you to decode a sample bar code 1 Go to Start Demos Scan Demo 2 Aim the terminal at a bar code and press the SCAN key The scan LED lights red and a green aimer beam projects out from the scanner 3 When a good sc...

Page 32: ...ta stored in RAM memory and all RAM installed applications 1 Press and hold the Control CTRL and the Escape ESC keys for approximately five seconds 2 The decode and scan LEDs light for approximately three seconds 3 The terminal re initializes see Initialize the Mobile Computer on page 2 8 Suspend Mode To put the Dolphin terminal into suspend mode manually press and hold the POWER key The terminal ...

Page 33: ...cient data collection devices such as Dolphin 9500 Series terminals Memory Main Board IPSM The standard memory configuration is 64 MB RAM and 32 MB non volatile Flash Secure Digital Card SD Dolphin 9500 Series terminals contain one Secure Digital SD memory interface for additional application and data storage You can order memory upgrades of 64 MB 128 MB and 256 MB Each terminal contains an access...

Page 34: ...nt panel on Dolphin 9500 Series terminals DOL PHIN 9500 SCAN ESC TAB SFT A B C E F G I J K M N O S R Q U V W Y Z D H L P T X NUM ENT 1 2 3 7 8 9 4 5 6 F1 F2 F3 F4 F5 F6 F7 F8 START INS BKSP DEL CTRL ALT SEND END POWER VOL PG VOL PG 0 SP Decode LED Scan LED Display Navigation keys SCAN key Keyboard Magnesium top cover ...

Page 35: ...ssed Monochrome units contain an additional contrast setting to enhance readability For more information about the Backlight see Adjusting the Backlight on page 4 15 SCAN Key The SCAN key is centrally located for easy access with the right or left hand When pressed the SCAN key activates the scanner imager The SCAN key also functions as an on or system wakeup control for the terminal Navigation Ke...

Page 36: ...d the Dolphin 9550 are different each is featured in its own section Dolphin 9500 The following graphic describes features on the back panel of the Dolphin 9500 terminal Battery Well underneath the battery Battery Image Engine Window Stylus in slot Speaker Microphone Fastener for the Stylus Tether Hand Strap Attachment ...

Page 37: ...MP3 files as well as handset voice operation with a GSM GPRS equipped terminal For more information about handset use see Audio Modes on page 9 13 Hand Strap Attachment The Dolphin 9500 has an adjustable elastic hand strap to provide a comfortable secure grip on the terminal It is attached to the terminal with a clip on the bottom panel see Hand Strap Clip on page 3 9 If desired the strap may be a...

Page 38: ...his is the front view of the window For more information see Image Engine Window on page 3 5 Scan Trigger The scan trigger provides comfortable scan activation for scan intensive applications Pistol Grip Handle The comfortable ergonomic handle is integrated into the back panel to enhance the terminals durability in rugged real world settings the handle cannot be removed from the terminal Designed ...

Page 39: ...hin 9550 in a nose down position resting on its rubber bumpers Stylus The stylus is used to operate the touch screen display The Dolphin 9550 stores the stylus inside the pistol grip handle Dolphin 9501 and Dolphin 9551 See Dolphin 9551 and Dolphin 9501 on page 11 1 Rubber Bumpers Stylus inside the handle ...

Page 40: ...rticle intrusion and provides secure storage for read write data However the user can open the access door manually to gain access to the SD You can custom configure the terminal with SD memory of 64MB 128MB or 256MB The SD memory interface does not support SDIO Audio Jack Dolphin 9500 Series terminals contain a 2 5mm audio jack supports both speaker stereo and microphone mono headsets The microph...

Page 41: ...or USB For RS 232 the maximum communication speed is 115 Kbps with seven baud rate settings For USB the communication speed is up to 12 Mbps If the peripheral unit is connected to a PC this connector also transmits data Powering Out The mechanical connector also provides power out to peripheral devices 5V at 500mA This means that with the proper HHP cable the terminal can power another device By d...

Page 42: ...e auxiliary battery well of the HomeBase see page 12 7 Charging Time The Li ion battery pack requires four hours to charge completely Internal Backup Battery Located inside the terminal the backup battery is a 3 6 Volt nickel metal hydride NiMH battery Purpose The internal backup battery prevents the terminal from being reset if you need to remove and replace the main battery pack It retains RAM d...

Page 43: ...oes not wake the Dolphin terminal you must replace the discharged battery with a fully charged battery Default Critical and Low Battery Points Dolphin 9500 Series terminals are programmed to display warnings when the battery reaches critical and low battery points There are two DWORD value registry entries HKEY_LOCAL_MACHINE System CurrentControlSet Control Power that allow these warning points to...

Page 44: ... for Battery Use and Disposal The following are general guidelines for the safe use and disposal of batteries Use only the battery supplied recommended or approved by HHP Replace defective batteries immediately using a defective battery could damage the Dolphin terminal Never throw a used battery in the trash It contains heavy metals and should be recycled according to local guidelines Don t short...

Page 45: ...Supported on page 2 5 Composite Codes See Bar Code Symbologies Supported on page 2 5 OCR Fonts See Bar Code Symbologies Supported on page 2 5 Three Keyboard Options 35 key numeric shifted alpha 43 key alpha shifted numeric and 56 key full alpha numeric See Using the Keyboards on page 4 9 Data Outputs Display See Display on page 3 3 I O Ports Custom industrial grade mechanical connector supports US...

Page 46: ...e field Other Integrated stylus with optional tether and adjustable removable hand strap Peripherals Accessories Dolphin HomeBase Charging communications cradle with auxiliary battery well Data transfer via RS 232 serial or USB ports Dolphin Mobile Base Mobile charging communication cradle Data transfer via RS 232 serial Power out 5 volts for peripheral devices Dolphin QuadCharger Four slot batter...

Page 47: ...pecially when used with applications that require high volume interfacing with the touch screen Screen protectors help prevent damage to the touch screen display and are easily installed Screen protectors can be purchased at any major computer retail store or directly from HHP For touch screen input use the included stylus or your finger The method you choose depends on which one is appropriate fo...

Page 48: ...first time you see the Today screen You can also display it by tapping Start and then Today On the Today screen you can see at a glance important information for the day Tap to adjust the volume Your email messages Tap to open to change owner information Tap to change the date and time Your active tasks ...

Page 49: ...d bar at the bottom of the screen to perform tasks in programs The command bar includes menu names buttons and the Input Panel button To create a new item in the current program tap New To see the name of a button tap and hold the stylus on the button Drag the stylus off the button so that the command is not carried out Tap to see to customize your terminal Tap to open a program you have recently ...

Page 50: ...ete a contact make a copy of a contact or send an e mail message to a contact The actions in the pop up menus vary from program to program To access a pop up menu tap and hold the stylus on the item name of the action you want to perform the action When the menu appears lift the stylus and tap the action you want to perform Or tap anywhere outside the menu to close the menu without performing an a...

Page 51: ...ams The Programs screen displays the programs that are not listed on the Start menu To open a program tap once on the icon Note Some programs have abbreviated labels underneath the icon To see the full spelling of an abbreviated label tap and hold the stylus on the label Drag the stylus off the label so that the command is not carried out ...

Page 52: ... aiming beam should be centered horizontally across the bar code ALD ALD provides fast reading of linear and stacked linear bar codes To achieve a positive read when reading linear 1D and PDF417 bar codes the green aiming beam should be centered horizontally across the bar code When ALD is enabled the reader does not read matrix or postal codes To Decode a Bar Code 1 Point the Dolphin terminal dir...

Page 53: ... from the code Symbologies with smaller bars or elements mil size should be read closer to the unit Symbologies with larger bars or elements mil size should be read farther from the unit The following chart displays the imager s aiming positions Note The Dolphin 9551 can read only 1D linear bar codes and does not support omni directional scanning Linear bar code 2D Matrix symbol ...

Page 54: ...ze are determined by the data compression method used by the software application used to take images The average size of the image file is approximately 4 8K However the size of the image depends on the content of the image the more complex the content the larger the file size Note For the highest quality take grayscale images Taking an Image The following steps are basic guidelines for taking im...

Page 55: ...for both right and left hand operation The silver background of both the keys and the overlay enhances the readability of each The overlay of each keyboard is color coded to indicate the functions performed or characters typed when the color coded key is pressed immediately after the Red or Blue Modifier key at the bottom of the keyboard In addition to the alpha and numeric keys each keyboard cont...

Page 56: ... backspace is a shifted function press Red SP to backspace To delete a single character press Red SP To delete multiple characters press Red SP and hold the SP key Delete DEL This key appears on both the 35 and 56 keyboard The Delete key deletes the next character forward each time the key is pressed On the 43 key keyboard delete is a shifted function press Red the Backlight key to delete Enter EN...

Page 57: ...gle Caps Lock on and off by double tapping it or by pressing SFT the Red modifier key When Caps Lock is toggled on characters are uppercase when toggled off characters are lowercase CTRL and ALT Functions of the ALT and CTRL keys depend on the software application in use and the keys pressed in combination with each Blue and Red The blue and red keys are used in combination with other keys to type...

Page 58: ... you type letters with the number keys On the overlay there are alpha lock indicators above specific number keys that specify the letter that will be typed when you press that key in alpha mode Please note that when typing in alpha mode you must use the same multi press method you would use when typing letters on a phone keypad Each key press will type the next letter in the sequence as displayed ...

Page 59: ...o toggle between the alpha and numeric modes Alpha mode is when you type letters with the letter keys Numeric mode is when you type numbers with the letter keys The numbers on the overlay above specific letter keys indicate what number will be typed when you press that key in Numeric mode Backlight key use with SFT to delete SCAN key Space key use with SFT to backspace CTRL Blue Red ALT Modifier k...

Page 60: ...Y Key Combinations There are keyboard combinations for specific functions and special characters on each keyboard For charts of the key combinations associated with each keyboard layout see Appendix A Keyboard Combinations on page A 1 Shift key Navigation keys SCAN key Power key Backspace key Space key Delete key Backlight key Insert key CTRL Blue Red ALT Modifier keys Enter key Tab key Escape key...

Page 61: ...ab are the same Go to Start Settings System tab Backlight Backlight settings open displaying the Battery tab The graphic on the right displays the default backlight settings for color display terminals on battery power From the Turn off backlight drop down list select how many minutes you want to elapse before the backlight automatically turns off Select the Turn on backlight option if you want th...

Page 62: ...djust the contrast using the keyboard or system settings Using the Keyboard Press and hold the Red Modifier key ESC to decrease the contrast Red Modifier key TAB to increase the contrast Using the System Settings Tap Start Settings System tab Contrast The current settings are displayed Use the slider to adjust the contrast to the desired setting Tap OK to save adjustments All three keyboards have ...

Page 63: ...nce spread spectrum wireless local area network WLAN radio For more information see Wireless LAN Communications with 802 11b on page 7 1 Bluetooth Radio Dolphin 9500 Series terminals may be equipped with a Bluetooth wireless personal area network WPAN radio For more information see Wireless PAN Communications with Bluetooth on page 8 1 GSM GPRS Radio Dolphin 9500 Series terminals may be equipped w...

Page 64: ...er is powered up automatically after initialization is complete In general when more than one radio installs the terminal powers up the 802 11b radio However if a GSM radio is installed the terminal powers up the GSM radio The Radio Manager The Radio Manager is a control panel applet through which the radio power driver controls the radio state It enables you to choose which radios on the terminal...

Page 65: ...er powers down the Bluetooth radio first then powers up the 802 11b radio If an error occurs during this process the radio mode change is abandoned The resulting radio state is the status of the radios at the time the error occurred Radio Modes The Radio Modes section displays the radio hardware modules currently installed on the terminal For example if a working Bluetooth module is installed the ...

Page 66: ...ing and displays it above the input panel When you tap the displayed word it is inserted into your text at the insertion point The more you use your Dolphin terminal the more words it learns to anticipate To change word suggestion options such as the number of words suggested at one time tap Start Settings Personal tab Input Word Completion tab Using the SIP Keyboard 1 Tap the arrow next to the In...

Page 67: ...nizer you can input character strokes using the stylus 1 Tap the arrow next to the Input Panel button and then Block Recognizer 2 Write a letter in the box When you write a letter it is converted to typed text that appears on the screen For specific instructions on using Block Recognizer with Block Recognizer open tap the question mark next to the writing area Selecting Text To edit or format type...

Page 68: ...Guide Input Panel Options You can set input options by going to Start Settings Personal tab Input The following graphics are the tab windows where you can customize the input panel to your preferences Input Method tab Word Completion tab Options tab ...

Page 69: ... that program to find out how to switch to writing mode To Select Writing If you want to edit or format writing you must select it first 1 Tap and hold the stylus next to the text you want to select until the insertion point appears 2 Without lifting drag the stylus across the text you want to select If you accidentally write on the screen tap Tools then Undo and try again You can also select text...

Page 70: ...ized while writing cannot Note You may want to change the zoom level so that you can more easily work on or view your drawing Tap Tools and then a zoom level Selecting a Drawing To edit or format a drawing tap and hold the stylus on the drawing until the selection handle appears To select multiple drawings deselect the Pen button and then drag to select the drawings you want You can cut copy and p...

Page 71: ... an alarm in Clock you ll be notified in any of the following ways A message box appears on the screen A sound which you can specify is played To choose reminder types and sounds tap Start Settings Personal tab Sounds Notifications see Personal Tab on page 5 2 The options you choose here apply throughout the terminal Status Icon Meaning Turns all sounds on and off Backup battery is low Main batter...

Page 72: ...d select a data type and then tap Go to start the search To quickly find information that is taking up storage space select Larger than 64 KB in Type You can also use the File Explorer to find files and organize these files into folders On the Start menu tap Programs and then File Explorer You can move files in File Explorer by tapping and holding the item you want to move and then tapping Cut or ...

Page 73: ...screen opens Settings consists of three tabs Personal System and Connections Tab This tab enables you to Personal Customize buttons set SIP options and adjust headset settings see Personal Tab on page 5 2 System Adjust system settings see System Tab on page 5 6 Connections Establish network connections settings see Connections Tab on page 5 18 Personal Tab System Tab Connections Tab ...

Page 74: ...ee Headset Control on page 5 5 Input Customize the SIP For details see Input Panel Options on page 4 22 Menus Customize what appears on the Start and New menus see Modifying the Start Menu on page 5 3 Owner Information Enter your contact information Password Password protect the terminal to limit access to your device Sounds Notifications Set the sound volume enable and disable sounds for specific...

Page 75: ...pears on the Start menu Note You can also remove shortcuts from the Start menu by de selecting them here and tapping OK Using File Explorer You can use File Explorer to place a shortcut to a program on the Start menu Note We recommend that you Copy and Paste Shortcut so that you do not alter your program configurations by accident If you Cut and Paste the program you will be removing the program f...

Page 76: ...can use the Explore feature of ActiveSync on your desktop computer to navigate through the files on your Dolphin terminal The process is essentially the same except that you are using Windows Explorer utility to create and paste shortcut 1 Go to ActiveSync Explore 2 Navigate to the program 3 Right click on the program and select Create Shortcut 4 Select the shortcut right click and select Cut 5 Na...

Page 77: ...ly have one earpiece for mono audio Tap OK to save your selection Mic Volume These options enable you to adjust the audio level of the microphone Normal is the default setting If this is too loud for the listener you can change the setting to Low These settings apply to the selected Headset Type When you select Stereo headphone the volume on the terminal s microphone Microphone page 3 2 adjusts Wh...

Page 78: ...o access the System tab go to Start Settings System tab Tap the appropriate icon to open that system setting About The About system setting displays specific information about what is loaded on the terminal It contains three tabs Version Device ID and Copyrights Version tab Displays the information about the software operating system and processor of the terminal ...

Page 79: ...arType is a Microsoft technology that increases the readability of text on LCD displays After you enable ClearType font rendering in the Screen setting Screen page 5 17 you can adjust the render level Use the slider to adjust the appearance of the sample type on the screen and tap OK For more information about ClearType font rendering visit www microsoft com typography cleartype what htm fname 20 ...

Page 80: ...program data Field Description Total main memory Total RAM memory Storage RAM memory being used for storing programs and program data Program RAM memory being used to run programs Fields Under Storage and Program Allocated Displays the current amount of RAM memory allocated for Storage vs Program use In use Displays the current amount of RAM memory being used by Storage vs Program memory functions...

Page 81: ...ple are stored in IPSM so that they are always installed at cold boot startup When IPSM is selected in the drop down list the Storage Card tab displays the IPSM memory capacity and usage statistics Storage Card You can install additional memory in Dolphin terminals see SD Memory on page 3 8 If a storage card is installed in the terminal Storage Card appears in the drop down list Select Storage Car...

Page 82: ...running programs Anytime you stop a running program it frees up RAM memory Be advised that when you stop a program here any unsaved data in that program is lost To free up memory without risking data loss return to the running program save your data and close the application Links at the Bottom of the Memory Tabs At the bottom of all three Memory tabs are two links Remove programs Opens the Remove...

Page 83: ...v c 5 11 Power Power system settings contains three tabs Battery Wireless and Advanced Tab This tab enables you to Battery Tab Check the remaining charge of both the main and backup batteries For more information about the terminal s batteries see Batteries on page 3 10 ...

Page 84: ...on Select Wireless signals off when you don t want to use system power to power up the radio s Select Wireless signals on when you want the radio to use system power to transmit This is the default setting The list contains the radio firmware installed in the terminal The selected items are the items using system power Tab This tab enables you to ...

Page 85: ...activity you want to pass before the terminal powers off when running on battery power For On external power select from the drop down list the number of minutes of inactivity you want to pass before the terminal powers off when running on external power Options below the tabs Adjust backlight opens the Backlight settings so that you can make adjustments to conserve power usage see Backlight on pa...

Page 86: ...Specifically you can customize numbers number of decimal places allowed for example currency using the or symbol for example time and date These specifications apply to all screens including the Today screen The Region tab displays an overview of the region selected in the drop down list at the top The terminal is loaded with a number of pre programmed regional settings Select one from the list ...

Page 87: ...ve programs installed on the terminal Use this setting to troubleshoot when you receive messages that the device is out of memory The programs removed are removed from RAM memory Any program usually cab or dll files stored in the Autoinstall folder My Device IPSM Autoinstall will re install after the next hard reset For information about the Autoinstall process see Let Autoinstall Run on page 2 10...

Page 88: ...rogram you want to remove 2 Tap Remove The following message appears 3 Tap Yes Wait while the program is removed 4 Verify that the program no longer appears in the list Memory For more detailed memory information tap memory of Adjust memory allocation The Memory system setting opens For information about memory settings see Memory on page 5 8 ...

Page 89: ...arType Select Enable ClearType to enable ClearType font rendering You will need to perform a soft reset for the change to take effect After ClearType font rendering is enabled you can adjust the render level in the ClearType Tuner setting For more information see ClearType Tuner on page 5 7 Input Options Tapping input opens the input panel settings see Input Panel Options on page 4 22 uPhone Setti...

Page 90: ...d on the terminal Tapping the icon enables you to disable or enable the IrDA port For details see Verify That the IrDA Port is Enabled on page 6 6 uPhone GPRS This icon appears only if a GSM GPRS radio is installed on the terminal Tapping the icon opens GPRS settings For details see GPRS Settings on page 9 27 Server Assigned IP Addresses Please note that all server assigned IP addresses use Dynami...

Page 91: ...The connection manager opens displaying the Tasks tab The connections manager consists of two tabs Tasks and Advanced Task tab The Task tab enables you to configure and manage your My Work Network settings Click on the link to setup or manage existing network accounts Advanced tab The Advanced tab enables you to configure and manage network parameters and network cards ...

Page 92: ...r name password and TCP IP settings 2 Use a NULL modem cable to connect to an external modem 3 Tap Start Settings Connections tab Connections Task tab 4 Tap Add a new modem connection The Make New Connection screen appears 5 Enter a name for the connection such as My Connection 6 In the Select a modem list select the external modem by selecting Hayes Compatible on COM1 7 Tap Next The My Connection...

Page 93: ...ication information your ISP requests 10 You should not need to change any settings in Advanced because most ISPs now use a dynamically assigned addresses See Advanced Settings on page 5 21 11 Tap Finish to complete this wizard Advanced Settings General Tab Use the General tab to change the connection speed of your connection Wait for dial tone before dialing then wait for credit card add dial str...

Page 94: ...de Preliminary Draft Rev c Port Settings Tab The Port Settings tab has options that should be left alone unless indicated otherwise by your ISP TCP IP Tab If your ISP does not use a dynamically assigned address enter that information into the TCP IP tab ...

Page 95: ... enter it into the Servers tab Connecting to Your ISP 1 Tap Start Settings Connections tab Connections to open the connections manager 2 Tap Manage existing connections 3 Tap and hold on the applicable dial up settings and select Connect You can delete the connection by selecting Delete 4 Your modem will dial out and attempt to create the connection ...

Page 96: ...RLs for example intranet companyname com If you attempt to connect to one of these URLs Pocket Internet Explorer will search for the website on the Internet rather than the company s intranet To connect to such intranet URLs they need to be entered as Work URL exceptions in the connections manager 1 Go to Start Settings Connections tab Connections Advanced tab see page 5 19 2 Tap Select Networks 3...

Page 97: ...ronization from your PC If these settings are not on your PC or need to be changed ask your ISP or network administrator for the proxy sever name server type port type of Socks protocol used and your user name and password 1 Go to Start Settings Connections tab Connections 2 Under the My Work Network heading tap Set up my proxy server 3 Select This network connects to the Internet and This network...

Page 98: ...ser s Guide Preliminary Draft Rev c Tap Advanced for advanced settings This information can be provided only by your network administrator 5 To change existing settings under My Work Network tap Manage existing connections and tap the Proxy tab ...

Page 99: ...et Ask your network administrator for your user name password domain name TCP IP settings and host name or IP address of the VPN server 1 Go to Start Settings Connections tab Connections 2 Under the My Work Network heading tap Add a new VPN server connection 3 Enter the requested information including VPN type and tap Next 4 Indicate whether a pre installed certificate should be used or rather a p...

Page 100: ...ls If finished tap Finish to complete VPN setup 6 Otherwise tap Advanced to access more options Enter TCP IP settings in the first tab server assigned IP addresses use DHCP Enter Server DNS WINS information in the Servers tab Connecting to a VPN Server 1 Go to Start Settings Connections tab Connections ...

Page 101: ...v c 5 29 2 Select Edit my VPN servers 3 Tap and hold on the server then select Connect on the popup menu Note that through this screen you can delete your VPN server connection 1 Your VPN Server is accessed When connected tapping on the icon displays the following bubble ...

Page 102: ...ons Advanced tab see page 5 19 2 Tap Select Location 3 Select Use dialing rules By default two dialing rules profiles exist Home and Work 4 Tap Edit to configure either profile You can define your own dialing profile by tapping New A warning appears that your existing modem connections must include the correct country and region area code settings ...

Page 103: ...er the appropriate information on the next screen 6 Tap Dialing Patterns to change how dialing occurs 7 Following the format of e represents country code f represents area code and g represents the number enter how local long distance and international calls should be dialed Tap OK to save your changes ...

Page 104: ...e network cards installed on your terminal tap Start Settings Connections Advanced tab see page 5 19 Network Card Tap on an adapter to review its settings Server assigned IP addresses use DHCP If you make any changes on these tabs you must tap OK to save the changes then perform a soft reset to update the registry ...

Page 105: ...hanges For details about performing a soft reset see Soft Reset Warm Boot on page 2 12 During the soft reset the new registry entries created by the changes can be read by the applications that need them Do NOT perform a hard reset see Hard Reset Cold Boot on page 2 12 after modifying an adapter here Hard resets return the terminal to factory defaults ...

Page 106: ...5 34 Dolphin 9500 Series Mobile Computer User s Guide Preliminary Draft Rev c ...

Page 107: ... Help Inbox or Connections For more information go to the Windows Mobile software website at www microsoft com windowsmobile products pocketpc Installing Additional Software In addition to the default programs installed on your terminal when it is first booted up you can install any program created for a Windows Mobile device as long as the terminal has enough memory to store the program and the p...

Page 108: ...Sync on your desktop computer insert the Microsoft Companion CD into the CD ROM drive of your desktop computer Click the yellow arrow then Start Here and follow the directions on your screen When communicating via ActiveSync your terminal must be connected to the host PC with a peripheral device sold manufactured by HHP such as the Dolphin HomeBase Dolphin Mobile Base Dolphin Net Base Dolphin Mobi...

Page 109: ...gins Note If you have a wireless LAN card you can synchronize remotely After the first synchronization when using Dolphin peripherals such as the HomeBase or Mobile Base synchronization begins automatically whenever a terminal is properly seated in the terminal well For more information see Dolphin 9500 Series HomeBase on page 12 1 or Dolphin 9500 Series Mobile Base on page 13 1 Tap to connect and...

Page 110: ...verify your processor by tapping Start Settings System tab About Version tab Make a note of the information in the Processor field Depending on the application the software must be stored or installed on the host PC 1 Download the program to your desktop computer from either the Internet or the CD or disk that contains the program You may see a single exe or setup exe file a cab file or dll There ...

Page 111: ...ion open ActiveSync and click Explore 2 Navigate to the My Pocket PC folder and copy the program file or files to the Program Files folder on the terminal If you want the program to be part of the Autoinstall that occurs after every hard reset place the program file in the Autoinstall folder My Pocket PC IPSM Autoinstall 3 Depending on the program you may need to open File Explorer on the terminal...

Page 112: ...By default the IrDA port is assigned to Com port 6 and is enabled When a Bluetooth radio is installed the IrDA port can be disabled to free up a Com port for Bluetooth devices To verify that the IrDA port is enabled tap Start Settings Connections tab IrDA If Enable IrDA ports is selected then the IrDA port is active Note The IrDA icon appears on the Connections tab only if there is a Bluetooth rad...

Page 113: ...6 7 Verify That Beam Settings Are Set to Receive The Beam Settings must be set to receive for the terminal to receive data from other infrared devices To verify tap Start Settings Connections tab Beam The Beam Settings window should appear as follows ...

Page 114: ... 115 Kbps Sending 1 Align the IrDA ports 2 Open the program where you created the item you want to send and locate the item in the list You can also beam files but not folders from File Explorer 3 Tap and hold the item A pop up menu appears 4 Select Beam File The information begins transmitting to the other device Receiving 1 Align the IrDA ports 2 Have the owner of the other device send the infor...

Page 115: ...the Beam Settings are not set to receive or you ve aligned two IrDA ports and the terminal is still not receiving go to Start Programs Infrared Receive The terminal searches for the sending device If the terminal cannot find the sending device the following message appears ...

Page 116: ...processor by tapping Start Settings System tab About Version tab Make a note of the information in the Processor field 1 Determine your device and processor type so that you know which version of the software to install Go to Start Settings System tab About On the Version tab make a note of the information in the Processor field 2 Download the program to your device straight from the Internet usin...

Page 117: ...ard adapters and other wireless portable terminals Powering Up the 802 11b Radio Driver The radio driver for 802 11b is installed when the Dolphin terminal is first initialized The 802 11b radio must be powered up before you can configure it For more information see Powering Up Radios on page 4 9 Configuration Utilities There are two configuration utilities for the 802 11b radio 802 11b Settings a...

Page 118: ...ty consists of four tabs Status Config Advanced and About Each tab is described in its own section in this chapter Icons This configuration utility contains icons that indicate the status of the network Icon This icon means Excellent signal strength Excellent connection Poor signal strength Poor connection Radio disabled No radio connection Access Point AP Mode Peer Station Peer to Peer Mode WEP e...

Page 119: ...n process to search for an AP with a stronger signal in the network Link Quality Displays the signal to noise ratio Strength Displays the signal strength of the receiver IP Address Displays the IP address of the radio Verify configuration information with your network administrator Renew IP Tap this button to reapply IP the address from the DHCP server when automatic DHCP is enabled State Displays...

Page 120: ...as shown in the following screen Ping Tap this button to open the Ping Utility Field Description IP Address Displays the current IP address You can enter another IP address to ping it Size Bytes Displays the current size in bytes 32 is the default You can select up to 8192 bytes in the drop down list Field Description ...

Page 121: ...and configure APs Timeout ms Displays the current timeout 500 is the default Increase or decrease it by tapping the up and down arrow buttons Clear Tap this button to clear IP Address input and the ping statistics field Ping Tap this button to ping the IP address entered in the input field Ping Statistics This section lists the pinging IP address and the pinging results Icon Name Description New T...

Page 122: ...e list to be edited 1 Select an SSID in the Active SSID list and tap Add If the SSID has the WEP Key turned on the Settings window displays and prompts you to enter the WEP Method Encryption Key and Key ID 2 Now you need to configure its profile 3 In the Preferred Profile list select the SSID and tap Edit see To Create a New Profile on page 7 7 4 When configuration is complete tap OK The SSID and ...

Page 123: ...io stations cards without an access point Access Point AP This mode is also called Infrastructure mode Chan Scroll to select a channel for communication AP Search Threshold Select Low Density default Medium Density or High Density from the drop down list and tap OK AP search thresholds are used for wireless client roaming between APs In general the higher the density selected here the easier your ...

Page 124: ... should match the AP s setting for Shared Method The options in this drop down list determine what characters can be used to create the WEP encryption key Select one of the following five Disabled WEP Key is off 64 bit HEX You can use up to 10 characters in Hexadecimal in the Encryption Key field 64 bit ASCII You can use up to 5 characters in ASCII in the Encryption Key field 128 bit HEX You can u...

Page 125: ...ation then select the 802 1X security standard PEAP or TLS from the drop down list Properties Tap the Properties button to choose the certificate that applies Accessing 802 1x networks require personal certificates for authentication Please note that 802 11b Settings does not support authentication therefore these fields are not active If you are using authentication in your wireless 802 11b conne...

Page 126: ...and Best Battery Life The setting here modulates Power Save Mode to achieve maximum performance and maximum battery life Preamble Mode A preamble consists of a Synchronization Sync field and a 16 bit Start Frame Delimiter SFD field Long TX Preamble Where Sync field consists of 128 bits Short TX Preamble Where Sync field consists of 56 bits Auto TX Preamble Automatically changes between long and sh...

Page 127: ...Dolphin 9500 Series Mobile Computer User s Guide 7 11 About Tab This window provides Version Number and time of build for Network Driver Configuration Utility and NIC Firmware ...

Page 128: ...off and the Status icon will change color from green to red on the top without signal strength displayed The WLAN card module will stop functioning Remove Status Icon Removes the Status Icon from the bottom tray A pop up window asks you to confirm Click Yes to confirm or No to cancel If confirmed the Status icon does not display in the task tray and you will need to go to Start Programs 802 11b Se...

Page 129: ...The appropriate version of the AEGIS Client software package for your operating system Contact HHP for the correct version for your company Platforms Supported There are several versions of AEGIS Client software for computers using a wide variety of operating systems Specific capabilities of a particular version of AEGIS Client may vary according to the operating system This is due to varying leve...

Page 130: ...ware supports the following EAP authentication methods MD5 LEAP TLS SmartCard TTLS PEAP There is a worksheet for each method Complete the worksheet for the method you choose MD5 Worksheet To configure AEGIS Client to use MD5 authentication you need to know 1 Will you use your Windows user name and password for network authentication Applies only to Windows clients 2 If not what is your unique user...

Page 131: ...tor 2 Should the AEGIS Client validate the server certificate chain ____ No Skip Questions 3 4 ____ Yes 3 Will the server accept any trusted Certificate Authority CA or is a particular CA required ____ Any trusted CA is acceptable ____ A particular CA is required ________________________ 4 Are intermediate certificates allowed ____ No ____ Yes 5 What is the name of the server _____________________...

Page 132: ...nd password for the tunnel authentication User name _______________________________________ Password ________________________________________ 5 What is the tunnel authentication protocol ____ CHAP Challenge Handshake Authentication Protocol ____ MS CHAP Microsoft CHAP Extensions ____ MS CHAP v2 Microsoft CHAP Extensions v 2 ____ PAP ____ EAP MD5 6 Is a server certificate is required ____ No ____ Y...

Page 133: ...inistrator 4 What is the user name identity and password for the tunnel authentication User name _______________________________________ Password ________________________________________ 5 What is the tunnel authentication protocol ____ MS CHAP v2 Microsoft CHAP Extensions v 2 ____ EAP TLS SmartCard ____ Generic Token Card 6 Is a server certificate is required ____ No ____ Yes 7 Should the Aegis C...

Page 134: ...olor icon indicates that Green Authentication succeeded Yellow Authentication is in process Red Authentication failed If there is no yellow red or green in the icon then either the ports are not being controlled by 802 1X or there is no authentication activity on the controlled ports The absence of yellow red or green may also indicate that the network access server is not an 802 1X aware device G...

Page 135: ...e left of each port listed The color of this icon indicates the status of the port The color of the icon changes as the port starts authentication negotiates with the access point and or authentication server and then joins the network As the network interface starts or stops the color of the port icon and the status field in the Interface List updates to reflect the current state of the interface...

Page 136: ...art If the port is already active tap Stop first then Start to force the program to read the new configuration file Restart Same as a Stop followed by Start Tap this when you receive a notice such as the following Configure Opens the Configuration screen displaying the User tab Install Protocol Selecting this option binds the 802 1X protocol to the WLAN adapter currently installed on the device Th...

Page 137: ...s control the number of columns displayed in the main menu Menu Item Tapping this item Standard View Displays the Port adapter name and State columns This is the default view Advanced View Displays the Port adapter name State Primary Wireless Network Wireless Network and MAC Address of AP columns Scroll right to see all columns ...

Page 138: ...sted sequentially with a time stamp and a text message Tap Refresh to retrieve the most current information and display it in the log immediately Tap Close to return to the main screen For more information about logging INSERT CROSS X Help Menu Tapping Help opens the help menu Select Online Help to access online help Select About to review software version information ...

Page 139: ...bar is displayed at the bottom of the main screen and indicates the connection status between the network card and the access point The status bar displays one of the following depending on the status of connectivity Not Associated AP Name of the SSID MAC MAC address Status Bar ...

Page 140: ...n the port The port should be enabled before the protocol is started Enabling a port is not the same as starting it see Client Menu on page 7 20 however both actions are required for the Client to work Configure Opens the port configuration screen For details CROSS X TO PORT SETTINGS SECTION Delete Removes an adapter from the port list An unused port may be deleted from the port list The radio car...

Page 141: ... and is accessed from the Client menu in the command bar 2 Port Settings area enables you to configure Network Properties settings for individual wireless networks and is accessed from the Port menu Configuration Screens Both Client Configuration and Port Settings areas lead you through a series of setup screens The following diagram displays the different screens and how they are related ...

Page 142: ...if not relevant to the selected protocol Accessing the Client Configuration Area On the main screen tap Client Configure see Client Menu on page 7 20 The Client Configuration screen opens displaying the User tab On this tab You User Settings Tab Configure authentication credentials and profiles System Settings Tab Set the level of detail that the Client will provide in the system log and zero conf...

Page 143: ...k to another The drop down list contains existing authentication credential profiles Select a profile from the list to edit it in the fields that follow Tapping Add permits new profiles to be added to the list A screen appears where you can enter a name for the new profile Enter a Profile name and tap OK The name entered appears in the Profile drop down list Tapping Delete deletes authentication p...

Page 144: ...e Authentication type If Use certificate is enabled the client certificate displayed in the field is the one that is passed to the server for verification To select a client certificate tap Change and select the certificate from the list that appears To appear in this list certificates must be installed in the system for a description of this process see Installing Certificates with CertAdd on pag...

Page 145: ...eld Description Log Level These settings control the detail of the log messages generated by the Client Each level is cumulative By default all errors warnings and information events are logged Each entry records a severity code of one debug message to four error asterisks a time stamp and a message Errors only the most severe conditions are logged Warnings less severe conditions are logged Inform...

Page 146: ...he 10 second default unless so advised by technical support Field Description Do not validate server certificate chain If this option is selected the server certificate received during the TLS TTLS PEAP message exchange is not validated Certificate issuer must be This is the certificate authority used during TLS TTLS PEAP message exchange Any Trusted CA is the default selection and means that any ...

Page 147: ...will be compared to the server certificate s Subject CN field Must match exactly When selected the server name entered must match the server name found on the certificate exactly Must contain domain name When selected the server name field identifies a domain and the certificate must have a server name belonging to this domain or to one of its sub domains e g zeelans com where the server is bluebe...

Page 148: ...g the Port Settings Area 1 On the main screen tap and hold on a port The Port popup menu appears see Port Menu on page 7 24 2 Tap Configure The Port Settings Configuration screen opens displaying the Wireless Networks tab On this tab You Wireless Networks Tab Set the parameters for Network Access Points and underlying protocol Protocol Tab Configure common protocols that apply to any network the p...

Page 149: ...d edit the properties of existing configured networks Default When the Client is first installed there is a Configured Network named default in the list This profile has Associate with any network selected in its Properties selection screen If you are going to be in a location with only one access point or more than one access point that attaches to the same network the default profile may be suff...

Page 150: ...e the timer intervals and retry settings defined in the 802 1X standard They determine how long the supplicant state machine will wait in a given state These parameters shouldn t be modified without an understanding of the supplicant state machine For more information about the supplicant state machine obtain its 802 1X protocol specification The parameters are Authentication Timeout The period of...

Page 151: ...even if they are not displayed Renew IP address Select this option to initiate a DHCP request to obtain a dynamic IP address after a successful authentication but only if the client detects that the connected network the SSID has changed The result is that renewal should not occur upon re authentication but does occur at boot or when connecting to a different network If you have a slow authenticat...

Page 152: ...rt popup menu then tap Add in the Network Configurations section of the Wireless Networks tab The Network Profile screen opens displaying the Profile Info tab On this tab You Profile Info Enter basic profile information for your wireless connection WEP Mgmt Enter the WEP settings for your wireless connection see page 7 37 WPA Settings Enter the WPA settings for your wireless connection see page 7 ...

Page 153: ...re Peer to Peer Group ad hoc mode Select this option to have two or more client workstations communicate with each other without the benefit of an access point You should also select Do Active Scan and in the WEP Management page enable Use key for data encryption while entering a common key for both sides WPA is not supported in this mode Do active scan Select this option whenever the access point...

Page 154: ...ntication and you need to connect to the access point without username and password authentication The key entered below is used to authenticate instead Key In this field enter the WEP key ASCII 5 or 13 characters Hexadecimal 10 or 26 characters When the key entered is in the correct format the screen changes to display the type ASCII or Hexadecimal For example Key Index Transmit Key The Key Index...

Page 155: ... bottom of the screen is used to update the log file while you are reading it If the file gets too large old entries are automatically deleted Field Description WPA Mode This drop down list contains the following options Disabled Do not enable WPA mode This is the default selection WPA 802 1x Enable WPA and obtain key information through the 802 1x protocol WPA PSK Enable WPA with Pre Shared Key P...

Page 156: ... to start with a blank file exit from the Client so the icon no longer appears at the lower right of the screen and delete the log file log8021x in File Explorer see Finding and Organizing Information on page 4 16 When you restart the Client a new log file is created ...

Page 157: ...ted when the configuration is saved However on some systems there may not be a certificate If that is the case you can use the section below as a primer on OS X certificate management About CertAdd CertAdd is a stand alone utility included with the Client that allows certificates to be selected and installed on a Windows Mobile device Installing Certificates with CertAdd Client or Certificate Auth...

Page 158: ...rofile s information 2 Verify that you have configured the identity and password into the correct fields on the User tab page 7 37 in the authentication profile If you are using PEAP or TTLS the username and password are entered in the Tunneled authentication section My Access Point does not broadcast its SSID Even though I have manually configured an access point with that name the Client won t a...

Page 159: ...s point On the Wireless Networks tab add a new profile to the Configured Network list On the Profile Info tab give each side the same network name SSID Select Peer to Peer Group ad hoc mode and Do active scan On the WEP management section select Use key for data encryption and enter an identical key for both clients Verify that this network profile is the first or only one in the Configured Networ...

Page 160: ... is serving If a Client has been authenticated its control port status is said to be Authorized and the Client can send application data to the LAN through the AP Otherwise the control port status is said to be Unauthorized and application data cannot traverse the AP Typical Message Exchange Using MD5 or TLS The above graphic displays the typical message exchange when the device and the AP support...

Page 161: ...S server may optionally request authentication of the client s certificate but by default the client verifies only the server s certificate The TLS handshake is negotiated between the client and the TTLS server Following the TLS handshake Phase 2 may proceed using a secure channel tunnel provided by the TLS record layer The secure tunnel is then used to exchange information for the negotiation of ...

Page 162: ...shared key is generated each time a station associates itself with an access point TLS has proven itself an excellent authentication and encryption protocol in commercial environments The Client also supports the MD5 and TTLS security protocols Additional Advantages of TTLS and PEAP The Client provides the advantage of Tunneled TLS TTLS and PEAP support These protocols provide the security of TLS ...

Page 163: ...e PEAP supports only EAP compliant authentication protocols within the tunnel structure and is rapidly becoming the most widely supported of the EAP methods TTLS supports pre EAP authentication protocols within the tunnel structure and should be used in those circumstances when pre EAP interior protocols are desirable LEAP is a pre EAP Cisco proprietary protocol with many of the features of EAP pr...

Page 164: ...7 48 Dolphin 9500 Series Mobile Computer User s Guide ...

Page 165: ...is recommended for normal usage then this step is not necessary This step would be used to change the friendly name of your mobile computer 1 Tap the Bluetooth icon that appears in the task tray on the Today screen 2 In the pop up menu select Advanced Features then My Bluetooth Device If you installed OBEX the menu also lists Transfer via Bluetooth 3 In the My Bluetooth Device screen you can modif...

Page 166: ...n page 6 6 1 Tap on the Bluetooth icon on the Today screen Select Advanced Features then My Bluetooth Device Note If you installed OBEX the menu also lists Transfer via Bluetooth 2 The My Bluetooth Device screen appears Tap on the COM Ports tab 3 As needed view and or enable disable the Bluetooth COM port assignments Tap OK Note The Bluetooth Phone port cannot be disabled For more information abou...

Page 167: ...arby When prompted select the device type you seek 4 When the search is complete a screen reports the discovered Bluetooth devices Check the box next to any device you wish to save information about i e any devices you wish to connect to Tap Next 5 A service discovery phase begins 5 10 seconds per chosen device 6 In the next screen tap Finish Bond With Discovered Device s Follow these steps to bon...

Page 168: ...ylus on the Bluetooth device you want to bond with In the pop up menu select Bond 3 Alternatively after selecting a device tap on the Bond icon Or tap on Device then select Bond 4 The Bluetooth Device Bonding Wizard launches Follow the wizard to bond with your selected device ...

Page 169: ...sfully bonded with the other device tap Finish View Device Properties Follow these steps to view the properties of an already discovered device 1 If not open launch the Bluetooth Devices folder Tap on the Bluetooth icon on the Today screen Select Advanced Features then Bluetooth Devices 2 Select a device Tap on the Properties icon or tap on Device then select Properties Alternatively you can tap a...

Page 170: ...one Complete these steps 1 Tap on Tools and select My Favorites 2 Tap on the tab for the type of device you would like to set a favorite for If needed use the arrow buttons to scroll and find the tab you need Note Tabs appears only for COM ports you have enabled To enable a port refer to the Assign COM Ports section earlier in this chapter 3 To select a favorite device select Use the favorite sele...

Page 171: ...a Device From the Folder If you no longer plan to connect with it you can delete a device from the Bluetooth Devices folder 1 If not open launch the Bluetooth Devices folder 2 Tap and hold your stylus on the device you wish to delete In the pop up menu select Delete 3 Alternatively after selecting a device tap on the Delete icon Or tap on Device then select Delete 4 A Confirm screen appears Tap Ye...

Page 172: ...rplane 1 The Bluetooth icon should appear in the task tray on the Today screen Tap on the icon 2 In the pop up menu select Turn Transmitter OFF 3 The Bluetooth Card radio transmitter shuts off The Bluetooth icon in the task tray becomes gray as well as relevant menu options e g Get Connected 4 To turn the radio transmitter back on tap on the gray Bluetooth icon In the pop up menu select Turn Trans...

Page 173: ... When you tap Bluetooth ActiveSync your mobile computer automatically tries to connect to your favorite computer b The Connect To screen appears reporting that it is trying to connect to Wireless ActiveSync c After a successful connection is made the status screen reports Connected Now you are ready to synchronize files if desired SCENARIO 2 Your Bluetooth Devices folder contains no favorite deskt...

Page 174: ...h automatically begins Note You can also start the device search by tapping Find in the Bluetooth Devices screen b After the search is complete select the computer you wish to ActiveSync with and tap Select If the computer is not listed make sure the computer is discoverable and tap Refresh to search again c After you tap Select a service discovery phase begins d The Connect To screen appears repo...

Page 175: ...RIO 1 Your Bluetooth Devices folder contains no favorite access point a When you tap Bluetooth LAN Access a screen appears that allows you to choose which access point to connect to in your Bluetooth Devices folder Choose an access point from the list and tap Select Note If your access point is not listed tap Find and proceed as described in Scenario 3 b Your mobile computer tries to connect to th...

Page 176: ...to access your LAN for Internet access files etc SCENARIO 3 Your Bluetooth Devices folder has no access points a When you tap Bluetooth LAN Access the mobile computer automatically begins to search for new Bluetooth devices Note You can also start the device search by tapping Find in the Bluetooth Devices screen See Scenario 2 on page 8 9 b After the search is complete select the access point you ...

Page 177: ...Dolphin 9500 Series Mobile Computer User s Guide 8 13 e After a successful connection is made the screen reports Connected f Now you are ready to access your LAN for Internet access files etc ...

Page 178: ... last two operations receive contact or file and enable file sharing are server oriented They involve accepting objects in an exchange initiated by another Bluetooth device Exchange Business Cards 1 Make sure both Bluetooth devices have a business card assigned to them Note If each device does not have a business card assigned to it you cannot exchange business cards To assign a business card to y...

Page 179: ...evices Folder then it begins to search for Bluetooth devices nearby 5 Select the Bluetooth device you wish to exchange business cards with If the device is not listed tap Find 6 Your mobile computer begins to exchange business cards After the exchange the new business card should appear in your Contacts list Send a Contact 1 Make sure the other Bluetooth device is set up to receive a contact It mu...

Page 180: ...h to send the contact s to If the desired device is not listed tap Find 6 Your mobile computer processes and send the contact s Send a File 1 Make sure the other Bluetooth device is set up to receive a file It must support the OBEX Object Push server profile Refer to the documentation that came with the device for instructions Note If the other device is also using the Bluetooth Connection Kit you...

Page 181: ...vices in the Bluetooth Devices Folder then it begins to search for Bluetooth devices nearby 4 Select the Bluetooth device you wish to send a file If the desired device is not listed tap Find 5 In the next screen tap on the file you wish to send You can use the Folder and Type drop down menus to search for your file Also you can scroll horizontally to view the folder date size type and location of ...

Page 182: ... you are running the OBEX from Remote device refers to the Bluetooth device you are trying to transfer files with Prepare for File Transfer 1 Make sure the remote device has file sharing enabled It must support the OBEX File Transfer server profile Note If the other device is also using the Bluetooth Connection Kit you can enable file sharing by tapping the Bluetooth icon In the pop up menu tap Tr...

Page 183: ...g connection 6 After the devices successfully connect the Bluetooth File Explorer appears Half of the screen shows contents of the remote device while the other half shows contents of your device the local device The very bottom of the screen reports the connection status Send Receive File s or Folder s Single tap items to select them for transfer Double tap on a folders to open it and see its con...

Page 184: ...to remote icon or Get from remote icon as applicable The inappropriate icon should be gray 3 A screen reports the status of the transfer 4 After the transfer a copy of each selected item should appear in the other device Create a Folder 1 Tap on the File menu Select Remote device or Local device wherever you want to create a folder then tap Create remote folder or Create local folder as applicable...

Page 185: ...ed then tap Delete remote item s or Delete local item s as applicable 3 Tap and hold your stylus an item in either the remote or local device that you wish to put in a new folder In the pop up menu select Delete folder 4 In the Confirm screen tap Yes Refresh Remote View 1 Tap on the Device menu Select Refresh remote view 2 Your local device begins to read the contents of the remote device 3 After ...

Page 186: ...ects from the remote device Afterwards no contents are listed for the remote device Exit Bluetooth File Explorer To exit the Bluetooth File Explorer tap File Exit Receive Contact or File 1 Tap on the Bluetooth icon In the pop up menu tap Transfer via Bluetooth Receive Contact or File 2 The Receive Contact or File status screen appears Your mobile computer waits two minutes for the contact or file ...

Page 187: ...ooth Enable File Sharing 2 The Enable File Sharing status screen appears Your mobile computer waits two minutes for the remote device to connect 3 After successfully connecting to the remote device the screen report Connected 4 If two minutes passes before you connect tap Wait Again 5 File sharing is enabled until you end it by tapping Cancel ...

Page 188: ...d as being supported by the Bluetooth system Assign a Dialing Prefix If you have not already assigned a dialing prefix during the install process you can do so by following these steps 1 Go to Start Settings System tab Tap on Dialer 2 Select the appropriate Dialing Prefix then tap OK Using the Dialer 1 To use the dialer the mobile computer must already be connected to the Bluetooth phone You can u...

Page 189: ...al 5 Your mobile computer connects to your phone and begins dialing The Dialer can dial a phone number containing any of the following non numeric characters space A B C D T P W The following string can also be included in a phone number The Dialer cannot dial a phone number containing non numeric characters other than those listed above HHP recommends that you follow the standard Microsoft Outloo...

Page 190: ...nes 1 Tap on the Bluetooth task tray icon In the pop up menu select Get Connected 2 Follow the Bluetooth Get Connected Wizard In the second screen use the drop down list to select your Bluetooth phone The wizard provides tailored instructions based on your selection 3 Follow the next screen s to prepare your specific phone for Bluetooth connections You may need to do 1 2 or all of the following st...

Page 191: ...ou if you want to bond select 2 Add to paired devices Do not tap ACCEPT 8 Tap Finish After successfully connecting the phone appears in the Bluetooth Devices folder On the Today screen the Bluetooth icon blinks You do not need to run the Get Connected Wizard again unless you plan to switch between different phones Note You may also switch between different phones by assigning a new favorite phone ...

Page 192: ...ocedures you complete outside of the wizard Read through each screen but do not complete the described procedures until you exit the wizard Bonding with your phone This must be completed to establish the Bluetooth connection and involves dial up networking Automatic Connections This procedure is optional but makes future Bluetooth connections more convenient 7 Continue to the last screen of the wi...

Page 193: ...r what you name the connection In the future you will need to select it to start the connection For the modem select Bluetooth Phone For the Baud Rate select 115200 If you want to configure Port Settings TCP IP or Name Server settings navigate to the setting and tap Advanced 4 Tap Next 5 In the Phone number field enter the dial up number Tap Next 6 Uncheck Wait for dial tone before dialing Tap Fin...

Page 194: ...50 On the phone press MENU Scroll to Connectivity then press OPTIONS The Open option should be highlighted Press SELECT The Bluetooth option should be highlighted Press OPTIONS The Open option should be highlighted Press SELECT Scroll to the right tab to access the Paired devices list Highlight your mobile computer then press OPTIONS Scroll to Set as authorized then press SELECT In the confirmatio...

Page 195: ...ering Up the GSM GPRS Radio Driver When the mobile computer is first initialized the radio driver for the GSM module is installed Before using the radio make sure that the GSM radio is powered up For more information see The Radio Manager on page 4 18 Tri Band Antenna Requirements Using GMS GPRS on a Dolphin 9500 terminal requires a network subscription to a GSM GPRS network you need to know what ...

Page 196: ...to the SIM card while securing it under an installed battery To Install a SIM Card Note You need a metric 050 Hex head wrench to open the SIM card door The SIM card must be activated by the service provider prior to installation 1 Turn off your terminal and lay it face down on a flat surface 2 Remove the battery pack For details see To Remove the Main Battery Pack on page 2 6 3 Using the Hex head ...

Page 197: ...Dolphin 9500 Series Mobile Computer User s Guide 9 3 6 Install the battery pack and turn on the terminal ...

Page 198: ... icons to launch the program Navigation Bar When the Dialler or SMS Manager applications are not open the icons in the Navigation bar at the top of the screen indicates the status of the phone and messaging system Each icon indicates s specific action and when tapped displays a bubble window that lets you know what is happening Status Icons and Bubble Options Icon This icon means Tapping this icon...

Page 199: ...tomatically when a new SMS message is received It contains the sender s information and the first line of the text message Tap View to display the full message in SMS Manager Tap Reply to switch to the SMS Manager Compose screen The To field is auto filled with the sender s address Tap Save to put the message in the SMS Manager Inbox Tap Delete to delete the message Tapping each button closes the ...

Page 200: ...rcumstance If the incoming call is a conference call a different bubble displays For a call going out Tap Hide to close the bubble Tap End to end the call When a call is coming in this bubble displays while the ringtone sounds If the caller is in the Phonebook the name displays If not in the Phonebook the caller s number displays if the number can t be read no number displays Tap Answer to answer ...

Page 201: ...n the list and tap OK you can also tap and hold on the entry The number is automatically entered in the Dialler and appears on the screen Use speed dial Tap and hold on the list to see a popup menu of speed dial numbers Use the Call Log Call Log page 9 15 When the phone is in Idle status you can tap the Send button on the screen press the ENTER key or tap Tools Call Log to see a list of the last 2...

Page 202: ...have elapsed Receiving a Call When the Dialler screen is open and an incoming call is detected text is displayed on the Dialler screen If the Dialler is not visible at the time of the incoming call a Navigation Bar notification appears see Status Icons and Bubble Options on page 9 4 When a call is coming in the ringtone sounds and the three information lines on the Dialler screen display the follo...

Page 203: ...o end calls Call Waiting The uPhone Dialler supports call waiting functionality This means that you can receive a second call while on a first call Placing a Current Call on Hold When a second call is coming in to place the current call on hold Tap the Send button Press the ENTER key on the keyboard Press the key combination for sending calls on the keyboard The Status line of the first call chang...

Page 204: ...l Use the Dolphin keyboard to manually adjust the volume To raise the volume press the Blue modifier key VOL To lower the volume press the Blue modifier key VOL Button Tapping this button Hold Active and Accept Held Swaps between the currently held and active calls Tapping Send or pressing ENTER performs the same function without opening this bubble dialog End Active and Accept Held Drops the curr...

Page 205: ...nually by opening the Dialler and going to Tools Phonebook When you tap and hold on an entry a popup menu displays Dial Opens the Dialler with the number entered ready for dialing Send SMS Opens the SMS Manager in the Compose screen with the To field populated with the number Speed Dial 2 9 These eight slots are used to assign the Dialler Speed Dial keys To assign a number to a Speed Dial slot tap...

Page 206: ... control panel Exit Exit the uPhone Dialler Settings Menu The Settings menu provides the following options Speakerphone Toggles speakerphone mode on and off When an audio plug for a headset is inserted into the audio jack 2 5mm Speakerphone is inactive on this menu Mic mute Toggles microphone mute on and off the other party cannot hear a private conversation when the microphone is muted This mode ...

Page 207: ...back panel of the terminal just as you would a cell phone holding the speaker to your ear to receive audio information and the your mouth over the microphone to send audio information This is the default audio mode Headset Headset mode is when you plug a headset into the audio jack and speak into the microphone You must use a 2 5mm plug no other audio plug will fit Hands Free Hands free mode is wh...

Page 208: ...rams uPhone Dialler and go to Tools Ringtones The Ringtones screen opens displaying the current settings Select the desired ringtone for each type of tone in the drop down lists Tapping OK saves any changes Opening another screen without tapping OK discards any changes WAV Files You can customize your ringtones with wav files installed on your terminal To appear here wav files must be stored in th...

Page 209: ...ault display whenever the Call Log is opened Call Log Options Voice Calls Out and Voice Calls Missed are available from the drop down list Select the option you want to view To see everything select All Calls Opening the Call Log You can access the Call Log two ways 1 Go to Start Programs uPhone Call Log OR 2 Open the Dialler go to Tools Call Log The Call Log opens displaying the last few Voice Ca...

Page 210: ...ntry in the Phonebook Time Time and date the call started This is the local time and date Duration Duration of the call hours minutes seconds The clock starts when the call connects not when dialed Tools Menu The Tools menu in the Call Log provides the following options Select this menu option To Clear Delete the entire Call Log Exit Close the Call Log ...

Page 211: ...ages sent or received can be up to 160 characters long Opening the SMS Manager You can access the SMS Manager two ways 1 Go to Start Programs uPhone SMS Manager OR 2 Open the Dialler Start Programs uPhone Dialler and go to Tools SMS Manager The SMS Manager opens displaying a list of your most recent text messages Tap the Inbox and the SMS folders drop down Three folders are available from the Inbo...

Page 212: ...selected the messages in it appear in the list The name of the folder appears in the gray bar just under the title bar To Do this Open a message Tap on it in the list Delete a message Tap and hold on it in the list A popup menu appears that enables you to delete the message ...

Page 213: ...thout the country code Destination numbers can start with a sign 3 Tap inside the text area To write a message you can use the SIP or the keyboard The Remaining characters field displays how many characters you can type It counts backwards from 160 as you type each character 4 When finished typing tap the Send icon to transmit the message If you tap OK before tapping send the program requests conf...

Page 214: ...ides the same options as the icons at the top of the screen with the following additional options Select All Selects all text in the active message section Clear Selection De selects all text in the active message section Online Help Tapping Help About provides information about the uPhone applications ...

Page 215: ...twork settings the GSM radio must be powered up and a SIM must be installed for it to open correctly If not you will receive a notification message when you try to open the control panel If the radio is powered up and a SIM installed an animated wait icon displays the following message while the system accesses the network Settings on the Network are being accessed Please wait If there is no respo...

Page 216: ... waiting Select On or Off to enable or disable call waiting functionality Call waiting must be set to On for conference calls PIN protection Select On or Off to enable or disable PIN protection If enabled a PIN number is requested when the phone is switched on Change PIN This button is active only if PIN protection is set to On Otherwise the button is grayed out If you tap Change PIN a dialog box ...

Page 217: ...ab provides the ability to choose between Automatic and Manual network selection If you choose Manual network selection the drop down list of available networks activates Choose a network from this list and tap OK A wait icon appears while the system accesses the selected network ...

Page 218: ...e All Calls drop down list to divert all incoming calls automatically Select an option from the Unavailable drop down list to divert incoming calls when you are unavailable The options in both lists are as follows Not Diverted Select this option to not divert calls This is the default setting Answerphone Select this option to divert calls to voicemail To number Select this option to forward incomi...

Page 219: ...ions from the drop down list Not barred No restrictions on outgoing calls International calls Bar international calls International except to home country Only international calls to the home country designated on the SIM card can be made All outgoing calls Bar all outgoing calls Not barred No restrictions on incoming calls Incoming calls when roaming Bar incoming calls when the network coverage i...

Page 220: ...ield enter the current code and enter the new code in the New code and the Confirm code fields Tap OK to save the change While typing the numbers appear as asterisks to protect the number from observation by third parties To save the barring options tap OK The system displays a dialog requesting the barring password before sending the updated settings to the network Type in the password and tap OK...

Page 221: ...configure GPRS settings for browsing the web via a VPN or Proxy Server To Select Pre Configured GPRS Settings 1 Go to Start System Connections tab uPhone GPRS The GPRS Settings screen appears displaying the default settings The Current Profile drop down list contains a number of pre configured connection profiles 2 If the profile associated with your account appears in the list select it If it doe...

Page 222: ...ype in the Profile Name APN IP Address and select the Protocol 3 Tap OK You return to the settings screen The Profile Name you selected now appears in the Current Profiles list GPRS Connection When a GPRS connection is required e g by navigating to a web site a Network Log On screen is automatically displayed Enter the Password and Domain then tap OK to connect ...

Page 223: ...ure those settings in the Connection Manager For details see Connections Tab on page 5 18 Requirements Make sure that you are not using ActiveSync when configuring the connection settings To establish a GPRS connection you need to review the information from your network service provider Given that there can be so many different configurations such as VPN or Proxy Server connections see Connection...

Page 224: ...9 30 Dolphin 9500 Series Mobile Computer User s Guide ...

Page 225: ...ipped but may be installed from the Microsoft Companion CD Calendar Use Calendar to schedule appointments including meetings and other events You can check your appointments in one of several views Agenda Day Week Month and Year and easily switch views by using the View menu Note You can customize the Calendar display such as changing the first day of the week by tapping Options on the Tools menu ...

Page 226: ...esired information To see all available fields hide the input panel 6 To add notes tap the Notes tab You can enter text draw or create a recording For more information on creating notes refer to Notes on page 10 10 7 When finished tap OK to return to the calendar Note If you select Remind me in an appointment you will be reminded according to the options set in Start Settings Personal tab Sounds R...

Page 227: ...hen you connect to your e mail server Indicate how you want meeting requests sent by tapping Tools and then Options If you send and receive e mail messages through ActiveSync select ActiveSync To Schedule a Meeting 1 Create an appointment 2 In the appointment details hide the input panel and then tap Attendees 3 From the list of e mail addresses you ve entered in Contacts select the meeting attend...

Page 228: ...es Mobile Computer User s Guide Contacts Contacts maintains the contact information phone numbers e mails addresses etc you need on your terminal Note To change the way information is displayed in the list tap Tools Options ...

Page 229: ...t list To Search for Contacts There are four ways to find a contact In the contact list enter a contact name in the box under the navigation bar To show all contacts again clear text from the box or tap the button to the right of the box In the contact list tap the category list labeled All Contacts by default and select the type of contact that you want displayed To show all contacts again select...

Page 230: ...10 6 Dolphin 9500 Series Mobile Computer User s Guide Using the Summary Screen When you tap a contact in the contact list a summary screen displays their information ...

Page 231: ...Dolphin 9500 Series Mobile Computer User s Guide 10 7 Tasks Use Tasks to keep track of what you have to do Note To change the way information is displayed in the list tap Tools Options ...

Page 232: ... enter a due date for the task 4 To assign the task to a category tap Categories and select a category from the list In the task list you can display tasks by category 5 To add notes tap the Notes tab For more information on creating notes refer to Notes on page 10 10 6 When finished tap OK to return to the task list Note To quickly create a task with only a subject tap Entry Bar on the Tools menu...

Page 233: ...Dolphin 9500 Series Mobile Computer User s Guide 10 9 Using the Summary Screen When you tap a task in the task list a summary screen displays the task information ...

Page 234: ...9500 Series Mobile Computer User s Guide Notes Quickly capture thoughts reminders ideas drawings and phone numbers with Notes If a note is open when you create the recording it will be included in the note as an icon ...

Page 235: ...Dolphin 9500 Series Mobile Computer User s Guide 10 11 To Create a Note 1 Tap New 2 Type your note using the SIP or the Dolphin keyboard ...

Page 236: ...irectly from an e mail server are linked to your e mail server rather than your desktop computer When you delete a message on the terminal it is also deleted from the e mail server the next time you connect the terminal to the e mail server according to the settings selected in ActiveSync You can work online or offline When working online you read and respond to messages while connected to the e m...

Page 237: ...omputer User s Guide 10 13 Using the Message List Messages you receive are displayed in the message list By default the most recently received messages are displayed first in the list and unread messages are displayed in bold type ...

Page 238: ...to the Outbox folder and will be sent the next time you connect 5 If you are sending an SMS message and want to know if it was received tap Edit Options and select Request SMS text message delivery notification before sending the message Managing E mail Messages and Folders Messages are displayed in one of five folders for each service you have created Inbox Deleted Items Drafts Outbox and Sent It...

Page 239: ...the messages while away from your desktop computer SMS If you use SMS messages are stored in the Inbox folder POP3 If you use POP3 and you move e mail messages to a folder you created the link is broken between the messages on the terminal and their copies on the mail server The next time you connect the mail server will see that the messages are missing from the terminal Inbox and delete them fro...

Page 240: ...ernet through an ISP or a network connection and browse the Web Browse the Internet on Your Terminal You must set up a connection to your ISP or corporate network using Connections before browsing see Using an ISP on page 6 10 If you select Pocket Internet Explorer before setting up the network connections a screen may appear allowing you to proceed to the connection settings screen After you sele...

Page 241: ...wnloads Web content to your device so that you can view pages while you are disconnected from your ISP and desktop computer Use the Internet Explorer plug in installed with ActiveSync to create mobile favorites 1 On your desktop computer open Internet Explorer click Tools Create Mobile Favorite 2 To change the link name enter a new name in the Name box 3 Optionally in Update select a desired updat...

Page 242: ...ed pages In Internet Explorer on the desktop computer right click the mobile favorite you want to change and then Properties On the Download tab specify 0 or 1 for the number of linked pages you want to download Using AvantGo Channels AvantGo is a free interactive service that provides access to personalized content and thousands of popular web sites Subscribe to AvantGo channels directly from the...

Page 243: ...of the files stored on the terminal Tap a file in the list to open it To delete make copies of and send files tap and hold a file in the list Then select the appropriate action on the pop up menu You can change the zoom magnification by tapping View Zoom and then selecting the percentage you want Select a higher percentage to enter text and a lower one to see more of your document If you re openin...

Page 244: ...g through the text you want to select You can search a document to find text by tapping Edit and then Find Replace Drawing Mode In drawing mode use your stylus to draw on the screen Gridlines appear as a guide When you lift your stylus off the screen after the first stroke you ll see a drawing box indicating the boundaries of the drawing Every subsequent stroke within or touching the drawing box b...

Page 245: ...riate text and formatting already provided If your workbook contains sensitive information you can protect it with a password To do so open the workbook tap Edit and then Password Every time you open the workbook you will need to enter the password so choose one that is easy for you to remember but hard for others to guess Tips for Working in Pocket Excel View in full screen mode to see as much of...

Page 246: ... Player WMP for Pocket PC to play digital audio and video files stored on the terminal To switch to Windows Media Player for Pocket PC tap Start Windows Media After a media file has been loaded you can play pause stop song advance reverse mute sound or adjust volume This slider indicates the progress of media playback ...

Page 247: ... of WMP Settings allows you to configure several important aspects of WMP Properties gives a detailed listing of a media file s attributes Open URL allows you to open WMP compliant media from a network or Internet resource Add Web Favorite adds a streaming media file that is currently playing to web favorites Repeat plays a playlist repeatedly Shuffle plays items in a playlist in a random order ...

Page 248: ...to use MSN Messenger Service If you have a Hotmail or MSN account you already have a Passport account Sign up for a Microsoft Passport account at www passport com Setting Up Before you can connect for the first time you must enter the information from your Passport or Exchange account After you set up your account information on the terminal for the first time you will go directly to login when yo...

Page 249: ...ccount information Be sure to indicate the service you re using to connect Messenger or Exchange 4 When complete tap OK You are returned to the sign in screen 5 To sign in tap the sign in screen and enter your e mail address and password Note If you already use MSN Messenger your contacts will show up on your device without being added again ...

Page 250: ...ctures stored on the terminal or storage card To begin tap Start Programs Pictures Choose to view main memory or storage card contents By tapping and holding on an image you can create a clone of that file delete that file select all files send file via e mail beam picture or rename the image ...

Page 251: ...s High Performance HP The HP non decoded engine reads 5 mil bar codes from 2 75 to 7 in 0 07 to 0 17 m and 55 mil reflective bar codes from 5 to 50 in 13 to 1 27 m Long Range LR The LR non decoded engine reads 10 mil bar codes from 10 to 24 in 0 25 to 6 m and 100 mil reflective bar codes from 66 to 232 in 1 67 to 5 9 m Advanced Long Range The ALR non decoded engine reads ALR 13 mil bar codes from ...

Page 252: ...nformation see Using the Keyboards on page 4 9 Peripherals and Accessories Because Dolphin 9551 and Dolphin 9501 terminals have the same mechanical connector Mechanical Connector page 3 9 they are compatible with all Dolphin 9500 Series peripherals Dolphin 9500 Series Peripherals page 2 3 and accessories Dolphin 9500 Series Accessories page 2 4 However due to their different shape both the Dolphin...

Page 253: ...ol grip as the Dolphin 9550 for secure and versatile handling in scan intensive applications The front end of the bottom housing accommodates the laser engine Side Panel The following graphic shows the left side panel of the Dolphin 9551 Note Just like the Dolphin 9550 the stylus is stored in the pistol grip handle ASER NGINE ...

Page 254: ...11 4 Dolphin 9500 Series Mobile Computer User s Guide Back Panel Speaker Laser Engine Microphone Pistol grip Handle ...

Page 255: ...r s Guide 11 5 Dolphin 9501 The Dolphin 9501 contains a powerful laser engine inside a solid flashlight form factor Side Panel Like the Dolphin 9551 the front end of the bottom housing accommodates the laser engine Finger Saddle Laser Engine ...

Page 256: ...1 6 Dolphin 9500 Series Mobile Computer User s Guide Back Panel For secure handling in the field the back panel of the Dolphin 9501 contains a finger saddle Speaker Laser Engine Microphone Finger Saddle ...

Page 257: ...ast on the Dolphin 9500 the hand strap is attached to the top portion of the back panel Hand Strap Attachment page 3 4 and the stylus is stored in a slot in the back panel Stylus in slot page 3 4 Bottom Panel Features All Dolphin 9500 series terminals contain the same industrial grade mechanical connector on the bottom panel see Bottom Panel Features on page 3 9 Stylus in the loop on the hand stra...

Page 258: ...11 8 Dolphin 9500 Series Mobile Computer User s Guide ...

Page 259: ...g the full speed USB port the data transmission rate goes up to 12 Mbps HomeBases cannot be physically connected to each other sometimes referred to as daisy chained but can be networked together via a serial or USB hub Convenient Storage Intelligent battery charging makes the Dolphin HomeBase a safe and convenient storage receptacle for your Dolphin terminal Capacity The Dolphin HomeBase holds on...

Page 260: ...2 Dolphin 9500 Series Mobile Computer User s Guide Dolphin 9500 Series HomeBase Parts and Functions Front Panel DOCK AUX BATTERY COMM Terminal Well DOCK LED Auxiliary Battery Well AUX Battery LED COMM LED ...

Page 261: ...f the battery charging in the auxiliary battery well To see the auxiliary battery well see Rear Panel on page 12 4 For information about charging a battery in the auxiliary battery well see page 12 7 COMM LED This is the communication LED It indicates the status of data transfer between the Dolphin terminal and the host device The color of this LED differs if the HomeBase is using the serial or US...

Page 262: ... to a peripheral device such as a desktop computer or printer When the Dolphin terminal is seated in the terminal well it is connected to the peripheral device via the HomeBase The USB port on the HomeBase requires that you use ActiveSync 3 7 or higher RS 232 Port Use a 9 pin RS 232 cable from HHP to connect this port to a peripheral device for RS 232 data communication For more information see Ho...

Page 263: ... voltage accordingly Only the power adapter cable from HHP converts the voltage appropriately HHP recommends that you leave the Dolphin HomeBase connected to its power source at all times so that it is always ready to use 1 Connect the HHP power cable to the DC jack on the rear panel of the HomeBase 2 Connect the HHP power cable to the power adapter 3 Plug the power adapter cable into the power so...

Page 264: ...displays the pin diagram of the serial connector of the HomeBase Note Signals referenced are for a DTE device The HomeBase is at a right angle to the printed circuit board PCB The ninth pin has a ring indicator RI Pin Description 1 Internal Jumper to Pin 6 2 TXD 3 RXD 4 DSR 5 GND 6 DTR 7 CTS 8 RTS 9 RI ...

Page 265: ... 2 6 1 Connect the HomeBase to the power supply provided by HHP 2 Slide the terminal into the terminal well until the Dock LED lights green to indicate that the terminal is properly seated 3 The battery pack begins charging Charging a Spare Battery Using the Auxiliary Battery Well The auxiliary battery well located on the back of the HomeBase charges a spare battery independently of the terminal w...

Page 266: ...S 232 device using a standard serial cable and communications software Note The HomeBase should have only one type of interface cable connected at a time either USB or RS 232 You must be using ActiveSync version 3 7 or higher Equipment Requirements To use the HomeBase for communications you need the following equipment A HomeBase powered by the HHP power cable and HHP power adapter cable For RS 23...

Page 267: ...the hardware is installed and operating You may need to reboot your PC to complete the installation process Setting up the Terminal for ActiveSync Communications 1 On the terminal tap Start ActiveSync Tools Options Activesync opens displaying the PC tab 2 In the Use this PC drop down list select the name of the host PC 3 Select Sync with this PC during manual sync to indicate that the terminal syn...

Page 268: ...n terminal in the HomeBase The Dolphin terminal attempts to start an ActiveSync connection with the desktop computer automatically Setting up the Desktop Computer for ActiveSync Communications After the USB HomeBase is installed you can use ActiveSync to connect to a Dolphin terminal that is properly seated in the HomeBase These instructions assume that ActiveSync v3 7 is installed on your PC ...

Page 269: ... ActiveSync to establish a connection 2 The HomeBase can now transfer data between the terminal and the host device If communication does not occur check the port connections to ensure that the cradle is correctly configured Setting up the HomeBase for RS 232 Communications Connecting the Cables Connect the HomeBase to the host computer or other device by plugging an RS 232 serial cable into the R...

Page 270: ... Activesync opens displaying the PC tab 2 In the Use this PC drop down list select the name of the host PC 3 Select Sync with this PC during manual sync to indicate that the terminal syncs with the selected host PC when synchronization is run from the terminal HomeBase Host Port DCE IBM AT DB9 DTE IBM XT DB25 DTE Modem DB25 DCE Pin Input Signal 2 RD 2 3 2 3 TD 3 2 3 5 SG 5 7 7 4 DTR 4 20 6 6 DSR 6...

Page 271: ... recommended for RS 232 communication 6 Tap OK 7 Place the Dolphin in the HomeBase The terminal attempts to start an ActiveSync connection with the desktop computer automatically Setting up the Desktop Computer for ActiveSync Communications ActiveSync must be installed and configured for RS 232 on the desktop computer to sync successfully with a Dolphin terminal configured for RS 232 communication...

Page 272: ...ing processing However you would most likely use one or the other Verifying Communication You can verify that the USB driver is functioning by watching the COMM LED on the USB HomeBase When the COMM LED illuminates solid green the HomeBase is communicating with the host device Verifying Data Transfer The COMM LED flashes when data is being transferred via the HomeBase For an RS 232 connection the ...

Page 273: ...cess to the Auxiliary Battery Well and the serial and USB ports as well as the power jack face straight out of the rear panel and you will most likely want easy access to them in the future Desk Mounting Dolphin charging communication cradles have a DIN rail 7 5 X 35 mm slot on the bottom to allow for secure desk attachment of the unit if desired To mount the HomeBase you slide the DIN rail slot a...

Page 274: ...cations ports For more details on both ports see Rear Panel on page 12 4 Turn the secured HomeBase right side up Attach the bottom panel to the mounting bracket match the holes to the secured screws 4 2 Back wedge Open slot for cords Insert a screw into the round end of each screw slot on the bottom panel Slide each screw towards the narrow end of the slot Then use a washer nut set on each screw t...

Page 275: ... main battery pack in less than four hours The Mobile Base also provides power to the intelligent battery charging system in all Dolphin terminals that senses when a full charge has been achieved and switches to a trickle charge to maintain the full charge Communications The Mobile Base transmits data to other devices at speeds of up to 115K baud via its RS 232 serial port Convenient Storage Intel...

Page 276: ...ry pack Mounting Brackets Use these to mount the Mobile Base to a fixed location DOCK LED Illuminates solid green when the Dolphin terminal is properly seated in the terminal well COMM LED Indicates the status of data transfer between the host device and the Dolphin terminal COMM LED color Indicates that Red Data is being sent from the Host Device to the Dolphin Mobile Base Green Data is being sen...

Page 277: ... The appropriate cable comes with the kit you ordered The 12 VDC cable can be used with a cigarette lighter outlet The 24 VDC pigtail cable can be used to hard wire into the vehicle power bus Verify that the power source is always within the specified range and observe correct input voltage polarity An improper input voltage range above the 48 VDC maximum or reverse polarity could damage the power...

Page 278: ...e Mobile Base supplies charging power to the Dolphin terminal so that the terminal can monitor the charging of its battery pack This charging method protects the battery from being damaged by overcharging Therefore the Dolphin terminal may be stored indefinitely in the Mobile Base without damage to the terminal the battery pack or the Mobile Base To charge a Dolphin terminal complete these steps 1...

Page 279: ... the turnscrew 2 Insert the ball joint of the mounting bracket to the back of the bracket 3 Insert the ball joint on the back of the Mobile Base into the other side of the bracket 4 Tighten the turnscrew to secure both ball joints 5 Secure the mounting bracket to the appropriate location Back Panel Latch The latch sits on top of the spring arm assembly and holds the back of the terminal securely i...

Page 280: ...Mobile Base Connectors The power and RS 232 connectors are located on the bottom panel For more information see Bottom Panel on page 13 3 Brackets Bracket The bracket contains the turnscrew and two slots Ball joints are inserted into each slot and secured with the turnscrew Turnscrew The turnscrew is located on the top of the bracket Rotate the turnscrew to secure or loosen the ball joint slots Mo...

Page 281: ...ur cable depends on whether the other device is set up as a Data Communications Equipment DCE or Data Terminal Equipment DTE device The Mobile Base Communication Port is configured as a DCE device To communicate with a DTE device such as a computer use a standard or straight through RS 232 cable To communicate with a DCE device use either a null modem adapter in line with a standard RS 232 cable o...

Page 282: ...obile Base Note Signals referenced are for a DTE device The Mobile Base connector is straight to the printed circuit board PCB The ninth pin sends 500mA at 5V power out This can power a peripheral device such as a mobile printer as long as that peripheral device can accept 500mA at 5V Pin Description 1 Internal Jumper to Pin 6 2 TXD 3 RXD 4 DSR 5 GND 6 DTR 7 CTS 8 RTS 9 5 VOLT OUT ...

Page 283: ...he PC tab 2 In the Use this PC drop down list select the name of the host PC 3 Select Sync with this PC during manual sync to indicate that the terminal syncs with the selected host PC when synchronization is run from the terminal 4 Tap Options 5 Select Enable PC sync using this connection then select 115200 Default from the drop down list 115200 baud is recommended for RS 232 communication ...

Page 284: ...olphin 9500 Series Mobile Computer User s Guide 6 Tap OK 7 Place the Dolphin terminal in the Mobile Base The Dolphin terminal attempts to start an ActiveSync connection with the desktop computer automatically ...

Page 285: ...rging process CC CV that is recommended for Li Ion batteries The process monitors changes in temperature current and voltage Convenient Storage Intelligent battery charging makes the Dolphin ChargeBase a safe and convenient storage receptacle for your Dolphin terminal Capacity The ChargeBase can hold up to four Dolphin 9500 Series terminals Each charging slot charges each terminal independently of...

Page 286: ...well displays a Dock LED on the front that lights solid green when a terminal is properly seated which means that the terminal and the base are connected Charge LEDs Each terminal well displays a Charge LED on the front that lights green to indicate charging For details see Charging Terminals in the ChargeBase on page 14 4 Back Panel Power Supply Connector This connector receives input from the po...

Page 287: ... to the circuitry of the Dolphin ChargeBase 1 Be sure the power switch on the power adapter is in the OFF position 2 Plug the power cord into the power adapter 3 Plug the power connector cable into the power connector on the back panel of the ChargeBase 4 Plug the power cord into a standard wall outlet 5 On the power adapter turn the power switch to the ON position The LEDs illuminate as the Charg...

Page 288: ... than four hours The ChargeBase uses the intelligent battery charging system incorporated into all Dolphin terminals that prevents overcharging This means that Dolphin terminals may be stored in the ChargeBase indefinitely without damage to the terminals battery packs or the ChargeBase 1 Power the ChargeBase see Supplying Power to the ChargeBase on page 14 3 2 Insert a terminal into a terminal wel...

Page 289: ... The mounting location must allow users easy access to the power connector The ChargeBase should be oriented so that users can easily read the labels Bottom Panel The bottom panel of the Dolphin 9500 Series ChargeBase offers two mounting options insert a DIN Rail for desk mounting or use mounting brackets with the available screw slots for wall mounting DIN Rail Slot Screw Slots Rubber Feet ...

Page 290: ...in charging communication cradles have a DIN rail 7 5 X 35 mm slot on the bottom panel to enable secure mounting 1 Slide the DIN Rail into the DIN Rail slot on the bottom panel 2 Turn the ChargeBase and DIN Rail right side up 3 Secure the DIN Rail to a stable flat horizontal surface ...

Page 291: ...s an open slot in the back to accommodate the connector cables Each mounting bracket contains an open slot in the back to accommodate the connector cables 1 Insert the head of each screw into the round end of each of the four screw slots on the bottom panel Slide each screw towards the narrow end of the screw slot 4 Use a washer nut set on each screw to secure the screw in each slot 5 Attach the b...

Page 292: ... Dolphin 9500 Series Mobile Computer User s Guide 6 Using the remaining washer and nut sets secure the mounting brackets to the bottom panel 7 Secure the mounting brackets to an appropriate vertical surface ...

Page 293: ... and power adapters Use of peripherals cables or power adapters not sold manufactured by HHP will void the warranty and may damage the terminal Use only the Li ion battery packs provided by HHP The use of any battery pack not sold manufactured by HHP in Dolphin 9500 Series terminals will void your warranty and may result in damage to the Dolphin terminal or battery Dolphin QuadCharger Parts and Fu...

Page 294: ...lots The color of the LED indicates the charge status of the batteries in its slot Rear Panel Power Switch Toggle the power switch to turn the QuadCharger on and off Power Supply Connector Use this connector to attach the power supply to the QuadCharger The universal power supply accepts input voltages between 90 265 volts Status LED color This color indicates that the battery in the slot Green Ha...

Page 295: ...range when the battery has been properly inserted Removing To remove a battery pack push the locking tab down and pull the battery out from the charging slot with a hinging motion Storing Batteries Recommendations To maintain top performance from batteries follow these storage guidelines Avoid storing batteries outside of the specified temperature range of 4 to 104 F 20 to 40 C or in extremely hig...

Page 296: ...y capacity is displayed as a percentage of measured capacity rated capacity Status LED The Charge Analyze slot also contains a standard status LED in the upper left corner of the slot When this slot is used for regular charging this LED operates in the usual manner see Status LEDs on page 15 2 When this slot is being used to analyze a battery the status LED functions as follows To Analyze a Batter...

Page 297: ...easy access to power switch and power connector the QuadCharger should be oriented so that users can easily insert and remove battery packs and read the labels especially for the Battery Analyzer Mounting with the DIN Rail All Dolphin charging communication cradles have a DIN rail 7 5 X 35 mm slot on the bottom panel to enable secure mounting To mount the QuadCharger you slide the DIN rail slot al...

Page 298: ...make sure the POWER switch is ON and the battery pack is properly seated The Status LED lights red during charging Try to charge the battery in one of the other charging slots If the red Status LED comes on again then the problem is associated with the battery pack If the red status stays with the charging slot the problem is associated with the charging circuity The Status LED lights red and stay...

Page 299: ...NG IN CONNECTION WITH ANY PRODUCT SOLD HEREUNDER WHETHER SUCH LIABILITY ARISES FROM A CLAIM BASED ON CONTRACT WARRANTY TORT OR OTHERWISE EXCEED THE ACTUAL AMOUNT PAID TO HHP FOR THE PRODUCT THESE LIMITATIONS ON LIABILITY SHALL REMAIN IN FULL FORCE AND EFFECT EVEN WHEN HHP MAY HAVE BEEN ADVISED OF THE POSSIBILITY OF SUCH INJURIES LOSSES OR DAMAGES SOME STATES PROVINCES OR COUNTRIES DO NOT ALLOW THE...

Page 300: ... following information Product type and serial number Brief description of problem Dated proof of purchase If your equipment is still covered under the initial end user s product warranty please notify the Product Services Representative when you call Service and Repair Locations Shipping Please make note of the RMA number if required and the product s serial number before shipping If you must ret...

Page 301: ...a m to 6 p m EST Fax number 315 685 4960 E mail support HHP com Europe Middle East and Africa Telephone European Ofc 31 0 40 29 01 600 U K Ofc 44 1925 240055 E mail euro_support HHP com Asia Telephone 852 2511 3050 E mail asia_support HHP com Latin America Telephone 239 263 7600 E mail la_support HHP com Assistance Online You can also access technical assistance online at www hhp com Site aspx ser...

Page 302: ...16 4 Dolphin 9500 Series Mobile Computer User s Guide ...

Page 303: ...ve the insertion point to the beginning of the next paragraph CTRL UP ARROW Move the insertion point to the beginning of the previous paragraph SHIFT with any of the arrow keys Select more than one item in a window or on the desktop or select text within a document CTRL A Select all ALT ENTER View properties for the selected item ALT TAB Switch between open items ALT ESC Cycle through items in the...

Page 304: ...ser s Guide A 2 43 Key Alpha Numeric Keyboard Blue Key Combinations Key Combination Function Special Character Blue key D Blue key H _ Blue key L Blue key P Blue key Q Blue key R Blue key S Blue key T Blue key U Blue key X Blue key Y START ...

Page 305: ...ndicators over the key Key Combination Function Special Character Red key ESC Lightens Contrast Red key TAB Darkens Contrast Red key SFT Toggles on Caps Lock Red key Q F1 Red key R F2 Red key S F3 Red key T F4 Red key U F5 Red key V F6 Red key W F7 Red key X F8 Red key Z Insert Red key SP Backspace Red key BKSP Delete Key Key Combination Function Special Character Press the NUM key only once to sw...

Page 306: ...omputer User s Guide 35 Key Numeric Alpha Keyboard Blue Key Combinations Key Combination Function Special Character Blue key SP Blue key DEL Blue key F1 Blue key F2 Blue key F3 Blue key F4 Blue key BKSP START Blue key F5 _ Blue key F6 ...

Page 307: ...you must use the same multi press method you would use when typing letters on a phone keypad Each key press will type the next letter in the sequence as displayed by the alpha lock indicators over the number keys Key Key Combination Function Special Character Press the ALPA key only once to switch to alpha mode ALPHA 1 When you press 1 repeatedly the 1 key produces the following characters in the ...

Page 308: ... Dolphin 9500 Series Mobile Computer User s Guide 56 Key Full Alpha Numeric Blue Key Combinations Key Combination Function Special Character Blue key Blue key Blue key A Blue key B Blue key E _ Blue key F ...

Page 309: ...t Red key TAB Darkens Contrast Red key SFT Toggles on Caps Lock Red key A F1 Red key B F2 Red key C F3 Red key D F4 Red key E F5 Red key F F6 Red key G F7 Red key H F8 Red key I F9 Red key J F10 Red key K F11 Red key L F12 Red key M F13 Red key N F14 Red key O F15 Red key P F16 Red key Q F17 Red key R F18 Red key S F19 Red key T F20 Red key U F21 Red key V F22 Red key W F23 Red key X F24 Red key Y...

Page 310: ...A 8 Dolphin 9500 Series Mobile Computer User s Guide SFT Key Combinations Key Combination Function Special Character SFT 1 SFT 2 SFT 3 SFT 4 SFT 5 SFT 6 SFT 7 SFT 8 SFT 9 SFT 0 SFT SFT ...

Page 311: ...If there is no Bluetooth hardware installed on the terminal this com port is unassigned Com Port 3 Raw Infrared Com Port 4 Com Port 5 USB virtual serial port Com Port 6 IrDA if IrDA is enabled If IrDA is disabled this com port becomes available See Verify That the IrDA Port is Enabled on page 6 6 Com Ports 7 9 Unassigned These are available for selection only when connecting to devices that use vi...

Page 312: ...A 10 Dolphin 9500 Series Mobile Computer User s Guide ...

Page 313: ......

Page 314: ... HHP Inc 700 Visions Drive P O Box 208 Skaneateles Falls NY 13153 0208 95 9550 WMS UG Rev C ...

Reviews: