background image

Ver 1.0 


10 

1.5  First-time Operation 

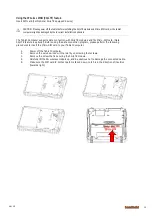
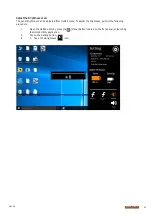
Inserting Battery Pack 

To insert the standard battery pack into the Tablet Computer: 

1.


Disconnect AC adapter and power cord from the tablet computer. 

2.


Turn the tablet computer over, back facing up. 

3.


Insert the battery on the connector-pins side first, and then lower the battery into the battery 
compartment. Continue to hold the Battery before battery is fully inserted. 

4.


Make sure the battery is completely lowered into the compartment before letting go the Battery 
will be flat against the housing once fully inserted 


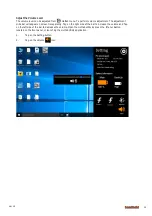
Removing the Battery Pack 

1.


Power off the tablet computer (or put it to sleep). Disconnect any cords connected to the 
computer. 

2.


Turn the tablet computer over, back facing up. 

3.


Lift the battery out using the opening on side of battery compartment. 


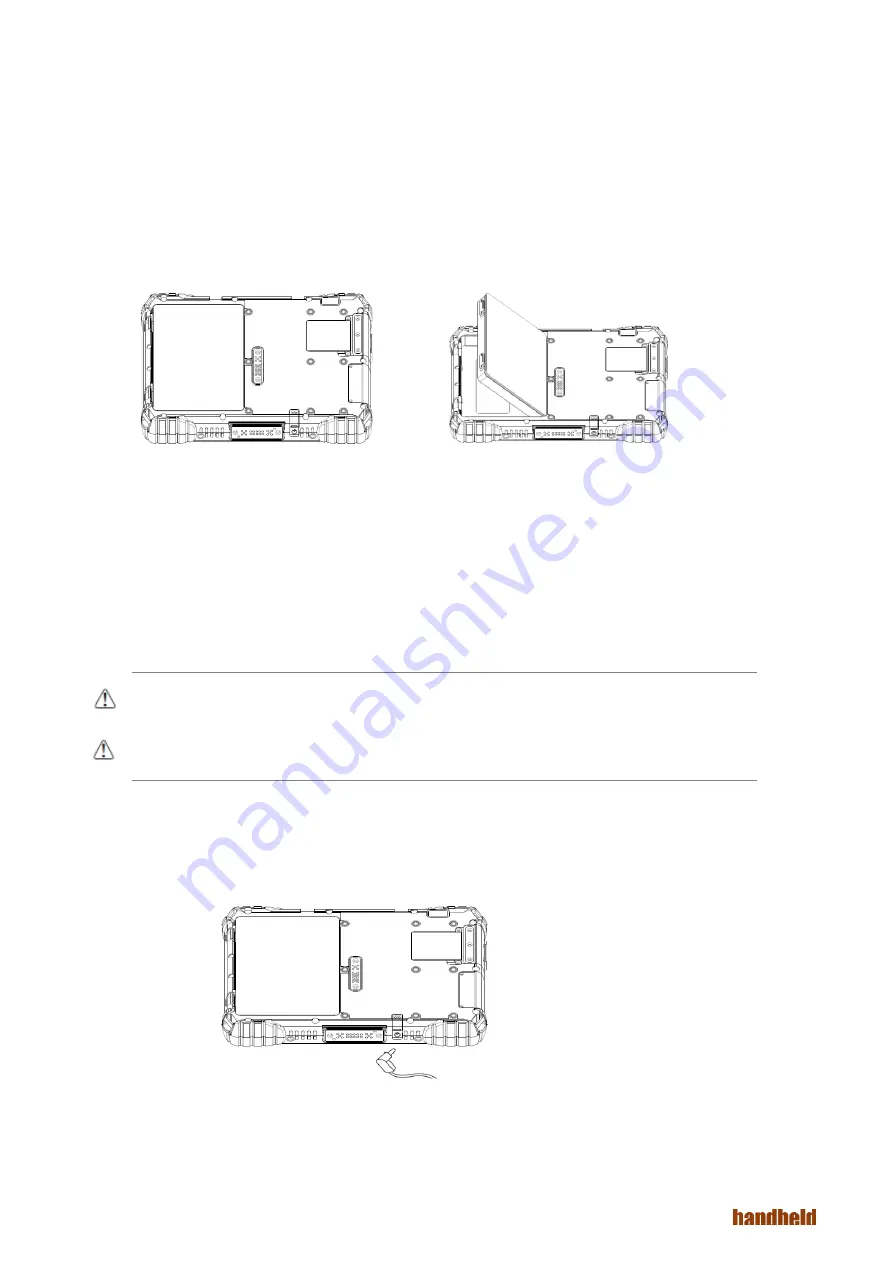
Connecting to Power Supply 

The Tablet Computer operates either on external AC power or internal battery power. It is recommended to 
use AC power when you start up the Tablet Computer for the first time.  

CAUTION - Use only the AC adapter included with your Tablet Computer. Using other AC adapters may damage the 
Tablet Computer and the Battery. 

CAUTION - For users start up the Tablet Computer for the first time with internal battery power, please make sure 
the battery is full charged before using. 

Perform the following to connect the Tablet computer to AC Power: 

1.


On the side of the Tablet computer, lift the I/O protective cover by pulling on the latch 

2.


Plug the DC cord of the AC adapter into the Power Jack of the tablet computer. 

3.


Plug the AC power cord into the AC adapter. 

4.


Finally, Plug the AC power cord into the electrical outlet.


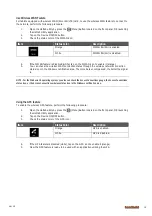
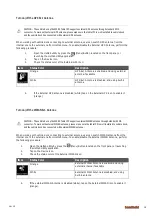
When the AC Adapter is connected, the battery pack starts charging. The battery LED indicator on the tablet 
computer would show different states. Please refer to description of LED indicator on Description of Parts 

Summary of Contents for Algiz 8X

Page 1: ...ALGIZ 8X MANUAL...

Page 2: ...First time Operation 10 1 6 Powering On Off 11 2 Quick Access through Hottab 12 2 1 Hottab Introduction 12 2 2 Device ON OFF 13 3 Frequently Used Settings 25 3 1 Replacing Hot Swappable Battery 25 3 2...

Page 3: ...that are described in this manual are for illustration purposes only Handheld Inc makes no representation or warranty that such application will be suitable for the specified use without further test...

Page 4: ...Safety Announcement UL Classification Class I mark with respect to electronic shock Fire and hazardous material only in accordance with the regulation of UL 60950 and CAN CSA C22 2 No 601 1 Power Sup...

Page 5: ...Touch Projected Capacitive Touch Support Normal Mode Rain Mode Gloves Mode I O Connectors Right Side 2x USB 3 0 1xMicro HDMI 4 different types of inter changeable I O Port Dummy Deafault LAN COM 2D Ba...

Page 6: ...Ver 1 0 6 1 2 Unpacking Check and identify the supplied accessories Tablet Computer Standard Battery Power Adapter Power Cord and Plugs...

Page 7: ...ct and touch screen lock to prevent input 6 Menu Button Hottab Quick Access 7 Home Button Windows Start Menu 8 F1 Button Programmable function key configured by Hottab Utility 8 F2 Button Programmable...

Page 8: ...Provide optional connectivity to custom modules for special application 16 Main Battery Slot For Main Battery pack 17 MicroSD Micro SIM Card Port Memory card SIM card reader port 18 Power Jack DC IN...

Page 9: ...ecovery Menu F2 ESC Menu F1 Enter Buttons Keystroke Power Power ON OFF Touch Lock Touch mode select and touch screen lock to prevent input Menu Hottab Quick Access Home Normal start menu Quick Access...

Page 10: ...ly The Tablet Computer operates either on external AC power or internal battery power It is recommended to use AC power when you start up the Tablet Computer for the first time CAUTION Use only the AC...

Page 11: ...ressing the power button o Touching the tablet buttons screen or external keyboard mouse _______________________________________________________________________________________________________________...

Page 12: ...Front Panel Hottab Utility Icon The main user interface is located on the right side of the screen There are 3 main menu options Device ON OFF Settings and Touch Lock Operations and functions on each...

Page 13: ...he Wi Fi feature is disabled white tap on the Wi Fi icon to enable it orange 5 Click the wireless network connection status icon in the Windows notification area A list of available wireless networks...

Page 14: ...card Note 3G LTE feature is optional Before using the data connection program please perform the following procedures to insert the Micro SIM card to your Tablet Computer 1 Power off the Tablet Compu...

Page 15: ...connection status icon in the Windows notification area The more bars encompassed the better the signal is NOTE For the Windows 10 operating system you also can check the Access Connections gauge the...

Page 16: ...nts to connect and follow onscreen prompt to continue the pair procedure and use the Bluetooth device Using Camera Features This Hottab menu option allows users take a picture or record a video Before...

Page 17: ...res Rear Video Resolution Picture compression quality File Location Opens the location where pictures and videos are saved 3 Switch Camera Switches the front or rear camera device 4 Flash Control Enab...

Page 18: ...If the External GPS antenna is disabled white tap on the External GPS icon to enable it orange Turn on off the WWAN Ext Antenna CAUTION The vehicle dock of ALGIZ 8X Tablet PC supports external WWAN an...

Page 19: ...een modes via the HotTab utility perform the following procedure 1 Open the Hottab utility by press the Menu Button located on the front panel OR launching the Hottab Utility application 2 Tap on the...

Page 20: ...ions as well as Unit Serial Number shown in the picture sample Battery Information This section provides user battery Information Main Battery The main battery Icon displays the battery level in perce...

Page 21: ...o change 4 type of press is being configured 5 You can switch what type of press you want to configure by tapping on t the bottom of the utility window 6 Pick from list of preset applications by tappi...

Page 22: ...e adjusted from Hottab menu To adjust the brightness perform the following procedure 1 Open the Hottab utility by press the Menu Button located on the front panel or launching the Hottab Utility appli...

Page 23: ...t sensor Windows 10 has the ability to automatically adjust the screen brightness depending on the ambient light levels This feature can be more annoying than helpful either leaving your screen too da...

Page 24: ...ide bar will appear on screen transparently Tap on the right side of the bar to increase the volume and Tap on the left side of the bar to decrease the volume Open the Hottab utility by press the Menu...

Page 25: ...e to allow for battery hot swapping Perform the following to hot swap the batteries 1 While the tablet is powered on go to Hottab utility to check on the power level of the Backup battery 2 do not rem...

Page 26: ...overy procedure 1 Plug in the AC adapter to ALGIZ 8X tablet computer Make sure the ALGIZ 8X tablet computer stays plugged in to power source during the recovery process 2 Power on the tablet computer...

Page 27: ...5 GND 15 ANT_SEL_DET 6 DOCK_USB_N 16 GND_GPS 7 DOCK_PWR 17 GND_GPS 8 GND 18 ANT_WWAN 9 DOCK_PWR 19 DETECT 10 DOCK_PWR GND_GPS 3 4 Expansion Port Pin Definition ALGIZ 8X tablet computer supports one op...

Page 28: ...32 of Expansion Port optional COM 3 GPS COM 11 RS232 at Docking optional COM 12 RS232 at Docking optional For some special applications user might re install OS and lose the COM port settings To make...

Page 29: ...nced button 3 Tap on the dropdown list and choose the correct COM Port Number refer to the COM Port Definition Table and click OK 4 Double check Device Manager to make sure the COM Port number has bee...

Reviews: