background image

HandiQuilter.com

 Page 31

Troubleshooting

HQ 18 Avanté

User Manual 1.0

Page 23

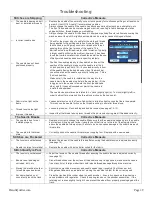
hole of throat plate or other 

thread handling part

Wrong type of needle

Other possible problems

cloth to remove the sharp edge. Consult a repair technician to polish any hard to reach or 

delicate areas, or if the burr is inside the throat.

Use needles recommended by Handi Quilter.  Using the wrong needle with a smaller shank 

diameter causes many problems.  For example, a system 1738 or 287WH needle with a shank 

diameter of 1.64mm will fit loosely into the needle bar clamp.  This condition allows the needles 

to fit into the clamp at an angle which may cause problems including skipped stitches and the 

needle positioned too far away from the hook point.

Needle too close to hook, causing friction and possible collision of hook point and needle 

(broken thread).

Needle plate damage

Hook damage

Broken needles or damaged needle bar clamp

Unresponsive Touch

Screen

Corrective Measure

Touch screen calibration 

needed

From either the REGULATED or the MANUAL screen, press the MORE button followed by the 

SYSTEM and then CALIBRATE buttons.  Follow the on-screen instructions for re-calibrating 

the touch screen.

No Visible Display

Corrective Measure

Cable unplugged

Check the communication cable that connects the handlebar to the casing of the machine and 

make sure that the connections are secure.

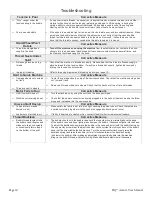
Tension is Poor

Corrective Measure

“Fuzz” caught under the 

tension spring in the bobbin

Poorly wound bobbin.

If using short staple threads, inexpensive or industrial threads or coated threads, lint and other 

material will build up under the tension leaf spring and begin to lift the spring, reducing the 

spring’s ability to compress against the thread. By inserting a needle under the spring and 

clearing out the lint, the bobbin tension will return fairly close to its preset tension. 

If the bobbin is wound too tight or too loose, this can lead to poor and inconsistent tension.  Make 

sure when the bobbin is wound that the thread tension is not so tight that the wound bobbin 

thread feels hard and causes the bobbin to bulge when it is wound.  It should also not be so 

loose that the thread is spongy, causing the thread to tangle as it is wound.

Hand Wheel Won’t

Rotate

Corrective Measure

Thread is entangled and 

caught in the hook 

Turn off the machine and unplug the machine

from the electrical outlet. Lubricate the hook, 

strongly turn the hand wheel clockwise and if necessary counterclockwise several times, and 

then remove the thread caught in the hook.

Thread Nests Under 

Quilt

Corrective Measure

Not enough tension on top 

thread

Improper threading

Check that the machine is threaded correctly. Make certain that the thread is flossed snugly in 

place between the two tension discs.  If machine is threaded correctly, tighten top tension by 

rotating the tension knob clockwise.

Refer to threading diagram and threading instructions (page 12).

Hard to Guide Machine

Corrective Measure

Carriage wheels not centered 

on track

Thread caught in wheels

Center the carriage wheels on top of the continuous track. Check that the machine carriage has 

not “jumped” track.

Remove all thread or debris in wheels. Check that the tracks are free of lint and threads.

Motor Fails to Run

Corrective Measure

On/Off switch turned off

Machine not receiving power 

Turn the machine on by using the switch on the back power pod.

Check that the power connector is securely plugged into the back of the machine and the three-

prong end is plugged into the power source.

Uneven Quilt Design

Corrective Measure

Take-up rollers may be 

bowed or bent

Leaders are stretched/worn 

Make certain the fabric is not rolled too tight, causing the poles to bow. Check that poles are 

inserted completely together with the push pin engaged so bowing won’t occur.

If fabric is beginning to stretch or fray, contact Handi Quilter for replacement leaders.

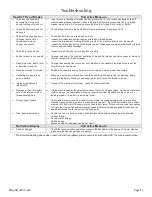
Needle Thread Breaks

Corrective Measure

Thread cones/spools are 

poor quality or may have 

severe twisting or thread rot

Top and bobbin tensions not 

balanced

The machine head has been 

threaded incorrectly or 

thread spools are not 

positioned correctly

Particles in tension discs

Bobbin rotation is not smooth

Needle is burred, bent or dull, 

or installed incorrectly

Needle not suited for thread

Hesitating too long at one 

point in pattern

Improper needle/hook 

relationship

Damage or “Burr” at needle 

Look for severe twisting of threads when approximately 12 to 15 inches has been pulled off, 

with the ends pinched together. Cotton threads are particularly susceptible to dry rot which 

makes thread brittle.  Do not use poor quality thread, or thread that is rotted or brittle.

Check thread tension in top and bobbin for proper balance.  See pages 14-16.

Check that the machine is threaded correctly.

Inspect for accidental double wrapping of thread on thread guides.  

Inspect the thread mast, making sure the eyelets of the mast are directly over the spools.

Inspect the vertical positioning of the thread cones. Tipped cones can dramatically affect thread 

tension and can cause breakage.

Inspect for particles and remove any fuzz or debris.

Change the bobbin. The slightest hesitation of the bobbin rotation can be the cause of dramatic 

tension change and thread breakage.

Change the needle at least once per quilt. Make sure the needle is installed to the top of the 

stop hole in the needle bar.

Replace the needle to one better suited for the thread. Use the proper size needle. 

Move more quickly so stitches don’t overlap or build up. When starting the machine, begin 

moving immediately. Sewing in one place too long will cause the thread to break.

Timing of the machine is improper.  Consult a repair technician.

If thread is shredding at the throat plate, check for burrs or jagged edges. Gently rub with metal 

* If the troubleshooting above does not eliminate the problem, please consult an authorized HQ

18

 Avanté representative.

HQ 18 Avanté

User Manual 1.0

Page 23

hole of throat plate or other 

thread handling part

Wrong type of needle

Other possible problems

cloth to remove the sharp edge. Consult a repair technician to polish any hard to reach or 

delicate areas, or if the burr is inside the throat.

Use needles recommended by Handi Quilter.  Using the wrong needle with a smaller shank 

diameter causes many problems.  For example, a system 1738 or 287WH needle with a shank 

diameter of 1.64mm will fit loosely into the needle bar clamp.  This condition allows the needles 

to fit into the clamp at an angle which may cause problems including skipped stitches and the 

needle positioned too far away from the hook point.

Needle too close to hook, causing friction and possible collision of hook point and needle 

(broken thread).

Needle plate damage

Hook damage

Broken needles or damaged needle bar clamp

Unresponsive Touch

Screen

Corrective Measure

Touch screen calibration 

needed

From either the REGULATED or the MANUAL screen, press the MORE button followed by the 

SYSTEM and then CALIBRATE buttons.  Follow the on-screen instructions for re-calibrating 

the touch screen.

No Visible Display

Corrective Measure

Cable unplugged

Check the communication cable that connects the handlebar to the casing of the machine and 

make sure that the connections are secure.

Summary of Contents for Avante QM30235

Page 1: ...USER MANUAL 04 18 14 2014 Handi Quilter Inc Avanté 18 QM30235 version 2 0 ...

Page 2: ... a combina tion blog and photo gallery where you can share your own quilting story Your new quilting friends are already there waiting for you Remember if you ever have questions your local Rep can help you If the Rep is not available contact Handi Quilter directly at techsupport HandiQuilter com or by calling us at 1 877 697 8458 Monday Friday 8 5 MST Package Contents Please keep your original bo...

Page 3: ...mes 8 Installation Handlebars Power Cord 9 Inserting Needle 9 Changing the Handi Feet 9 Installation Laser Stylus 10 Installation Thread Mast 11 Threading the Machine 12 Horizontal Spool Pin 14 Bobbin and Thread Tension Adjustments 14 Top Thread Tension Adjustment 15 Maintenance Oiling and Lubricating 16 Touch Screen Displays 17 System Information 24 Diagnostics Tests 24 HQ Stitch Regulator Operat...

Page 4: ...n then remove the plug from outlet pulling from the plug not the cord Never operate the HQ18 Avanté if the cord is damaged or not working correctly If a mechanical or electrical problem is encountered return the HQ18 Avanté to the nearest authorized service center or the manufacturer for examination repair electrical or mechanical adjustment The HQ18 Avanté utilizes high tech electronics and an in...

Page 5: ...e C 5 Tension Assembly 6 Stirrup Thread Guide E 7 Take Up Lever 8 Thread Guide F 9 Front Casing Frame 10 Handwheel 11 Side Laser Stylus Post Hole HQ18 Avanté Components Front Side View 3 1 2 10 4 5 6 7 8 9 11 3 1 2 10 5 8 9 11 3 1 2 10 4 5 6 7 8 9 11 3 1 2 4 5 6 7 8 9 11 3 1 2 10 5 8 9 11 Figure 1 ...

Page 6: ...le Holes 26 Top Laser Stylus Post Hole Back Side View 27 Spool Pin 1 28 Electronic Control Pod C Pod 29 Laser Stylus Power Connector 30 Serial Port for Stitch Regulator 31 Rear Handle Bar Serial Port 32 Rear Threaded Handle Holes 33 Accessory Power Outlet 34 Power Cord Connector 35 On Off Switch 36 Power Pod P Pod 37 Spool Pin 2 38 Bobbin Assembly Rear and Front Views 15 13 14 12 18 16 DETAIL A 25...

Page 7: ...machine and into the 9 pin serial port of the machine see Figure 5 5 REMEMBER that if the machine is to be removed from the carriage the cable must be disconnected from the Carriage Encoder Assembly The other two connectors on the cable should remain in place Failure to unplug the cable when remov ing the machine from the carriage could result in damage to the cable encoders and carriage Installat...

Page 8: ...onnector into the serial port located on the left hand side of the machine see Figure 2 18 page 6 Ensure the pins are lined up so they are not damaged when the plug is pushed in Push the plug securely in place Installing Front Handlebars Check that the HQ18 Avanté is unplugged from the electrical outlet All power to the machine must be turned off when installing the back handlebar Failure to do so...

Page 9: ...w quilt loaded on the machine or any time the needle becomes bent dull or burred Important Check the needle to confirm that it is fully inserted The needle bar has a stop sight hole above the needle bar clamp screw make sure the needle Your machine came with two Handi Feet a ruler foot and an open toe foot Use the ruler foot for ruler work and everyday quilting and the open toe foot when you need ...

Page 10: ...tion exposure Laser Focus Laser Image Size This high quality laser is focusable The laser is focused by simply grasping the threaded housing surrounding the lens and turning clockwise or counter clockwise see Figure 10 The laser image can be adjusted bigger or smaller The direction of rotation needed is determined by the distance of the laser from the intended focal plane Experiment by turning the...

Page 11: ...For use at rear of machine To attach the laser stylus to the side of the machine 1 Place the nut on the laser stylus post with the washer under it and thread the laser post into the threaded hole see Figure 1 11 page 5 near the rear wheel base Turn until securely in place Lock in place with lock nut The washer will be under the nut to protect the machine paint An unused spool pin can also be used ...

Page 12: ...using thread breakage and bad tension For most threads on a cone it is important to thread all three holes for consistent results and to make adjustments at the top tension assembly An exception to this rule is when working with very delicate threads such as holographic or threads that are prone to breakage in which case you may try skipping one or two holes on thread guide B Threading the Machine...

Page 13: ...d through the hole thread guide F 7 Make sure the thread is following the groove down the front of the needle and threads from front to back Be careful that the thread does not twist around the needle Figure 15 Important notes The HQ18 Avanté quilting machine does not have a presser foot lever or top tension release like a home sewing machine On a home sewing machine the top tension is released wh...

Page 14: ...Optional Horizontal Spool Pin Inserting the Bobbin Note Turn off the power switch while inserting the bobbin case or anytime your hands are near the needle area 1 Place the bobbin in the bobbin case so that the thread pulls off clockwise when viewing the open side Figure 17 2 Slide the thread through the slot Figure 18 and under the tension spring leaving 5 6 inches of thread hanging loose Figure ...

Page 15: ...s the needle up down button with right hand bringing the needle back to the up position 3 Pull the machine 3 4 inches away while holding the needle thread 4 Bobbin thread will pull up and through to the top allowing you to grasp the loop and pull it to the desired length Bobbin Tension The bobbin tension is the foundation tension for the entire machine To test that bobbin tension is correct hold t...

Page 16: ...ntenance and cleaning The hook assembly however needs regular lubricating Failure to keep the hook assembly lubricated can cause severe damage to the machine To lubricate turn off the machine Remove bobbin and case before oiling Clean around the hook assembly with a soft brush to remove lint Put a very small drop of oil on the hook in the region where the bobbin basket assembly and the rotating ho...

Page 17: ...dles This button does not move the needle but simply determines the final needle position after the machine has been stopped Figure 24 When in Needle Down mode the radio button is white when activated the needle ends in the Down position upon pressing the Stop button on the handles Again this button does not move the needle but sets the final resting position of the needle after Stop is pressed Us...

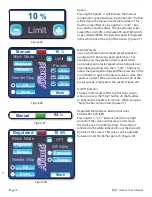
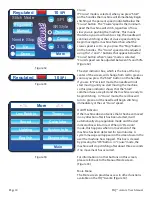
Page 18: ...t speeds simply press the speed Figure 26 On Off Indicator The box in the center of the top bar turns green when you press the Start button on the handles to indicate the needle is in motion When you press Stop the box will turn red Figure 27 Regulated Mode Screen Button Functions Stitches Per Inch SPI Pressing the or buttons near the top right portion of the screen will increase or decrease the s...

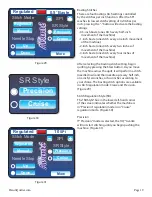
Page 19: ...uilt it will perform a stitch needle down and then needle up every half inch one inch two inches or four inches according to your choice The basting stitch options are available in stitch regulation mode Cruise and Precision Figure 29 Stitch Regulation Style SR The SR Style box in the lower left hand corner of the screen indicates whether the machine is in Precision regulation mode or in Cruise re...

Page 20: ...you start moving the machine so this green indicator shows that the Start command was accepted and the machine is ready to begin stitching In Cruise mode the red box will turn to green and the needle will begin stitching immediately at the set Cruise speed On Off Indicator If the machine does not sense that it has been moved in any direction after it has been started it will automatically stop reg...

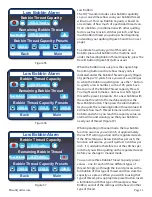
Page 21: ...y Figure 36 perhaps 210 yards Since you want a warning as to when the bobbin is getting low use the button to specify a lower number such as 195 yards Save that as one of the Bobbin Thread Capacity Presets You might want to make a note as to which type of thread the preset represents Put a new bobbin with the same thread into the machine and press the New Bobbin button Then press the Alarm button ...

Page 22: ... when you want to zero out the timer and begin a new timing session Sound Screen The Volume portion of this screen has two buttons and a sliding control Pressing on the Mute button turns the alarm volume off Pressing the Max button turns the volume to its loudest level Pressing the sliding control in any position sets the volume to the level indicated in that control Pressing and moving back and f...

Page 23: ...ieved when viewed in a dark or dimly lit room Although Handi Quilter has chosen to use UV lights which emit a light wavelength at the lowest end of the UV spectrum to minimize eye strain and damage constant or direct exposure to any UV lighting can cause eye strain and may lead to permanent eye damage Be careful and avoid looking directly at the UV lights which emit a violet colored light The UV l...

Page 24: ...g a given project To reset this counter press the blue Reset button just to the left of the Trip box The Lifetime counter cannot be reset and should be used as an indicator to determine when general machine maintenance should be performed by an authorized Handi Quilter Representative Figure 43 Press the Main button to return to the Regulated or Manual menu screen or the Back button to return to th...

Page 25: ...nted at the rear of the carriage As you slowly move the carriage left and right you should hear a pulsing beep that pulses faster as you move faster A solid beep no beep or periods of irregular beeping with constant motion indicate a problem with the X encoder The most likely cause of a problem is a stitch regulator wheel that is not making consistent contact with the track Check the spring tensio...

Page 26: ...he fully extended down position after being compressed Also assure that the track is straight with no dips or in dentations and that it is clean and free of contamination Other causes are an unplugged or damaged cable or pos sibly an issue with the main control board Figure 49 Press the Main button to return to the Regulated or Manual menu screen or the Back button to return to the More menu scree...

Page 27: ...he indicator will turn green As you start moving the machine it will begin stitching HQ STITCH REGULATOR OPERATION Choose from Two Types of Stitch Regulation Cruise or Precision When you stop moving the machine the needle pauses sometimes in mid stroke When you press the Start Stop or Needle Up Down key to stop the machine the indicator will turn red showing that the needle will not move when you ...

Page 28: ...itches get shorter and can build up on top of each other breaking the thread or making it extremely difficult to unpick The stitch speed can be decreased while maintaining a constant motion with the machine to bring the stitches back to the desired length Getting Started Quilting In Stitch Regulator Mode Set the machine to desired stitch length Begin moving the machine to become accustomed to the ...

Page 29: ...n order to adjust for a more positive thread loop pickup by the hook point Loosen pole tension on the frame Fabric that is rolled too tight causes the fibers to separate This reduces the needle friction on the thread resulting in a smaller thread loop Loosen top tension Re check top and bobbin tension see pages 12 13 Inspect that the thread take up lever thread stirrup or tension spring are all th...

Page 30: ...rective Measure Carriage wheels not centered on track Thread caught in wheels Center the carriage wheels on top of the continuous track Check that the machine carriage has not jumped track Remove all thread or debris in wheels Check that the tracks are free of lint and threads Motor Fails to Run Corrective Measure On Off switch turned off Machine not receiving power Turn the machine on by using th...

Page 31: ...ch makes thread brittle Do not use poor quality thread or thread that is rotted or brittle Check thread tension in top and bobbin for proper balance See pages 14 16 Check that the machine is threaded correctly Inspect for accidental double wrapping of thread on thread guides Inspect the thread mast making sure the eyelets of the mast are directly over the spools Inspect the vertical positioning of...

Page 32: ......

Page 33: ...n of HQ are defective in workmanship or material and are returned to HQ or an authorized repair facility or such other point or place that may be designated by HQ All other costs including cost of freight and shipment for repair under this warranty shall be the customer s costs This warranty shall be in force only for the original purchaser The machine registration card must be completed and recei...

Page 34: ...ginal warranty or ninety days from the date of shipment of a repaired or replaced Product whichever is longer HQ s entire liability for any defective Product shall in no event exceed the purchase price for the defective Product This limitation applies even if Handi Quilter cannot or does not repair or replace any defective Product Warranty Claims Service under the above warranties may be obtained ...

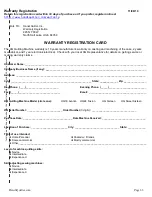
Page 35: ...___________________________________________________ State _____________ Zip ________________ Day Phone ____ _______________________ Evening Phone _____ ___________________________ Fax _____ ______________________________ Email _________________________________________ HQ Quilting Machine Model circle one HQ18 Avanté HQ24 Fusion HQ Sixteen HQ Sweet Sixteen HQ Serial Number _________________________...

Page 36: ...Page 36 HQ18 Avanté User Manual This page was intentionally left blank ...

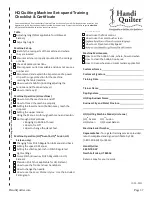
Page 37: ...use the front and rear handlebars How to change the needle How to use the Laser Pointer stylus Use the included Pantograph HQ Sweet Sixteen only How to use the foot control Half stitch explain the initial 2 second delay How to set a maximum speed on the menu My Speed Machine Maintenance How to oil the bobbin hook where how and when How to clean the bobbin hook area How to clean wheels and tracks w...

Page 38: ...Page 38 HQ18 Avanté User Manual This page was intentionally left blank ...

Page 39: ...Page 38 HQ18 Avanté User Manual This page was intentionally left blank ...

Page 40: ... 2009 Handi Quilter Inc All rights reserved Printed in the USA 04 18 14 Handi Quilter Inc 445 N 700 W North Salt Lake UT 84054 1 877 697 8458 www handiquilter com ...

Reviews: