HandiQuilter.com
Page 15
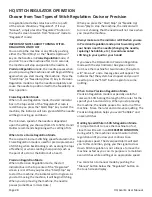
Figure 19
TENSION
SPRING
3. Turn off the power switch while inserting the
bobbin case or anytime the hands are near the
needle area.
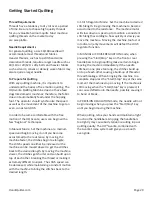
4. Do not lift the lever on bobbin case. When placing
the machine fit the bobbin case onto the hook
spindle in the machine. Rotate the casing until the
open throat keys into the alignment notch in the
middle of the hook. Push the casing in until it stops
in place. Push inward until it clicks (see Figure 20).
Note: It is not suggested that the lever on the bobbin
case be used for this installation. The latch lever
should be used only for removal of the bobbin case.
Figure 20
Drawing the Bobbin Thread to the Top of the Quilt
1. After the machine is threaded, locate needle
up/needle down button on the left handle.
2. While firmly holding the tail of the needle thread
with the left hand, press the needle up/down
button with right hand, bringing the needle back to
the up position.
3. Pull the machine three to four inches away while
holding the needle thread.
4. Bobbin thread will pull up and through to the top,
allowing you to grasp the loop and pull it to the
desired length.
Bobbin Tension
The bobbin tension is the foundation tension for the
entire machine. To test that bobbin tension is correct,
hold the bobbin case in the palm of your hand with
the open end facing up. Wrap the thread around
your index finger and while pulling up on the thread
and gently wiggling the finger front to back (not up
and down which is not consistent), the bobbin case
should lift up on its side, but NOT lift out of your
hand. If it will not lift up onto its side, it is too loose
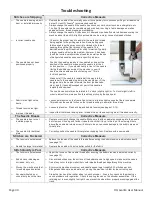
and if it lifts out of your hand, it is too tight. The small
screw in the center of the tension spring is where the
adjustment is made (see Figure 21). Turn clockwise to
tighten and counter-clockwise to loosen the bobbin
case tension. Check your bobbin tension every time a
new bobbin is inserted.
Figure 21


