


HQ Fusion
™
User Manual 1.0
Page 5
Installing Front Handles
Caution:
Unplug the HQ Fusion™ from the electrical outlet
.
All power to the machine must
be turned off when installing the front handles. Failure to do so can result in damage to the
machine.
Locate the three long bolts and the appropriate Hex wrench. To install the handles, tilt the
screen forward. Line up the holes on top of the handles with the pre-drilled holes on top of
the machine. Slide a single bolt into one of the holes until it stops. Hand-tighten the bolt
enough to secure the handles to the top of the machine, but still allow you to rotate the
handles. Secure the short 9-pin handlebar serial cable to the serial port on the back casing
of the machine (see diagram B, #24). You may need to rotate the handle slightly to allow
access to the finger screws. Use the finger screws to tighten the 9-pin connector in
position. If necessary, a flat screwdriver may be used to gently secure the connector.
Rotate the handles back to their correct position and insert and hand tighten the remaining
two handlebar bolts. Use the included 5 mm Hex wrench to securely fasten the handles to
the front of the machine.
Installing Rear Handles
Check that the HQ Fusion™ is unplugged from the electrical outlet. All power to the
machine must be turned off when installing the back handles. Failure to do so can result in
damage to the machine.
The rear handlebar comes mounted with three screws to the ―L
‖
bracket. Line up the two
holes in the ―
L‖ b
racket with those on the rear of the machine. Slide the short bolts into
holes until they stop. Hand tighten, and then use the Hex wrench to securely fasten the
handles to the back of the machine.
Once the two bolts are in place, plug the 9-pin connector into the serial port underneath the
rear handles (see diagram C, #33). Ensure the pins are lined up so they are not damaged
when the plug is pushed in. Push the plug securely in place.
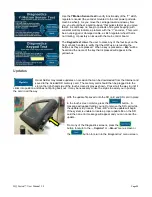
Installing the Power Cord
Insert the cord into the top power connector on the rear of the
machine. Plug the three-prong end into a power source (see
Photo 3).
The lower power connector is for powering other attachments
developed by Handi Quilter.
Note:
After the handles have been completely installed and plugged in, test them by turning the HQ Fusion
™
on/off switch to ―on
‖. I
f nothing is displayed, press the display power button on the top right of the touch-screen
display. If the display still does not turn on, check that the handle bar cable on the side of the machine is
plugged in securely, that your machine is turned on, and that the power cord is plugged into the machine as well
as a power source.
Photo 3


