background image

HandiQuilter.com

 Page 17

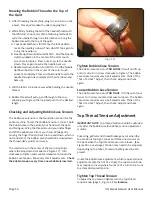
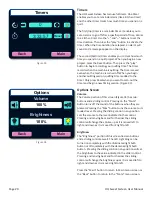
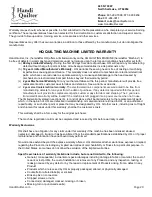
Presets

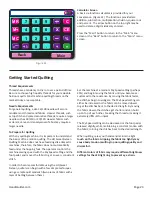
Save up to three preset speeds to quickly switch between 

speed preferences. For example, you may prefer a slower 

speed when using rulers and a faster speed when doing 

all-over meandering quilting. (Figure 23)

Use the “+” and “–” buttons to adjust the speed 

percentage and then press the record button next to one 

of the preset values to store that speed as a preset. When 

you want to use one of the preset speeds, simply press the 

speed.

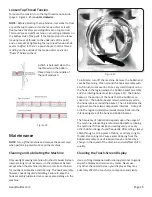
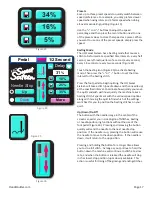
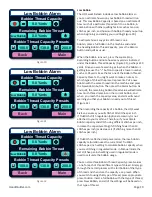
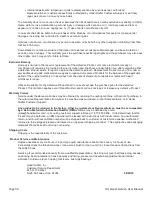
Basting Mode 

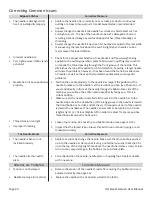
The HQ Sweet Sixteen has a basting mode that causes a 

stitch to be formed at a specified time interval – every half 

second, every three/quarters of a second, every second, 

every 1.5 second, or every two seconds. (Figure 24)

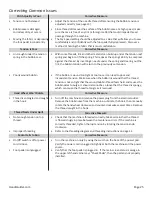
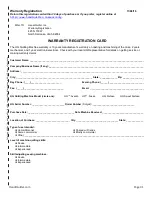
Touch the basting icon (Figure 25) to activate basting 

mode. Then press the “+” or “–” button to set the time 

interval for the basting stitch.

Press the foot pedal to begin quilting. The HQ Sweet 

Sixteen will take a stitch (needle down and then needle up) 

at the specified interval. Coordinate how quickly you move 

the quilt sandwich with how quickly the machine takes a 

basting stitch. Experiment with the various speed options 

along with moving the quilt to find which of the settings 

work best for you to position the basting stitches on your 

quilt.

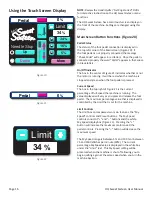
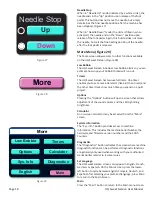
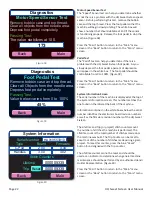
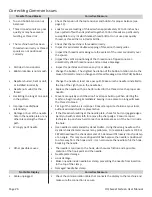
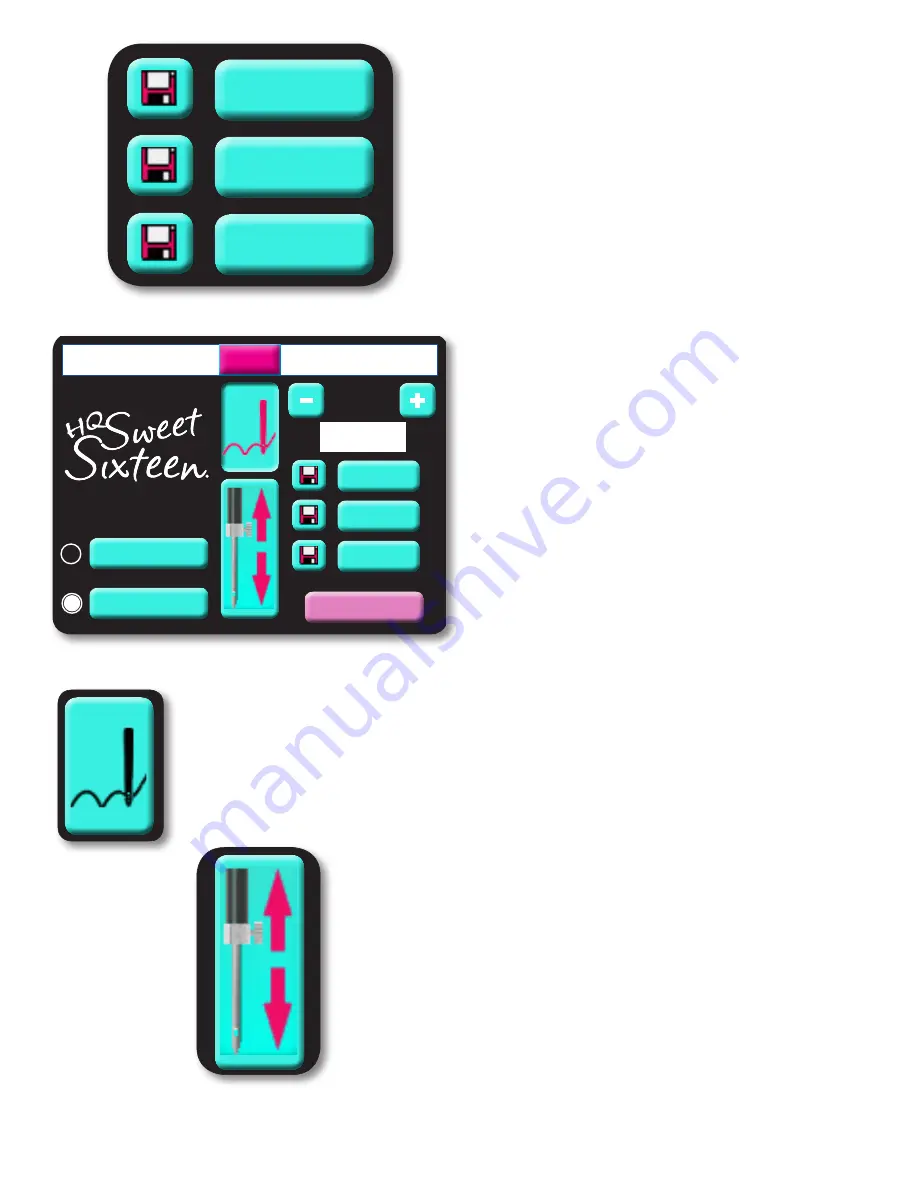
Up/Down/Tie-Off

The button with the needle image in the center of the 

screen can assist you in creating tie-off stitches, basting 

or needle-positioning functions without the use of the 

foot pedal (Figure 26).  Pressing and releasing the button 

quickly will send the needle to the next needle stop 

position.  If the needle is up, pressing the button will cause 

the needle to move to the down position.  If the needle is 

down, it will return to the up position.  

Pressing and holding the button for a longer time allows 

you to do a full stitch.  As long as you continue to hold the 

button down the machine will continue to stitch at a slow 

rate, and when the button is released the needle will stop 

in the closest stop position (up or down) available.  This 

action is useful for tieing off beginning and ending stitches. 

Figure 25

Figure 24

Figure 23

Up

Down

Needle Stop

More

Limit

Pedal

%

34 

%

34%
16%

5%

Up

Down

Needle Stop

More

Limit

Pedal

%

34 

%

34%
16%

5%

Figure 26

Up

Down

Needle Stop

More

Delay

Pedal

1/2 Second

31 

%

10%
25%
35%

Up

Down

Needle Stop

More

Limit

Pedal

%

34 

%

34%
16%

5%

Summary of Contents for HQ Sweet Sixteen QM30270

Page 1: ...USER MANUAL 04 04 14 2014 Handi Quilter Inc QM30270 version 2 1 ...

Page 2: ...isit to learn more about the art of quilting We ve posted tips tricks and tutorials on subjects as di verse as Oiling Your Machine to Loading a Quilt to Making Perfect Feathers We ve got videos to watch pdf files to print out for reference and forums for asking questions Set up your own Handi Quilter Glog a combina tion blog and photo gallery where you can share your own quilting story Your new qu...

Page 3: ...to correct the interference by one or more of the following measures Reorient or relocate the receiving antenna Increase the separation between the equipment and receiver Consult the dealer or an experienced radio TV technician for help Changes or modifications not expressly approved by the manufacturer or local sales distributor could void the user s authority to operate the equipment IMPORTANT I...

Page 4: ...ot operate where aerosol spray products are being used or where oxygen is being administered To disconnect turn the machine switch to the symbol O position which represents off then remove plug from outlet Do not unplug by pulling on cord To unplug grasp the plug not the cord Keep fingers away from all moving parts Special care is required around the machine needle Always use the proper needle pla...

Page 5: ... the machine and therefore should never be used 3 Do not drop or bump the machine 4 Always consult the manual to replace or fix the presser foot needle or any other part of the machine To repair or adjust the machine If the machine breaks down or needs adjustment first check the troubleshooting chart in the appendix to inspect and adjust the machine yourself For more product information and update...

Page 6: ...g Always replace the fuse cover Never use plugs with the fuse cover omitted WARNING DO NOT CONNECT EITHER WIRE TO THE EARTH TERMINAL WHICH IS MARKED WITH THE LETTER E BY THE EARTH SYMBOL OR COLOURED GREEN OR GREEN AND YELLOW The wires in this main lead are coloured in accordance with the following code Blue Neutral Brown Live As the colours of the wiring in the main lead of this appliance may not ...

Page 7: ... to a 2 pole receptacle as shown in sketch B if a properly grounded outlet is not available The temporary adapter should be used only until a properly grounded out let can be installed by a qualified electrician The green colored rigid ear lug and the like extending from the adapter must be connected to a permanent ground such as a properly grounded outlet box cover When ever the adapter is used i...

Page 8: ...N insérez ni ne laissez tomber aucun objet dans les ouvertures N utilisez pas la machine à l extérieur Ne faites pas fonctionner la machine en cas d utilisation d aérosols pulvérisations ou d administration d oxygène Pour débrancher la machine mettez l interrupteur de la machine en position O position d arrêt puis retirez la fiche de la prise Ne débranchez pas la machine en tirant sur le câble Tir...

Page 9: ...s à récurer peuvent endommager le boîtier et la machine et ne doivent donc jamais être utilisés 3 Ne faites pas tomber et ne cognez jamais la machine 4 Consultez toujours ce manuel pour remplacer ou fixer correctement les pieds de biche l aiguille ou toute autre pièce Pour réparer ou régler la machine Si la machine tombe en panne ou nécessite des réglages consultez tout d abord le tableau de dépan...

Page 10: ...t Views 8 Setting Up the Table Placing Machine in Table Installing Power Cord Installing Foot Pedal 9 Installing Thread Mast Installing Color Touch Screen 10 Inserting Needle Needle Thread Selection Guide Changing the Hopping Foot 11 Threading the Machine 13 Bobbin Case and Bobbin Thread Tension Adjustments 14 Top Thread Tension Adjustment Maintenance 16 Using the Touch Screen Displays 23 Geting S...

Page 11: ...e only attachments recommended by the manufacturer 11 To disconnect from the wall outlet push the switch to the off position then remove the plug from outlet pulling from the plug not the cord Never operate the HQ Sweet Sixteen if the cord is damaged or not working correctly If a mechanical or electrical problem is encountered return the HQ Sweet Sixteen to the nearest authorized service center or...

Page 12: ...hread Guide F 9 Front Casing Frame 10 Hand Wheel HQ Sweet Sixteen Components Front Side View Figure 1 3 2 1 7 6 4 5 8 10 Components Not Identified Because the HQ Sweet Sixteen is upgradeable to a stand up frame quilting system there are components found on the machine that are not used for sit down machine quilting such as threaded holes for handlebars 9 5 4 8 6 3 7 1 2 10 ...

Page 13: ...Casing Frame 21 Rear Base 22 Color Touch Screen Display Connector 23 Threaded Horizontal Spool Pin Mounting Hole 11 Needle Bar 12 Needle Bar Thread Guide 13 Needle 14 Ruler Foot 15 Needle Plate 16 Handi Feet mount 17 Presser Bar Back Side View Figure 2 23 18 19 21 20 15 14 13 12 11 DETAIL A 17 16 22 ...

Page 14: ...ch 24 Power Cord Connector 25 Accessory Power Outlet 26 Foot Pedal Connector Rear and Front Views Rear Front Figure 3 27 Spool Pin 1 28 Electronic Control Pod C Pod 29 Bobbin Assembly 30 LED Light Ring 31 Power Pod P Pod 32 Spool Pin 2 25 24 23 31 26 32 28 27 30 29 ...

Page 15: ... table weighs nearly 50 pounds so it is recommended that you ask someone to help 2 Unfold the legs pulling on the horizontal braces until the legs snap into place Set the table upright 3 Make the table taller by pinching the two height adjustment tabs on each set of legs and lifting on table while holding legs down with foot Make the table shorter by pinching the same tabs and pushing down on the ...

Page 16: ...h Screen The color touch screen comes pre installed on its mounting bracket and should have one end of the D cable attached to the back of the touch screen see Figure 6 NOTE Confirm that the power is turned offer before installing the Color Touch Screen 1 Remove the two long bolts from the bag in which they are packed 2 There are three holes on top of the machine head see page 6 Figure 2 17 Only t...

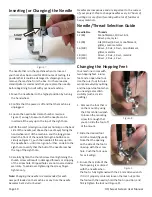
Page 17: ...red under warranty To avoid over tightening the screw finger tighten only Note Changing the needle is recommended for each new quilt loaded on the machine or any time the needle becomes bent dull or burred Needles are inexpensive and are important to the success of your project Plan to change needles every 5 7 hours of quilting or more often if working with a lot of fusibles or heavy materials Nee...

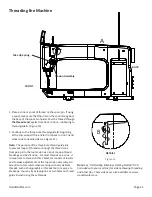
Page 18: ...These videos are also available on www HandiQuilter com Threading the Machine Figure 11 F Page 12 HQ18 Avanté User Manual 1 Place a cone or spool of thread on the spool pin Pass the thread through the thread mast eyelet from back to front continuing to thread guide A Figure 11 2 Continue to the three hole thread guide B Wrap all three holes from back to front hand wheel side to needle side see Fig...

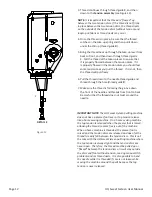
Page 19: ...ead through the hole thread guide F 7 Make sure the thread is following the groove down the front of the needle and threads from front to back Be careful that the thread does not twist around the needle IMPORTANT NOTE The HQ Sweet Sixteen quilting machine does not have a presser foot lever or top tension release like a home sewing machine On a home sewing machine the top tension is released when t...

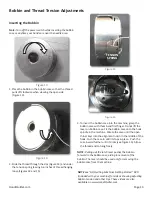
Page 20: ...deos showing adjusting bobbin tension and other tips These videos are also available on www HandiQuilter com 3 To insert the bobbin case into the machine grasp the bobbin case with thumb and first finger Do not lift the lever on bobbin case Fit the bobbin case onto the hook spindle in the machine Rotate the case until the open throat keys into the alignment notch in the middle of the hook Push the...

Page 21: ...ng on the fabric thread or batting used in each project Unlike the bobbin case adjustment which requires minute adjustments like the tick of a clock the top tension knob may require turns anywhere from 1 4 of a turn to 2 4 turns to achieve balanced tension Tighten Top Thread Tension To adjust the top tension tighter turn the top thread tension knob page 5 Figure 1 5 clockwise Top Thread Tension Ad...

Page 22: ...et assembly and the rotating hook meet see Figure 19 The bobbin basket is the portion of the hook that the bobbin case snaps into The bobbin basket remains stationary while the hook rotates around the basket The oil lubricates the region where these two components interlock A drop of oil in the region indicated will work its way back into the interlocking area of the hook and bobbin basket The fre...

Page 23: ...ot pedal The maximum percentage value that is displayed is controlled by the Limit that is set for the machine Limit Controls The Limit box encompasses two main features the My Speed controls and Preset buttons The My Speed controls consist of and buttons and the white My Speed display box Figure 22 Pressing the button will increase the maximum motor speed the pedal controls Pressing the button wi...

Page 24: ...th how quickly the machine takes a basting stitch Experiment with the various speed options along with moving the quilt to find which of the settings work best for you to position the basting stitches on your quilt Up Down Tie Off The button with the needle image in the center of the screen can assist you in creating tie off stitches basting or needle positioning functions without the use of the f...

Page 25: ...time you spend on a quilt project Options Pressing the Options button will open a screen that allows adjustment of the sound volume and the LED Light Ring brightness Calculator An on screen calculator may be accessed from the More screen System Information The Sys Info Button provides access to machine information This includes the machine Serial Number the hardware and firmware version num bers an...

Page 26: ...the capacity of a bobbin the HQ Sweet Sixteen assumes you will stitch at 10 stitches per inch if TruStitch stitch regulation optional accessory is not attached to your machine Therefore if you estimate bobbin capacity and stitch using different stitches per inch increase the capacity setting if stitching fewer than 10 stitches per inch or decrease it if stitching more than 10 stitches per inch If ...

Page 27: ...tions Screen Volume The Volume portion of this screen Figure 34 has two buttons and a sliding control Pressing on the Mute button turns off the sound of the buttons when they are pressed Pressing the Max but ton turns the volume to its loudest level Pressing the sliding control in any position sets the volume to the level indicated in that control Pressing and moving back and forth across the slid...

Page 28: ...ant solid beep or no beep at all this indicates a failed test and the machine should be inspected by a quali fied Handi Quilter repair technician Press the Main button to return to the Main menu screen or the Back button to return to the More menu screen Needle Sensor Test The Needle Sensor test will indicate whether the nee dle position sensor is functioning properly Rotating the hand wheel should...

Page 29: ...ow the serial number identifies the electronics board revision numbers as well as the firmware revision numbers of the HQ Sweet Sixteen The Lifetime and Trip or project stitch counters count the number of stitches the machine is performed The Lifetime count is the total number of stitches made since the machine was built The Trip Counter can be reset to keep track of the number of stitches made duri...

Page 30: ...uilting Set the machine at a medium My Speed setting perhaps 25 and begin moving the fabric until you become ac customed to the resistance By moving the fabric faster the stitches begin to elongate The My Speed setting can either be increased or the fabric can be moved slower to get the stitches back to the desired length By moving the fabric slower the stitches get shorter and can build up on top...

Page 31: ... the needle to make sure the needle is at the 6 o clock position see Photo 16 If you stand directly in front of the needle facing the bobbin case side of the machine you will see the entire needle eye directly facing you This is 6 o clock position Make sure 1 the needle is installed all the way into the needle bar to the needle stop hole in the needle bar 2 the long groove in the needle is toward ...

Page 32: ...the thread tension is not so tight that the wound bobbin thread feels hard and causes the bobbin sides to bulge It should also not be so loose that the thread is spongy which can cause the thread to tangle as it is wound Poorly wound bobbin Hand Wheel Won t Rotate Corrective Measure Turn off the machine and remove the power plug from the electrical outlet Remove the bobbin case from the machine Lu...

Page 33: ...se the proper size needle Needle not suited for the thread Move more quickly so stitches don t overlap or build up When starting the machine begin moving immediately Sewing in one place too long will cause the thread to break Hesitating too long at one point in the pattern Timing of the machine is improper Consult a repair technician at your local authorized Handi Quilter representative Improper n...

Page 34: ...xtension measures 18 x 30 see Figure 36 Purchase one or two to provide extra support for large projects Adding two extensions will expand the original table to a full six feet in width one extension shown above Debbie Brown DVD s Figure 38 Sit Down Longarm Quilting Featuring Debby Brown Handi Quilter National Educator Video 1 Getting Started Video 2 Quilting Blocks and Borders Video 3 Using Rulers...

Page 35: ...This page was intentionally left blank ...

Page 36: ...in the opinion of HQ are defective in workmanship or material and are returned to HQ or an authorized repair facility or such other point or place that may be designated by HQ All other costs including cost of freight and shipment for repair under this warranty shall be the customer s costs This warranty shall be in force only for the original purchaser The machine registration card must be comple...

Page 37: ...or replaced Product whichever is longer HQ s entire liability for any defective Product shall in no event exceed the purchase price for the defective Product This limitation applies even if Handi Quilter cannot or does not repair or replace any defective Product Warranty Claims Service under the above warranties may be obtained by returning the quilting machine with proof of purchase to the author...

Page 38: ..._______________________________________________________________________________ City __________________________________________________________ State _____________ Zip ________________ Day Phone ____ _______________________ Evening Phone _____ ___________________________ Fax _____ ______________________________ Email _________________________________________ HQ Quilting Machine Model circle one HQ...

Page 39: ...Page 32 HQ Sweet Sixteen User Manual This page was intentionally left blank ...

Page 40: ...nd mail or fax this registration information within 30 days of purchase How to use the foot control How to use the color touch screen Explain functions of touch screen displays How to set Presets and My Speed How to use Needle up down tie off button Table Adjusting length Not applicable for HQ Sweet Sixteen Adjusting height Machine Set up Identify the main parts of the machine and where they are l...

Page 41: ...Page 34 HQ Sweet Sixteen User Manual This page was intentionally left blank ...

Page 42: ... 2014 Handi Quilter Inc All rights reserved Printed in the USA 04 04 14 Handi Quilter Inc 445 N 700 W North Salt Lake UT 84054 1 877 697 8458 www handiquilter com ...

Reviews: