background image

HQ Sixteen

 User Manual 1.6 

 Page 19

Troubleshooting 

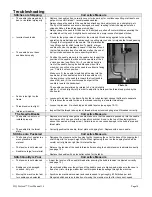
Stitches are Skipping 

Corrective Measure 


The needle is damaged, dull, 
bent, or installed improperly 


Incorrect needle size 


The needle has not been 
positioned properly 


Fabric is too tight on the 
frame 


Thread tension too tight 


Improper threading 


Replace the needle often, normally once or twice per day for continuous quilting or at least once 
per quilt. Use HQ Sixteen

 recommended needles.  


Always change the needle if the needle has struck any hard object such as a straight pin, etc. 
The tip of the needle can become damaged or burred, resulting in fabric damage as well as 
skipped stitches, thread breakage or shredding. 


Always change the needle if it has been hit, bumped or pulled off center while maneuvering the 
machine about the quilt. A slightly bent needle can be a major cause of skipped stitches. 


Check for the proper size of needle for the work and thread being applied to the quilting 
operation. Some battings and fabrics used in quilting may constrict or impede the thread passing 
through the front groove of the needle. This diminishes the 
loop lift required for stitch formation. Typically, a larger 
needle will solve the problem; however, it has been found 
that certain smaller sizes of needles as well as the use of 
ball pointed needles solve some specific problems. 


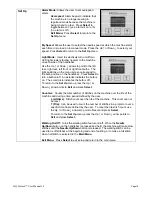
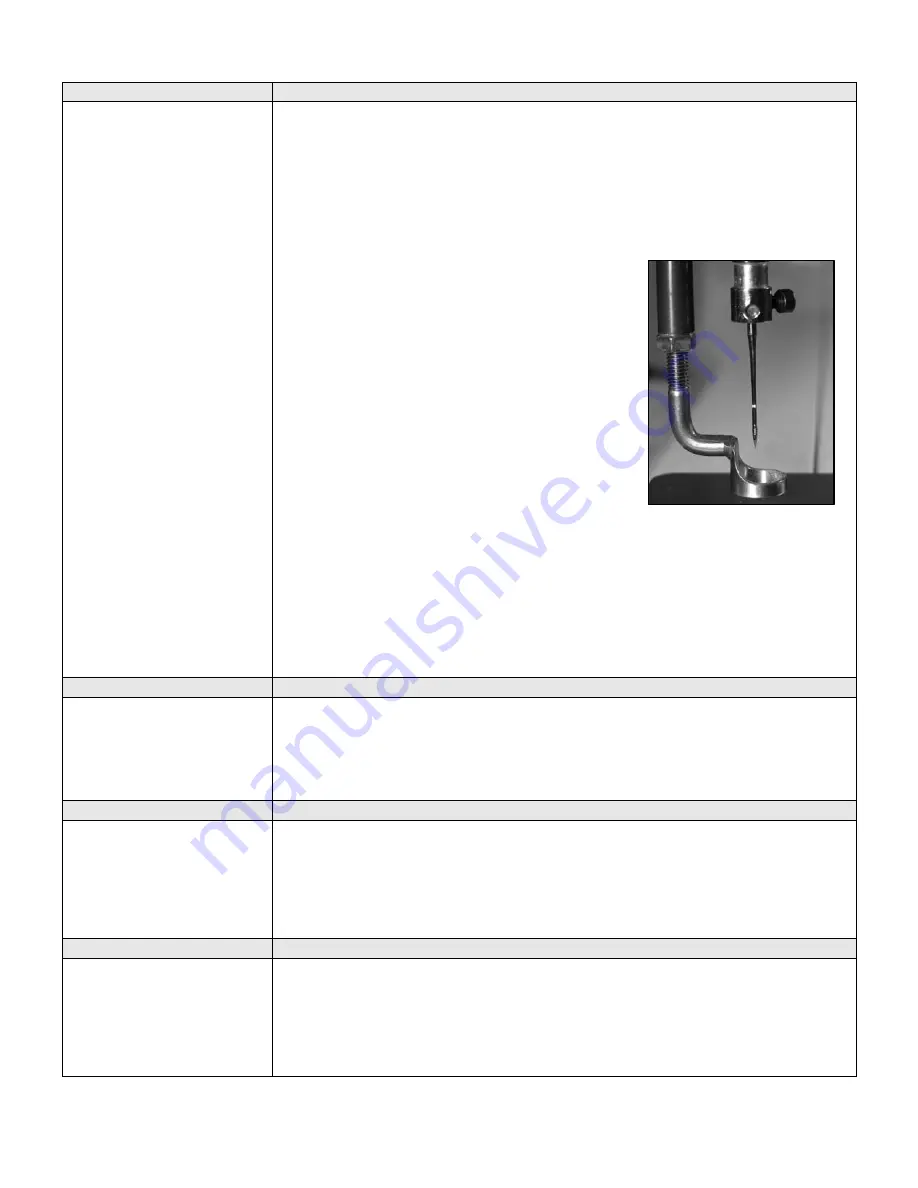
Position the needle properly to the needle bar. Inspect the 
position of the needle to make sure the needle is at the 6 
o’clock position (see Photo 16)—If you stand directly in 
front of the needle (facing the bobbin case side of the 
machine), you will see the entire needle eye directly facing 
you.  This is 6 o’clock position.  

Make sure (1) the needle is installed all the way into the 
needle bar to the needle stop hole in the needle bar, (2) 
the long groove in the needle is toward the front (bobbin 
case side), and (3) the scarf/scooped out part of the 
needle is toward the handwheel.   

The needle can sometimes be rotated to 5 o’clock (slightly 
right) or 7 o’clock (slightly left) in order to adjust for a more positive thread loop pickup by the 
hook point.   


Loosen pole tension on the frame. Fabric that is rolled too tight causes the fibers to separate. 

This reduces the needle friction on the thread resulting in a smaller thread loop.  


Loosen top tension.  Re-check top and bobbin tension (see pages 12-13).   


Inspect that the thread take-up lever, thread stirrup or tension spring are all threaded correctly. 
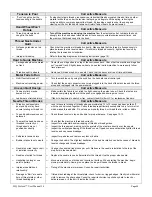
The Needle Breaks 

Corrective Measure 


The needle is bent or not 
installed properly 


The needle hits the throat 
plate 


Replace or correctly change the needle. Make sure that the needle is pushed up into the needle 
bar clamp until it can go no farther (visually check that it is up to the top of the stop/sight hole 
above the needle bar clamp screw). Failure to do so can cause damage in the bobbin area and 
throat plate. 


Correctly position the needle, throat plate or hopping foot.  Replace with a new needle. 

Stitches are Puckered 

Corrective Measure 


The hopping foot applies too 
much pressure to the 
material 


The tension is not balanced 


Needle too large for material 


Decrease the pressure on the hopping foot by loosening the nut at the base of the hopping foot 
shaft. Adjust to the proper height. Note: When tightening the nut on the hopping foot shaft, be 
careful not to tighten so tight that it rotates the bar. 


Balance the tension of the needle thread after ensuring the bobbin tension is adjusted correctly 

(see page 12).  


Replace the needle with a size better suited for the fabric. 

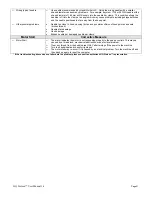
Stitch Quality is Poor 

Corrective Measure 


The tension is not balanced 


Bobbin case is damaged, 

corroded, dirty, etc 


Moving the machine too fast 

for needle speed selected 


Adjust the tension of the needle thread after ensuring the bobbin tension is adjusted correctly 
(see page 12).  


Since thread slides over the surface of the bobbin case at a high speed, make sure the case is 
free of any lint or foreign matter that could impede thread passage through the machine. 


Synchronize machine movement and needle speed to get roughly 8-10 stitches per inch. 
Elongated stitches are an indication of moving the machine too fast for the current speed. 

Photo 16

Summary of Contents for HQSixteen

Page 1: ...R Copyright 2007 All Rights Reserved No part of this manual may be reproduced in whole or part without express written consent from Handi Quilter LLC User Manual v 1 6 ...

Page 2: ...ator Installation 4 5 Installation Procedures 6 9 Laser Style Safety and Use Guidelines 9 Threading the Machine 10 Bobbin and Thread Tension Adjustments 12 Maintenance 13 Using the Handles and Menu Screens 14 Stitch Regulator Operation 17 Thread and Quilting Recommendations 18 Troubleshooting 19 21 ...

Page 3: ...t working correctly If a mechanical or electrical problem is encountered return the HQ Sixteen to the nearest authorized service center or the manufacturer for examination repair electrical or mechanical adjustment 11 It is not recommended that the HQ Sixteen Quilting Machine be used with any home machine quilting frame other than those recommended or manufactured by Handi Quilter LLC QuickFacts D...

Page 4: ...kage Contents Please keep your original box and packaging HQ Sixteen Components Optional Accessories 1 Front Handles 2 Rear Handles 3 Laser Stylus and Clamp 4 Laser Stylus Post Diagram A Front Side Diagram A 1 Thread Mast 2 Thread Guide A 3 Three Hole Thread Guide B 4 Thread Guide C 5 Tension Assembly 6 Stirrup Thread Guide D 7 Take Up Lever 8 Thread Guide E 9 Needle Bar Thread Guide 10 Needle 11 ...

Page 5: ...Handle Holes 22 Bobbin Assembly 23 Needle Plate 24 Front Wheel Base 25 Oval Position Guides 26 Rear Wheel Base 27 Wheels 4 Rear Diagram C 28 Spool Pin 1 29 Laser Stylus Power Connector 30 Front Electronic Control Pod 31 Serial Port for Stitch Regulator or Foot Control 32 Foot Pedal Connector 33 Rear Handle Bar Serial Port 34 Rear Threaded Handle Holes 35 Power Cord Connector 36 On Off Switch 37 Ba...

Page 6: ...at the Front Encoder Assembly will be toward the front of the machine the needle side of the machine The front side of the carriage has a longer distance from the end of the carriage to the cross bar The back side of the carriage has a shorter distance from the end of the carriage to the cross bar Be sure to place the carriage on the frame correctly see Photo 2 Note A Handi Quilter Welcome DVD is ...

Page 7: ...of the rear base up and over the rear base under the protruding display pod and connects into the 9 pin serial port of the machine see Photo 3 5 REMEMBER that if the machine is to be removed from the carriage the cable must be disconnected from the Front Encoder Assembly on the carriage The other two connectors on the cable should remain in place Failure to unplug the cable when removing the machi...

Page 8: ...hine must be turned off when installing the back handles Failure to do so can result in damage to the machine The rear handle bar comes mounted with three screws to the L bracket Line up the two holes in the L bracket with those on the rear of the machine Slide the short bolts into holes until they stop Hand tighten and then use the Hex wrench to securely fasten the handle to the back of the machi...

Page 9: ... appropriate Hex wrench see Photo 6 3 With the scarf small ground out section dip on the back side of the needle just above the needle eye facing toward the handwheel side of the machine and the long groove down the front of the needle facing the bobbin case side see diagram E push the needle all the way up into the needle bar until it can go no farther Diagram D FOR TRADITIONAL SIT DOWN QUILTING ...

Page 10: ... when the nut is tightened Tighten the mast clockwise until it is securely in place Use the nut to secure the mast to the machine Note The eyelets of the thread mast MUST be centered over the spool pins so the cone will not pull turn or tilt causing thread tension problems see Photo 7 Installing the Laser Stylus Begin by locating the laser stylus guide post the laser holder and the laser stylus To...

Page 11: ...d downward toward the table before connecting it to the port Never point it in a direction that would project the beam into someone s eyes If the laser should cease to operate check to ensure the plug is firmly seated into the HQ Sixteen laser port Caution Use of controls or adjustments or performance of procedures other than those specified herein may result in hazardous radiation exposure Laser ...

Page 12: ...ad tension For most threads on a cone it is important to thread all three holes for consistent results should top thread tension need to be adjusted it should be done at the top tension assembly 3 Thread continues through thread guide C and then down to the tension assembly see Detail 2 below NOTE It is important that the thread is flossed up between the two tension discs If the thread is not firm...

Page 13: ...10 3 When using threads on the Horizontal Spool Holder skip thread guide A Thread the top hole only of the three hole thread guide B back to front Important notes The HQ Sixteen quilting machine does not have a presser foot lever or top tension release like a home sewing machine On a home sewing machine the top tension is released when the presser foot is raised allowing the thread to come freely ...

Page 14: ...press the heel of the foot pedal for needle down 2 While firmly holding the tail of the needle thread press the needle up down button with free hand bringing the needle back to the up position For sit down use push the heel of the foot pedal to bring the needle back up 3 Pull the machine 3 4 inches away while holding the needle thread 4 Bobbin thread will pull up through to the top allowing you to...

Page 15: ...ension variables will be created and more tension adjustments will be required Dark threads will be heavier because of dye than light threads of the same weight type and brand also affecting tension settings The more consistent one is the fewer variables will be involved Maintenance Cleaning and Lubricating the Machine Only use light sewing machine oil in the HQ Sixteen Internal oiling is not nece...

Page 16: ...ept user selection and return to the main menu Needle Up Down Programs the needle to automatically return to the up or down position when stopped Press Select to toggle between Needle Up and Needle Down Stitch Half Full Programs the needle to take a half or full stitch when Needle Up Down button is pressed Press Select to toggle between Stitch Half and Stitch Full Lights On Off Spot Part Lighting ...

Page 17: ...asterisk indicates the bulb is on The small circle indicates the bulb is off To return to the Set Up menu press the Up or Down arrow points to Exit and press Select Counters Counts the total number of stitches on the machine over the life of the machine and during a time period defined by the user L Lifetime Stitch count over the life of the machine This count can not be reset T Trip Can be used t...

Page 18: ...ch The machine will make slow stitches when Needle Up Down is pressed and held Note Walking must be set to On in the set up menu for this feature see page 15 Start Stop Starts and stops the machine Speed Up By pushing the plus sign the speed of the machine will gradually increase The of machine needle speed is displayed on the Menu bar ranging from 10 100 Manual mode only Speed Down By pushing the...

Page 19: ...diately start stitching As you move the machine your stitches will be regulated to the length set in step 3 If you press START and don t move the machine the needle will start stitching but will stop after 3 4 stitches IMPORTANT NOTES You can stop the machine at any time by pushing the START STOP key If you don t move the machine after 3 or 4 stitches the machine will stop and position the needle ...

Page 20: ... or the machine can be moved slower to get the stitches back to the desired length By moving the machine slower the stitches get shorter and can build up on top of each other breaking the thread or making it extremely difficult to unpick The stitch speed can be decreased while maintaining a constant motion with the machine to bring the stitches back to the desired length In Stitch Regulator Mode S...

Page 21: ... 7 o clock slightly left in order to adjust for a more positive thread loop pickup by the hook point Loosen pole tension on the frame Fabric that is rolled too tight causes the fibers to separate This reduces the needle friction on the thread resulting in a smaller thread loop Loosen top tension Re check top and bobbin tension see pages 12 13 Inspect that the thread take up lever thread stirrup or...

Page 22: ...at poles are inserted completely together with the push pin engaged so bowing won t occur If fabric is beginning to stretch or fray contact Handi Quilter LLC for replacement leaders Needle Thread Breaks Corrective Measure Thread cones spools are poor quality or may have severe twisting or thread rot Top and bobbin tensions not balanced The machine head has been threaded incorrectly or thread spool...

Page 23: ...riction and possible collision of hook point and needle broken thread Needle plate damage Hook damage Broken needles or damaged needle bar clamp Motor Stall Corrective Measure Motor Stall The alarm indicates the motor is not responding properly to the speed controls This may be caused by a thread lock mechanical obstruction or an electrical problem Clear any thread from the bobbin area ONLY after ...

Page 24: ...www HandiQuilter com ...

Reviews: