3.16 | Installation
www.HandiQuilter.com
Installation (HQ Sixteen and HQ Avanté with
4-wheel carriage)
These instructions are for installing HQ Pro-Stitcher on the HQ Sixteen and HQ Avanté (with a 4-wheel
carriage). Handi Quilter recommends installation by an authorized Handi Quilter Representative if available.
Tools required
• Power drill
• 7/16-inch open end wrench
• 7/16-inch nut driver
(or second wrench)
• 4mm Allen wrench
• 5mm Allen wrench
• Manual engagement/disengagement tool (see Parts List, item O)
• Slotted screwdriver
(one large and one small)
• Phillips screwdriver
(one large and one small)
• Knife and/or wire cutters
Set frame height
Determine whether the quilting machine is placed on a Portable Professional Frame or an HQ Studio Frame
and follow the appropriate instructions below.
If you have a Portable Professional Frame
The Portable Professional Frame
(Pro-Frame)
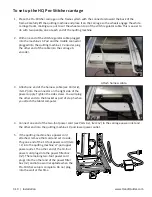
side arms have three sets of height-adjustment holes. The
ideal setting for the HQ Pro-Stitcher is the middle set of holes. This should allow the quilting machine arm
to pass freely under the idler bar while keeping the quilt as close as possible to the arm. Use the 7/16-inch
wrench to adjust the height if necessary. The ideal height allows just the tip of a finger between the idler
pole and the machine.
Portable Professional
Frame center holes
Summary of Contents for Pro-Stitcher QM30010-2
Page 43: ...3 32 Installation www HandiQuilter com...
Page 53: ...4 10 Overview www HandiQuilter com...
Page 57: ...6 4 Art Stitch www HandiQuilter com...
Page 105: ...7 12 Quilt Menu www HandiQuilter com...
Page 131: ...HQ Pro Stitcher User Manual 10 8 Warranty Training Checklist...
Page 133: ...HQ Pro Stitcher User Manual 11 2 HQ Printouts...
Page 135: ...www HandiQuilter com 12 2 Tutorials...


