background image

General safety regulations and instructions 


15 


Avoid the Calypso from coming into contact with sea water. Sea 
water is caustic and may damage the scooter. 


Avoid the Calypso from coming into contact with sand. Sand can 
affect the moving parts of the scooter, resulting in unnecessarily 
rapid wear. 


Never operate the scooter when you are under the influence of 
drugs, alcohol or medication that could affect your driving 
ability. 


You must have sufficient visual acuity to be able to drive safely 
in the scooter. 


You are obliged to put the lights on when the view is hindered. 


The standard version of your scooter was tested according to 
the strictest EMC requirements. Mobile telephones have no 
influence on the driving behavior of the scooter. 
When using a mobile telephone in the vicinity of a scooter with 
special adaptations, you are advised to first switch off the 
scooter. 


Your scooter may influence electromagnetic fields such as 
alarm systems. 


If the electronics of the scooter is not properly screened off, this 
may affect sensitive electrical appliances, such as shop alarms 
and garage openers. The scooter has been tested for this. 
Should any problems of this nature occur, please report these to 
your supplier immediately. 


Summary of Contents for CALYPSO

Page 1: ...009 00001 211D USER MANUAL BEDIENUNGSANLEITUNG CALYPSO...

Page 2: ...2...

Page 3: ...3 English 4 Deutsch 44...

Page 4: ...s the right to changes and modifications The information provided is valid for the product in its standard version Handicare cannot be held liable for possible damage resulting from specifications of...

Page 5: ...ifications 14 1 4 Safety 14 2 General description 16 3 Main components 17 4 Operation 19 4 1 Driving with the Calypso 19 4 1 1 Inspection before use 19 4 2 Operation 19 4 2 1 Ignition lock 20 4 2 2 Da...

Page 6: ...justing the seat width 34 5 1 3 Adjusting the arm rest 35 5 2 Adjusting the steering column 35 6 Maintenance 36 6 1 Maintenance table 36 6 1 1 Batteries 36 6 1 2 Replacing the batteries 37 6 1 3 Clean...

Page 7: ...results in easily operated quality products Delivery Your dealer will deliver the Calypso scooter ready for use This manual With this manual you can safely use and maintain clean the product In case o...

Page 8: ...Preface 8 Product reference 000000001 A B C D D The product has the following decals and labels A Charging connection B Automatic fuse C Drive Freewheel D Tire pressure wheels...

Page 9: ...ve of the motor is disconnected the scooter can be pushed E Tire pressure wheels For tire pressure of the wheels see product specification sheet Pictograms The following pictograms are used in this ma...

Page 10: ...d technical support For information concerning specific settings maintenance or repair work please contact your dealer He is always prepared to help you Ensure you have at hand Model Manufacture year...

Page 11: ...as described in this manual and for the quality of the material of which the Product is made and the manner in which the Product is manufactured 2 Repairs or replacement of parts of the Product that m...

Page 12: ...t damage or abuse of the Product or a use of the Product for another purpose than the one for which it was intended Parts of the Product are replaced by parts of another origin than those which Handic...

Page 13: ...scooter Calypso was designed for the transport of persons to a weight of maximally 125 kg 275 lbs Your dealer should give you good user s instructions before you can independently operate the product...

Page 14: ...covered or removed and must remain present and clearly legible throughout the entire lifespan of the scooter Immediately replace or repair illegible or damaged signs symbols and instructions Contact y...

Page 15: ...are obliged to put the lights on when the view is hindered The standard version of your scooter was tested according to the strictest EMC requirements Mobile telephones have no influence on the drivin...

Page 16: ...sidewalks or around pedestrian areas we advise you to set your scooter to a lower maximum speed The following should be kept in mind when using the scooter A scooter is not a motorized vehicle in the...

Page 17: ...ard and all necessary operating handles are located F Lighting When driving in the dark lighting must be used G Indicators To indicate a change in direction while driving H Carrier basket For carrying...

Page 18: ...Main components 18 000000003 A D B J C G E H F I...

Page 19: ...s Poorly pumped up tires have a negative effect on the driving characteristics Poorly pumped up tires cause a higher power consumption depleting the batteries more quickly Poorly pumped up tires cause...

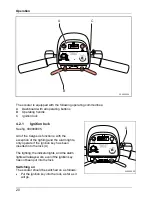
Page 20: ...ll of the Calypso s functions with the exception of the lighting and the alarm lights only operate if the ignition key has been inserted into the lock A The lighting the indicator lights and the alarm...

Page 21: ...A Speed control B Indicator left and right C Battery condition meter D Alarm lights E Lighting F Horn A Speed control With this knob the desired speed can be selected Turn the knob to the right clock...

Page 22: ...scooter may be used but the batteries should very soon be recharged If the pointer is in the red area the batteries should be recharged as soon as possible D Alarm lights Pressing this button will tur...

Page 23: ...u Keep to the current traffic regulations and the Road Traffic Act Avoid out of the way routes so that help can be on its way quickly when needed 4 3 1 Driving forward and in reverse See fig 000000008...

Page 24: ...g to the left or to the right accordingly You should always use your indicators when making a turn Always take turns at a safe speed Reversing while making a turn Turning left or right By turning the...

Page 25: ...ng up a slope This will provide the scooter with more stability Driving down a slope If you need to reverse down a slope use the lowest gear and drive as slowly and carefully as possible It can be ver...

Page 26: ...scooter to stop See Automatic fuse Abuse may also cause unnecessary malfunctions and defects to the scooter 4 3 6 Switching off After each ride the scooter should be switched off completely This preve...

Page 27: ...ble to use your scooter again Do not overcharge the batteries Safety The operation of the scooter is switched off as soon as the plug of the charging cable is connected to the charging connection When...

Page 28: ...en turned to its original position it will click back into place This way it cannot inadvertently turn while driving The seat is provided with arm rests that can be folded up so that you can get in an...

Page 29: ...start moving down the slope when the parking brake is deactivated If the Calypso is in the neutral position It cannot be driven electrically because the motor cannot drive the scooter In this situatio...

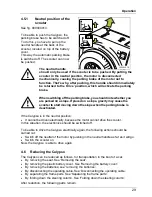
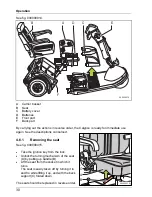
Page 30: ...dy for immediate use again See the descriptions concerned 4 6 1 Removing the seat See fig 000000015 Take the ignition key from the lock Unlock the turning mechanism of the seat A by pulling up handle...

Page 31: ...4 6 3 Removing the batteries See fig 000000017 The batteries should be removed as follows Switch off the scooter Take the ignition key from the lock Remove the seat see removing the seat Remove the ba...

Page 32: ...ping one hand on the handlebars and one hand on the handgrip Slide the slots of the front part over the pins of the back part Next tilt the back part forward by slowly moving the seat tube upward Make...

Page 33: ...lot less space The scooter can also be placed in a car as a whole The best way to do this is by using steel planking across which to push the scooter into the car Considering the nature of the scoote...

Page 34: ...can be readjusted in height This adjustment should be made by the dealer 5 1 2 Adjusting the seat width See fig 000000021 The space between the two arm rests can be adjusted according to your wishes...

Page 35: ...column See fig 000000023 The angle of the steering column can be adjusted as follows Loosen the locking handle A by turning it to the left anti clockwise Push the steering column B forward or backwar...

Page 36: ...seat must be removed See Removing the seat Yourself Every six twelve months General overhaul Dealer By following the maintenance guidelines yourself you will help keep your scooter in optimum conditio...

Page 37: ...C Lift the batteries from the scooter one by one using the carrying belts D Both batteries may now be removed New batteries are placed in the reverse order As soon as the new batteries are placed the...

Page 38: ...and can be inflated with a proper pump A foot pump may be used or you can have the tires inflated at your local gas station After adding air to the tire always make sure to replace the cap back on the...

Page 39: ...ted Yourself Check whether the battery terminals are connected properly Yourself Check whether the batteries are sufficiently charged Yourself The scooter will not drive and the battery indication poi...

Page 40: ...tomatic fuse is located on the right hand side underneath the seat on top of the battery cover By pressing the automatic fuse back in again you can try to restart the scooter If the automatic fuse jum...

Page 41: ...9 Energy consumption theoretic maximum distance 38 km2 Dynamic stability on slopes 6 Climbing capacity for obstacles 50 mm Maximal speed forward 8 km h Minimum brake distance from maximum speed 1500...

Page 42: ...N 12182 Technical tools for the handicapped General standards and testing methods October 1997 2 NEN EN 12184 Electrically driven wheelchairs scooters and associated charging equipment Standards and t...

Page 43: ...on The product is in conformity with the provisions of the Medical Devices Directive and thus has CE marking 8 4 Authorized service and technical support For problems or questions contact your dealer...

Page 44: ...lten Informationen gelten f r die Standardausf hrung des Produkts F r eventuelle Sch den die Ihnen entstehen weil die Spezifikationen des an Sie gelieferten Produkts von denen der Standardausf hrung a...

Page 45: ...55 1 3 nderungen 55 1 4 Sicherheit 55 2 Allgemeine Beschreibung 57 3 Hauptbestandteile 58 4 Benutzen 60 4 1 Das Fahren mit dem Calypso 60 4 1 1 Kontrolle vor der Fahrt 60 4 2 Bedienung 60 4 2 1 Z nds...

Page 46: ...r Sitzbreite 76 5 1 3 Armlehne verstellen 77 5 2 Lenks ule einstellen 77 6 Wartung 78 6 1 Wartungstabelle 78 6 1 1 Batterien 78 6 1 2 Auswechseln der Batterien 78 6 1 3 Reinigen der Batterien 79 6 2 R...

Page 47: ...ung resultiert Auslieferung Ihr Vertragsh ndler wird den Calypso Scooter fahrbereit bei Ihnen abliefern ber diese Anleitung Mit dieser Anleitung k nnen Sie das Produkt sicher benutzen und pflegen rein...

Page 48: ...Vorwort 48 Bezeichnungen und Piktogramme 000000001 A B C D D Auf dem Produkt befinden sich folgende Bezeichnungen Aufkleber A Ladeanschluss B Sicherungsautomat C Fahren Schieben D Reifendruck R der...

Page 49: ...es Motors ist ausgekuppelt Der Scooter kann geschoben werden E Reifendruck R der Hinweise zum Reifendruck der R der entnehmen Sie bitte dem Produktdatenblatt Piktogramme In dieser Anleitung werden fol...

Page 50: ...enungsanleitung Wartungsanleitung Wartung und Kundendienst F r Informationen ber bestimmte Einstellungen Wartungs oder Reparaturarbeiten wenden Sie sich bitte an Ihren H ndler Er hilft Ihnen jederzeit...

Page 51: ...ich Handicare dem Abnehmer des Produkts gegen ber f r dessen Tauglichkeit f r den Zweck f r den das Produkt bestimmt wurde gem der Beschreibung in dieser Anleitung und f r die Qualit t des Materials a...

Page 52: ...ache der oben gemeinte unrichtige oder unsorgf ltige Gebrauch des Produkts oder der dazu geh rigen Batterie ist 4 Die in den oben genannten Bestimmungen ausgedr ckten Garantien entfallen in jedem Fall...

Page 53: ...weitere als die unter 1 aufgef hrte Haftung Insbesondere haftet Handicare nicht f r Folgesch den egal in welcher Form Ausrangierte Scooter und die Umwelt Wenn Ihr Scooter berfl ssig geworden ist oder...

Page 54: ...ner anderen Verwendung als der f r die der RollSitz entwickelt und entworfen wurde 1 Die zweckgem e Verwendung gem der EN 292 1 ist die Verwendung f r die das technische Produkt gem den Angaben des He...

Page 55: ...Bezeichnungen Symbole und Anweisungen geh ren zu den angebrachten Sicherheitsvorrichtungen Daher d rfen sie nicht verdeckt oder entfernt werden und m ssen w hrend der gesamten Lebensdauer des Scooter...

Page 56: ...eintr chtigen k nnten d rfen Sie nie mit dem Scooter fahren Ihre Augen m ssen so gut sein dass Sie in der betreffenden Gebrauchssituation sicher im Scooter fahren k nnen Bei schlechten Sichtverh ltnis...

Page 57: ...ufmerksamkeit Besonders auf dem B rgersteig und in Fu g ngerzonen wird daher empfohlen eine niedrigere H chstgeschwindigkeit einzustellen F r die Benutzung des Scooters gilt Folgendes Ein Scooter ist...

Page 58: ...tt mit den erfordelichen Bedienhebeln F Beleuchtung Beim Fahren im Dunkeln ist Beleuchtung vorgeschrieben G Blinker F r das Anzeigen der Richtungs nderung w hrend der Fahrt H TragekorbF r den Transpor...

Page 59: ...Hauptbestandteile 59 000000003 A D B J C G E H F I...

Page 60: ...die technischen Daten Schlecht aufgepumpte Reifen beeintr chtigen das Fahrverhalten Schlecht aufgepumpte Reifen verursachen einen h heren Stromverbrauch wodurch die Batterien schneller leer werden Sc...

Page 61: ...ndschloss 4 2 1 Z ndschloss Siehe Abb 000000005 S mtliche Funktionen des Calypso mit Ausnahme der Beleuchtung und der Warnleuchten sind nur dann aktivierbar wenn der Z ndschl ssel ins Z ndschloss A g...

Page 62: ...Batteriezustandsanzeige D Warnleuchten E Beleuchtung F Hupe A Geschwindigkeitsregler Mit diesem Knopf kann die erw nschte Geschwindigkeit eingestellt werden Rechts herum drehen im Uhrzeigersinn f r e...

Page 63: ...innerhalb absehbarer Zeit aufgeladen werden Wenn der Zeiger im roten Bereich steht m ssen die Batterien so schnell wie m glich aufgeladen werden D Warnleuchten Durch Dr cken dieser Taste werden die W...

Page 64: ...die g ltigen Verkehrsregeln der Stra enverkehrsordnung Vermeiden Sie einsame Strecken so dass im Notfall schnell Hilfe herbeigerufen werden kann 4 3 1 Vorw rts und R ckw rtsfahren Siehe Abb 000000008...

Page 65: ...sich entsprechend nach rechts bzw nach links Wenn die Fahrtrichtung ge ndert wird ist der Blinker zu setzen Nehmen Sie die Kurven mit einer sicheren Geschwindigkeit R ckw rtsfahren in Kurven Rechts un...

Page 66: ...rursachen Neigen Sie den Oberk rper etwas nach vorne wenn Sie einen Hang hinauffahren um dem Scooter mehr Stabilit t zu geben H nge hinabfahren Wenn Sie r ckw rts einen Hang hinabfahren m ssen dann ne...

Page 67: ...unter warmen Bedingungen wird die automatische Sicherung ausgel st wodurch der Scooter zum Stillstand kommt Siehe Sicherungsautomat Eine berlastung kann berdies unn tige St rungen und Defekte am Scoot...

Page 68: ...gt dass die Batterien aufgeladen sind Nun k nnen Sie den Scooter wieder benutzen Die Batterien k nnen nicht berladen werden Sicherheitsvorrichtung Solange der Stecker des Aufladekabels an den Ladeansc...

Page 69: ...ebenen Weise wieder zur ck Wenn der Sitz in seine Ausgangslage zur ckgedreht wurde rastet er ein so dass er gegen unerw nschtes Verdrehen w hrend der Fahrt gesichert ist Der Sitz hat aufklappbare Arml...

Page 70: ...n zu steiler Hang kann dazu f hren dass sich der Scooter beim Ausschalten der Feststell 1bremse durch die Schwerkraft hangabw rts bewegt Wenn der Calypso im Leerlauf steht Kann nicht elektrisch gefahr...

Page 71: ...Abb 000000014 000000014 F A B D C E A Tragekorb B Sitz C Batteriedeckel D Batterien E Vorderer Teil F Hinterer Teil Der Vorgang sollte in umgekehrter Reihenfolge durchgef hrt werden um den Calypso wie...

Page 72: ...l entfernen Siehe Abb 000000016 Zum Abnehmen des Batteriedeckels gehen Sie folgenderma en vor Schalten Sie den Scooter aus Den Z ndschl ssel abziehen Entfernen Sie den Sitz siehe Sitz entfernen L sen...

Page 73: ...Scooter in zwei Teile zu zerlegen gehen Sie folgenderma en vor Entfernen Sie den Tragekorb Heben Sie das schmale Ende der Arretierung A in der Mitte des Bodens B an Dadurch wird das Kuppelsystem entr...

Page 74: ...ren des Calypso Nach dem Transport sollte der Calypso betriebsbereit gemacht werden Dazu m ssen Teile zusammengebaut und Teile in Position gebracht werden Die nachstehenden Schritte sollten in der auf...

Page 75: ...tze bieten selbst wenn der Calypso in dem betreffenden Fahrzeug noch so gut festgesetzt wurde Nachdem der Scooter im Auto untergebracht wurde sollten Sie sich vergewissern dass der Scooter nicht im Le...

Page 76: ...f hrt werden 5 1 2 Einstellen der Sitzbreite Siehe Abb 000000021 Der Zwischenraum zwischen den beiden Armlehnen kann ganz nach Wunsch eingestellt werden Zu diesem Zweck l sst sich der Halter f r die A...

Page 77: ...einstellen Siehe Abb 000000023 Zum Einstellen der Lenks ule gehen Sie folgenderma en vor L sen Sie die Verriegelung A links herum also entgegen dem Uhrzeigersinn Dr cken Sie die Lenks ule B soweit nac...

Page 78: ...j hrlich j hrlich Gesamtkontrolle H ndler Sie k nnen auch selbst dazu beitragen Ihren Scooter in einem guten Zustand zu halten indem Sie die nachstehenden Wartungsrichtlinien befolgen 6 1 1 Batterien...

Page 79: ...en an den Trageb ndern D einzeln aus dem Scooter Beide Batterien k nnen jetzt entfernt werden Das Einsetzen neuer Batterien erfolgt in umgekehrter Reihenfolge Sobald die neuen Batterien eingesetzt sin...

Page 80: ...pumpen Nach dem Aufpumpen immer den Deckel auf das Ventil schrauben damit kein Schmutz oder Sand in das Ventil gelangen kann 6 3 Reinigen Abwischen von trockenem Schmutz Polsterung Metallteile und die...

Page 81: ...en Sie sich bitte an Ihren H ndler Sie selbst Der Batterieanzeiger schl gt aus aber der Scooter f hrt nicht berpr fen Sie ob der Leerlauf im FAHREN Stand steht Sie selbst Wenn der Scooter nach der ber...

Page 82: ...ooter dann wieder in Betrieb gesetzt wird k nnen Sie ruhig weiterfahren vermeiden Sie jedoch m glichst Hindernisse und H gel Wenn der Sicherungsautomat nach dem Abk hlen des Motors sofort wieder herau...

Page 83: ...22 kg statische Stabilit t abw rts 9 statische Stabilit t aufw rts 9 statische Stabilit t seitw rts 9 Energieverbrauch theoretischer H chstabstand 38 km2 dynamische Stabilit t hangaufw rts 6 Kletterle...

Page 84: ...tladestrom 5 A Steckertyp A DIN 72311 3 Calypso 4 Rad Ausf hrung 8 2 Pr fungen und Zertifikate Das Produkt erf llt folgende Anforderungen 1 NEN EN 12182 Technische Hilfsmittel f r Behinderte Allgemein...

Page 85: ...linie 93 42 EWG f r Medizinische Hilfsmittel und hat deshalb eine CE Markierung 8 4 Offizielle Kundendienststellen und technische Unterst tzung Bei Problemen mit unserem Produkt wenden Sie sich bitte...

Page 86: ...Dealer...

Reviews: