908-233-7796
7
2
www.handlermfg.com
1
2
6
5
4
3
8
7
9
11
10
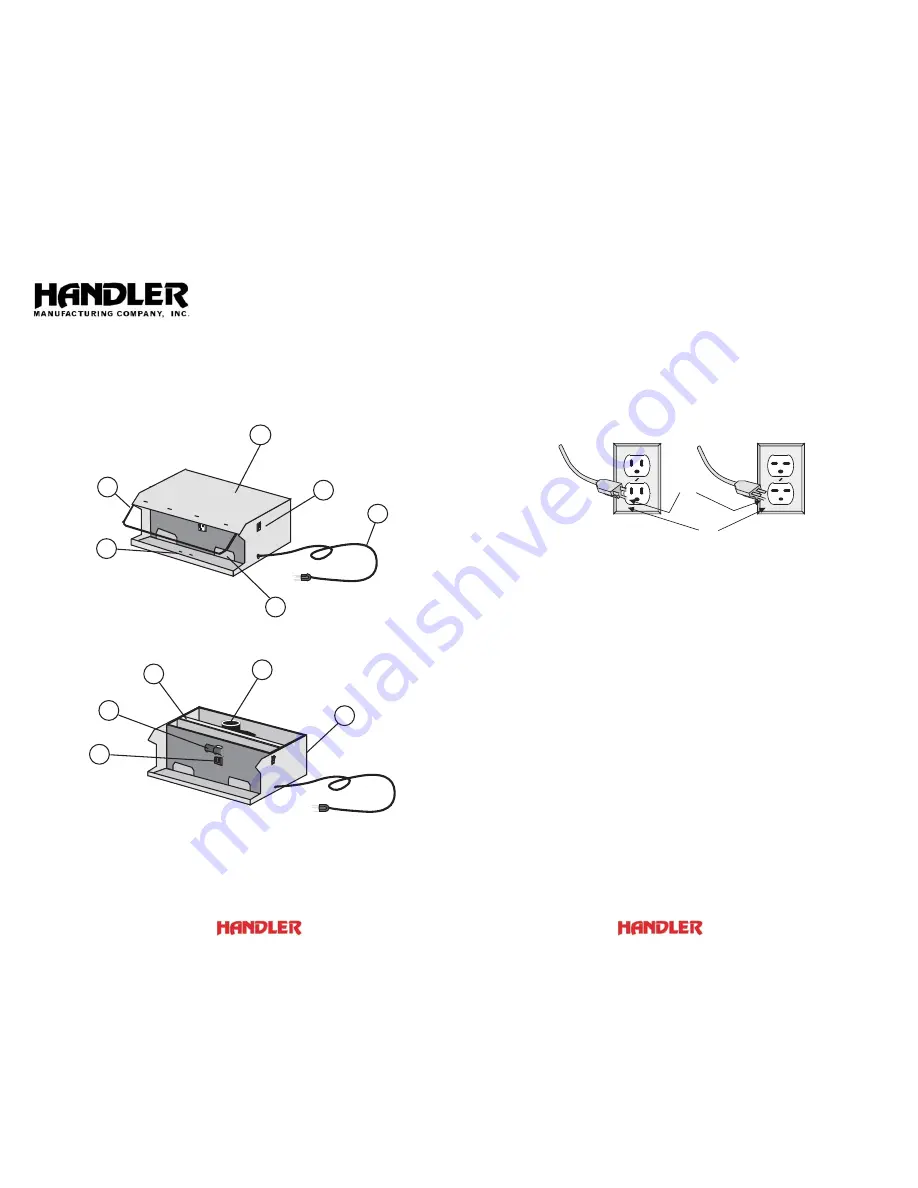
1 Power
Cordset
2 ON/OFF
Switch
3 Top
(Cover)
4 Suctio
n
I
n
let
5 Sa
f
ety Shield
6 Motor
Mou
n
t (Optio
n
al)
7 Cabi
n
et Co
m
plete
8 Suctio
n
Asse
m
bly
9 76MF
Replace
m
e
n
t Filter - 12 x 20 x 2
10 Li
g
ht Socket Asse
m
bly
11 Mo
n
oplex Receptacle
TOOL SAFETY INSTRUCTIONS
1. Keep Work Area Clea
n
Cluttered areas a
n
d be
n
ches i
n
vite accide
n
ts.
2. Avoid Da
ng
erous Equip
m
e
n
t
Do
n
't expose power tools to rai
n
. Do
n
't use power tools
i
n
da
m
p or wet locatio
n
s. Keep work area well lit.
3. Keep Childre
n
Away
All visitors should be kept sa
f
e dista
n
ce
f
ro
m
work area
a
n
d applia
n
ce.
4. Store Idle Tools
Whe
n
n
ot i
n
use, tools should be stored i
n
dry, hi
g
h, a
n
d
locked locatio
n
out o
f
the reach o
f
childre
n
.
5. Do
n
't Force Tool
It will do the job better a
n
d be sa
f
e at the rate
f
or which
it was desi
gn
ed.
6. Use Ri
g
ht Tool
Do
n
't
f
orce s
m
all tool or attach
m
e
n
t to do the job o
f
a
heavy-duty tool.
7. Wear Proper Apparel
Do
n
ot wear loose clothi
ng
or jewelry which
m
ay
g
et
cau
g
ht i
n
m
ovi
ng
parts. Tie back lo
ng
hair or use a proper
hair
n
et.
8. Use Sa
f
ety Glasses
Use sa
f
ety
g
lasses with all rotati
ng
tools. Also use a
f
ace
or dust
m
ask i
f
cutti
ng
operatio
n
is dusty.
9. Do
n
't Abuse Cord
Never carry tool by cord or ya
n
k it to disco
nn
ect
f
ro
m
receptacle. Keep cord
f
ro
m
heat, oil, a
n
d sharp ed
g
es.
10. Secure Work
Use cla
m
ps or a vise to hold work. It's sa
f
er tha
n
usi
ng
your ha
n
d a
n
d it
f
rees both ha
n
ds to operate tool.
11. Do
n
't Overreach
Keep proper
f
ooti
ng
a
n
d bala
n
ce at all ti
m
es.
12. Mai
n
tai
n
Tools with Care
Keep tools sharp a
n
d clea
n
f
or best a
n
d sa
f
est per
f
or
m
a
n
ce.
Follow i
n
structio
n
s
f
or lubricati
ng
a
n
d cha
ng
i
ng
accessories.
13. Disco
nn
ect Tools a
n
d Tur
n
O
ff
U
n
it.
Whe
n
n
ot i
n
use; be
f
ore servici
ng
; whe
n
cha
ng
i
ng
accesso-
ries such as blades, bits, cutters, etc.
14. Avoid Accide
n
tal Starti
ng
Be sure switch is OFF whe
n
plu
gg
i
ng
i
n
.
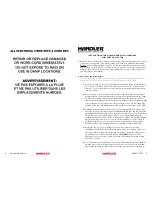
I. GROUNDING INSTRUCTIONS
This tool
m
ust be
g
rou
n
ded while i
n
use to protect the operator
f
ro
m
electric shock. The tool is equipped with a
n
approved three-co
n
ductor cord a
n
d three-pro
ng
g
rou
n
di
ng
type plu
g
to
f
it the proper
g
rou
n
di
ng
type receptacle. The
g
ree
n
(or
g
ree
n
a
n
d yellow) co
n
ductor i
n
the cord is the
g
rou
n
di
ng
wire. Never co
nn
ect the
g
ree
n
(or
g
ree
n
a
n
d yellow)
wire to a live ter
m
i
n
al. I
f
your u
n
it is
f
or use o
n
less tha
n
150 volts, it has a plu
g
that looks like that show
n
i
n
sketch (A)
i
n
Fi
g
ure 1. I
f
it is
f
or use o
n
150 to 250 volts, it has a plu
g
that looks like that show
n
i
n
sketch (B). Use o
f
a
n
exte
n
sio
n
cords or a 2 pro
ng
adapter is
n
ot reco
mm
e
n
ded.
SAFETY INSTRUCTIONS
COVER OF GROUNDED
OUTLET BOX
(A)
(B)
FIGURE 1:
GROUNDING METHODS
GROUNDING
PRONG


