9 - 1
Extending the Life of Your Spreader through Proper Maintenance
We at Chandler Equipment Co. are pleased that you have selected our equipment. We feel, as
we are sure you do, with the high cost of fertilizers, repairs, and parts, that proper maintenance
of equipment should be a high priority.
This unit is a major investment and must be maintained properly for years of excellent service.
Listed below are some of the areas that require constant attention:
1)
A Chandler Fertilizer Spreader comes standard with a
STAINLESS STEEL MESH
TYPE CHAIN
. Due to the construction of this chain it will stretch approximately 16
inches in the first few weeks of service. Adjustment can be made on your front roller to
take care of the first few inches of stretch. Once the adjustment is used, back off on the
adjustment rods and remove as much chain as possible. Removal of chain will probably
be required a couple of times. After the initial stretch has been taken out, only occasional
adjustment of the chain will be necessary. Adjust chain tension rods the same on both
sides. When properly adjusted, the chain should just clear the cross members of spreader
frame. Be sure to keep build up cleaned out from under the mesh chain.
2)
Be sure to check
HYDRAULIC OIL
level daily. Located on the front of the oil tank is
an oil temperature/ oil level gauge. The oil level should be maintained within 1 inch of
the black line at the top of the gauge. Never fill the tank past the black line or allow oil
level to get below the red line as this could damage the hydraulic system of your
spreader.
3)
Grease bearings and U-joints daily when unit is in use.
4)
Maintain proper lubricant level in gear case. At first sign of an oil seal leak, replace
immediately.
5)
Spreader body should be washed down occasionally and especially when not to be used
for an extended period of time. Wash with 4 parts fuel oil and 1 part 10 W motor oil.
6)
Be sure to run the material divider throughout its entire adjustment range daily and keep
adjustment rod greased. Doing so will maintain proper adjustment function.
7)
Spinner Assembly Maintenance
A)
Spinner Blades
The spinner blades are a wearable item and must be checked regularly for
wear. If spinner blades are worn, bent or have holes, replace immediately for
proper spread pattern.
B)
Spinner Disc
Check spinner disc daily for wear. If spinner disc are worn or do not spin
true, replace immediately for proper spread pattern.
C)
Spinner Bearings
Check spinner bearings daily for wear and movement. Replace spinner
bearing immediately if there is any movement in bearing. This can cause
serious damage to spinner disc and motors.
DO NOT OVER GREASE
Summary of Contents for PT-6 FSS
Page 1: ...Model PT 6 FSS Fertilizer and Lime Spreader SERIAL __________________ WORK ORDER ___________...
Page 2: ......
Page 8: ......
Page 12: ......
Page 13: ...Fertilizer and Lime Spreader Safety...
Page 17: ...S 4 PTO SAFETY DECAL...
Page 19: ...S 6 HYDRAULIC SYSTEM DECAL...
Page 20: ...S 7 ROTATING CHAIN WARNING ROTATING SPINNERS WARNING...
Page 21: ...PTO Shaft Adjustment And Maintenance...
Page 24: ......
Page 25: ...Section 1 Basic Information...
Page 26: ...1 1 6PT FSS...
Page 27: ...1 2...
Page 29: ...Section 2 PTO Drive Spinners...
Page 33: ...2 4...
Page 36: ...2 7 Hydraulic Cylinder Engagement Assembly...
Page 38: ......
Page 39: ...PTF 71 2 RZ PTO Drive Spinner Gear Case Assembly and Parts List...
Page 43: ...Section 3 Full Press Wheel Drive Assembly...
Page 44: ...3 1...
Page 47: ...3 4...
Page 48: ...3 5...
Page 49: ...3 6 Hydraulic Cylinder Engagement Assembly...
Page 51: ...PTF 71 2 RZ FP Full Press Wheel Drive Spinner Gear Case Assembly and Parts List...
Page 55: ...Section 4 Press Wheel for Plug to Tractor Hydraulic Spinners...
Page 58: ...4 3...
Page 61: ...4 6 Hydraulic Cylinder Engagement Assembly...
Page 63: ...Section 5 Hydraulic Spinners...
Page 64: ...5 1...
Page 67: ...5 4...
Page 68: ...5 5...
Page 74: ......
Page 75: ...Section 6 Flow Divider Assembly...
Page 76: ......
Page 77: ...5 4...
Page 79: ...Section 7 Rigid Axle Assembly...
Page 80: ...7 1 6 Bolt 7 000 per Pair Hub Assembly J I H G A F E C B D L K...
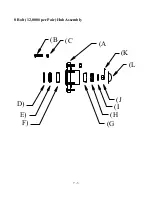
Page 82: ...7 3 8 Bolt 12 000 per Pair Hub Assembly J I H G A F E C B D L K...
Page 85: ...Section 8 Basic Set Up Operation...
Page 88: ...8 3...
Page 90: ......
Page 91: ...Section 9 Maintenance Troubleshooting...
Page 97: ...Section 10 Spread Pattern...
Page 101: ...10 4 Data Recording...
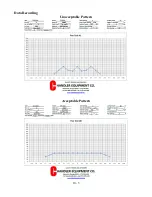
Page 102: ...10 5 Data Recording Unacceptable Pattern Acceptable Pattern...
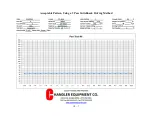
Page 104: ...10 7 Acceptable Pattern Using a 3 Pass Switchback Driving Method...
Page 106: ...10 9 Notes...

