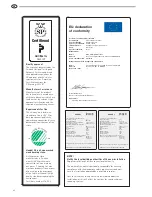
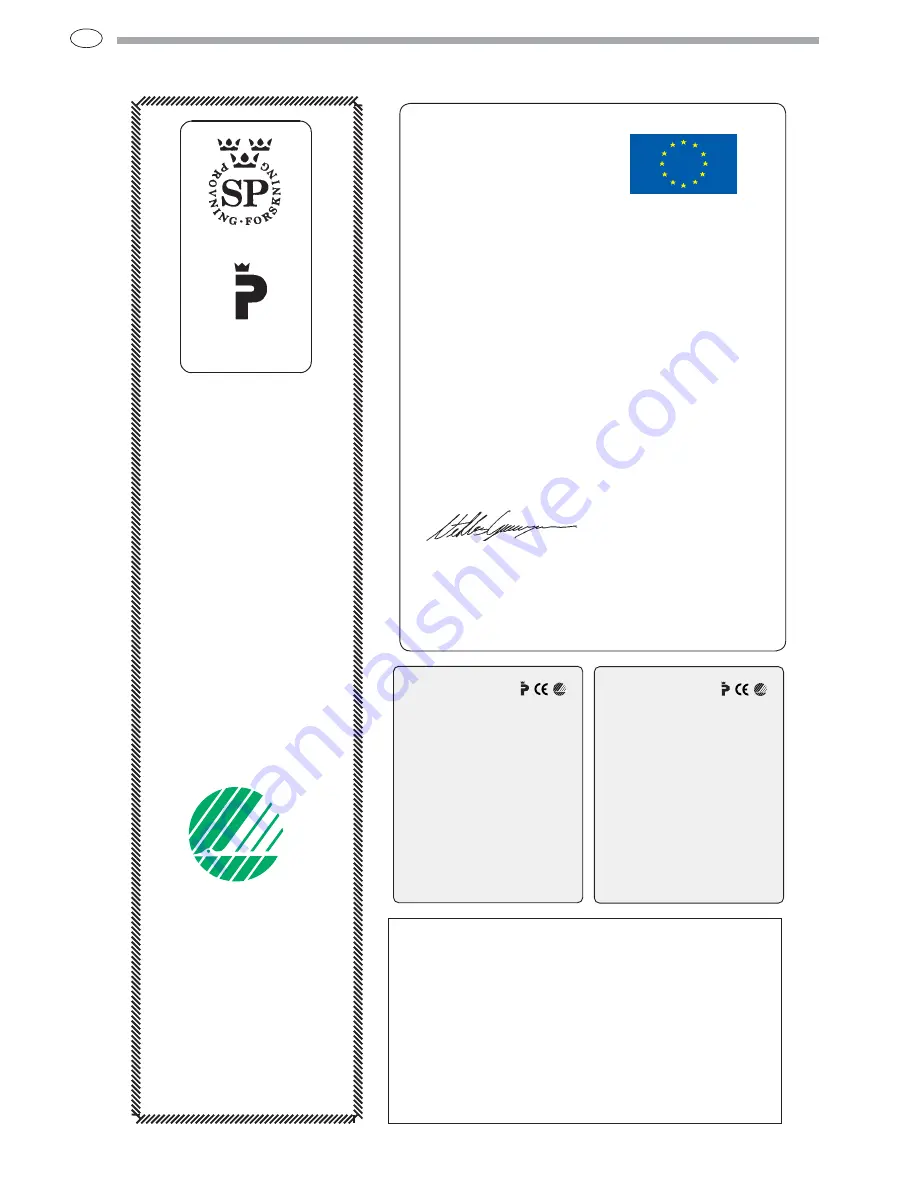
background image

GB

62

Quality approval

The stove has been tested by the 
Swedish National Testing and 
Research Institute and meets 
the applicable regulations for 
CE approval and the stricter 
requirements for P marking. 
Certificate number for 
P Marking: 0112/07.

Manufacturer’s assurance

Manufacture of the product 
has taken place in accordance 
with those documents which are 
the basis for the relevant type 
approval certification and the 
required manufacturing checks.

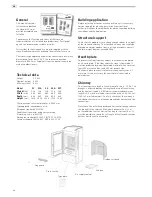
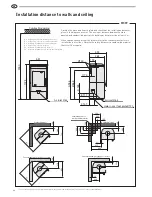
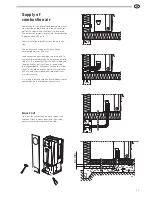
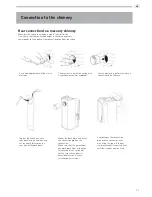
Requirements for flue

The chimney must be dimen-
sioned for at least 350° C for 
both top connection directly 
upwards and connection directly 
backwards from the rear of the 
stove.

Handöl 30 is a Swan marked 
wood burning stove. 

As the premier stove 
manufacturer in Sweden, 
we at NIBE Brasvärme are 
committed to Swan marking 
our stoves. Choosing to Swan 
mark our products is one aspect 
of our vision to be a company 
of the future with equally high 
quality standards regarding the 
environment.
Certifcate number 378-001.

Certifierad

Certifikat nr

0112/07

NOTE! 
Notify the local building authorities of the new installation

Report installation of a stove to your local authority.

The owner of the house is personally responsible for ensuring 
compliance with the mandatory safety requirements and must 
have the installation approved by a qualified inspector.

Your local chimney sweep must also be informed about the 
installation as this will affect the routines for regular chimney-
sweeping services.

EU-declaration
of confor

m

ity

Product covered by this declaration
Product type


Stove fired by fixed fuel

Type designation

 Handöl 

30-series

Type acc. to standard

 SS-EN 

13240

Intended for use


Heating of living acco

m

odation

Fuels

 Wood 

logs

Special conditions

 None

Manufacturer

Na

m

e


NIBE AB/NIBE Brasvär

m

e

Address


Box 134, Skulptörvägen 10, SE-285 23 MARKARYD

Place of 

m

anufacture

 Markaryd

Manufacturing check by approved organisation

Na

m

e


Swedish National Testing and Research Institute AB

Address


Box 857, SE-501 15 BORÅS

Report no / date


-/-


Niklas Gunnarsson
Business area 

m

anager NIBE Stoves

Appendices

4--!('3) )-.''.%*))-.,/.%*)-

HANDÖL

In accordance with standards below
marking was affixed:
European Standard:
SE Quality Certification, P-marked:
NO Standard NS 3059:
DE and AT Standard DIN 18.891 and
Art 15a B-VG:
Type:
Nominal Output:
Fuel:
Minimun draught:
Flue gas temerature:
Energy efficiency:
Emission of CO in cumbustion products:
Distance to cumbustible wall (mm):

Follow the user’s instructions and use only recomended fuel

NIBE AB Box 134 SE-285 23 MARKARYD SWEDEN

2007
EN 13240
Cert no 0112/07
SINTEF 110-0275

RRF-40 07 13 90

Handöl 31/31A/32/32A

5 kW
Wood
12 Pa
280°C
78%
0,14%
Behind 150
Beside 450 
Corner 150

HANDÖL

In accordance with standards below
marking was affixed:
European Standard:
SE Quality Certification, P-marked:
NO Standard NS 3059:
DE and AT Standard DIN 18 891
and Art 15a B-VG:
Type:
Nominal Output:
Fuel:
Minimun draught:
Flue gas temerature:
Energy efficiency:
Emission of CO in cumbustion products:
Distance to cumbustible wall (mm):

Follow the user’s instructions and use only recomended fuel

NIBE AB Box 134 SE-285 23 MARKARYD SWEDEN

2007
EN 13240
Cert no 0112/07
SINTEF 110-0275

RRF-40 07 13 90
Handöl 33T
5 kW
Wood
12 Pa
280°C
78%
0,14%
Behind 100
Beside 415 
Corner 100

378

001

N

O

RD

IC ECOLAB

EL

Summary of Contents for 31

Page 1: ...GB 61 INSTRUCTIONS Installation 31 31A 32 32A 33T...

Page 2: ...uct type Stove fired by fixed fuel Type designation Hand l 30 series Type acc to standard SS EN 13240 Intended for use Heating of living accomodation Fuels Wood logs Special conditions None Manufactur...

Page 3: ...n As a new owner of a stove from Hand l you have a stove with timeless design and a long lifetime The stove combustion is also environmentally friendly and efficient for the best heat production Read...

Page 4: ...cessory the hearth plate is available in painted steel Chimney The stove requires a draft in the chimney of at least 12 Pa The draught is affected both by the length and area of the chimney and by how...

Page 5: ...op connecting a steel flue please refer to the relevant manufacturer s installation instructions Observe the safety distances to combustible material that steel flues require H31 H31A och H32 H32A To...

Page 6: ...t 1 m When top connecting a steel flue please refer to the relevant manufacturer s installation instructions Observe the safety distances to combustible material that steel flues require To prevent th...

Page 7: ...the duct should be insulated with 30 mm mineral wool covered with a moisture inhibitor plastic It is important that the lead in between the pipe and the wall or floor is sealed using jointing compoun...

Page 8: ...nstructions for Lighting the Hand l 30 series before lighting the fire for the first time Sweeping When sweeping the smoke baffle must be lifted out on the Hand l 30 series this can be done by lifting...

Page 9: ...ector The closing force of the hatch can be adjusted by moving the spring between the three notches on the lever After adjustment the heat deflector must be reinstalled The angle of the stove also aff...

Page 10: ...ion instructions The start pipe is placed over the connection on the insert Make sure that the gasket on the connection is intact and in position The stop washer is positioned over the collar on the s...

Page 11: ...on Make sure that the gasket does not work loose from its position Installation of the surrounds for the respective models is described later on in these installation instructions Seal between the con...

Page 12: ...the cast iron foot as illustrated Hold the plates so that they do not tip and become damaged Aluminium model Important Remove the protective plastic from along the rear bent edge before installing th...

Page 13: ...frame so that the sides do not fall Guide in the back panel so that the lugs fix in the side panel slits Take out the valence and bend down the small tabs using pliers so that they fit in the grooves...

Page 14: ...nces 1 2 Place the soapstone holders and back plate in the lugs on the cast iron foot and attach them to the top frame Important If the stove is to be rear connected this must be done before the soaps...

Page 15: ...he front screws Screw the door extension into the door Leave a 2 mm gap between the door extension and the door Slide down the valence inside the front of the body and allow the tabs to clamp against...

Page 16: ...the lower knockout in the back panel must always be removed for the supply of convection air Press the front into the snap fasteners as illustrated Position the left hand section under the stove and...

Page 17: ...m Insert the screws in the hole of the rail as illustrated The second screw is inserted in the rear section Hold the rail as far out as possible and angle the front section downwards whilst you tighte...

Page 18: ...crew the drawer mounting into place at the front end using the star screws as illustrated Install the drawer on the pull out unit using the four Allen screws Adjust the drawer so that it is centrally...

Page 19: ...sories Wood compartment Screw the mounting plate to the cast iron parts with the Allen screws supplied Attach the cast iron component as illustrated and insert it under the stove Adjust the pieces wit...

Page 20: ...E AB NIBE BRASV RME Box 134 285 23 Markaryd www handol eu Nibe Brasv rme reserves the right to change colours materials dimensions and models at any time without special notice Your dealer can provide...

Reviews: