BatteryShip.com
14-0019-02 Handspring Treo 180 Battery Installation Instructions
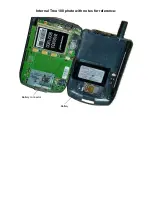
(Instructional photo on page 2)
PLEASE NOTE:
Patience and care, along with moderate technical and hand tool ability, are required for the successful
replacement of a Treo battery.
Excessive force may result in damage to your PDA.
The instructions below come with
no warranty, guarantee, proper, or improper assembly or use. The instructions below come with no warranty or guarantee.
By utilizing these instructions, you agree to hold Batteryship.com blameless and unaccountable for any and all damages,
problems, or personal injuries that may or may not arise by your use of these instructions. Replacing your Treo battery
may void any warranty you have on your PDA.
Please read all instructions and back up your data BEFORE replacing
the battery.
If your Treo is a different model, use these instructions as a reference and consult your owner’s manual or a
technician if necessary.
Make sure your PDA is off and your hold switch is activated.
Remove the four screws on the back of the PDA using the included Phillips screwdriver. They will be located near the four
corners of the device.
Once the screws have been removed, GENTLY pry open the Treo case starting on either side using the included plastic
flathead screwdriver or any small flathead screwdriver. Pry all around the device until the back cover comes open
completely. Be careful when prying around the top. Set it aside for reassembly.
Make sure that you are grounded before coming into contact with the PDA’s internal parts.
Note the location and orientation of the original battery, battery connector, and connector wires within the device.
You will
see where the battery connects to the motherboard socket. Disconnect the old battery at the connector by CAREFULLY
pulling outward on the connector with your thumb and forefinger or tweezers. Be very sure that you are pulling outward on
only the part of the connector that comes out, NOT on the entire socket or on the wires themselves.
Remove the original battery from the battery compartment, using the plastic flathead to assist if needed. Be very careful
not to bend or break the battery as you remove it.
Making sure that your new battery is facing the right direction, connect the new battery by pressing the connector at the
end of the battery wires into the socket. Note the location of the prongs in the socket of the Treo and the location of the
plugs for the prongs on the battery connector, and connect them accordingly. Do not press too hard or try to force the
pieces together. They will fit easily when correctly aligned. Place the battery in its seat.
Press the back cover of the PDA on over the new battery and screw the four screws back in. FULLY CHARGE your new
battery before use. Allow at least three hours.
PLEASE NOTE: Our tools fit the majority of Treo’s, but some devices may have different screws installed for
various reasons. If our tools do not fit your device, you may have the appropriate tool in a tool kit you already
own. You can also check your local hardware or electronics store if you do not have the right tool at home.
(Instructional photo on page 2)


