background image

11 


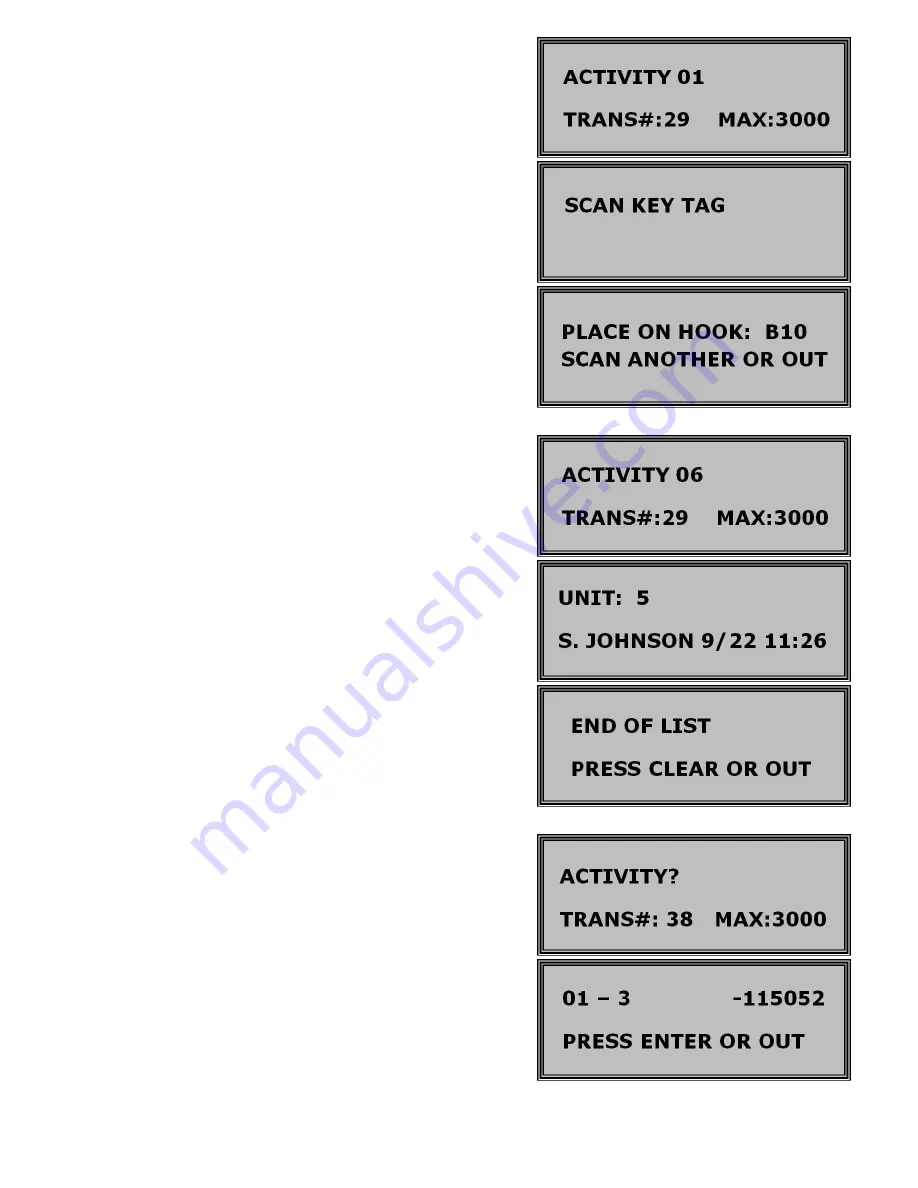
How to Return a Key 

1)


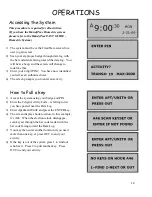
Access the system using your badge and pin. 

2)


Press the green "IN" key or enter activity 
code 01 - Return Key. 

3)


Scan key tag through Data Log as prompted 
by the screen. 

4)


The screen will display the correct hook 
number and the cabinet will unlock. Place the 
keyset on the hook indicated on the screen. 

5)


You now have 2 options... scan another key 
tag (if you are returning more than one key) 
or press OUT to end your activity. Close 
cabinet securely. 


How to Review Keys Out 

1)


Access the system using your badge and pin. 

2)


 Enter Activity Code 06 - Audit Keys Out. 

3)


 The screen will display a list of all of the 
keys out, one at a time (It will give the unit #, 
person, date and time the key was taken). 

4)


Press enter to scroll through the list. 

5)


When last unit is displayed you receive the 
message: END OF LIST – PRESS CLEAR 
OR OUT. 


How to Show Last Transaction 

1)


Access the system using your badge and pin. 

2)


Enter Activity Code 08 - Last Transaction; 
the screen will display the last successful 
transaction you completed.   
 
This example indicates 01 (return key) for 
unit #3 and the time (11:50:52) Press enter if 
you want another activity or press OUT. 


Summary of Contents for Key Control

Page 1: ...hing Communications 6 Scanning Your Tags 6 Moving Keys Into System 7 OPERATION HandyTrac com 8 9 Accessing the System 10 Pulling a Key 10 Returning a Key 11 Review Key Out 11 Show Last Transaction 11...

Page 2: ...ything you ll need to set up the system If you have any questions regarding this process please contact a HandyTrac technician at 888 458 9994 or email service handytrac com Here is what this kit incl...

Page 3: ...attery power 2 Mounting Fasteners capable of holding 50 lbs for masonry dry wall wood or metal studs Tools Needed 1 Drill Drill Bits 2 Level 3 Flat Head Screwdrivers 4 Phillips Head Screwdrivers 5 Pli...

Page 4: ...holes 6 When all holes are marked use screws that penetrate at least 2 inches into stud and wall anchors that are capable of holding at least 50 lbs Follow the manufacturer s directions for wall anch...

Page 5: ...net Snap the cable into the retaining clips on the inside of the cabinet to prevent contact with the Key Panels during operation Don t forget about your UPS Uninterruptable Power Supply Warranty will...

Page 6: ...C Plug the end of the network cable into the top jack on the left side of the Datalog Keypad D A solid green light next to the network plug on the Datalog Keypad will confirm an active connection E Pl...

Page 7: ...completed by using the return key IN or 01 activity code B The Datalog Keypad displays actual bar code number of the unit scanned i e 7044 and tells you what hook to place it on i e A5 It also tells y...

Page 8: ...ing the activation of your HandyTrac system you will be issued a User Name and Password for HandyTrac com Once logged in you are able to view various reports such as the keys out report reports by uni...

Page 9: ...s back in Master Full administrative rights to the HandyTrac system F Place a checkmark in the Active box to activate this employee G Click on Add Update Employee H Press the blue enter button on the...

Page 10: ...as an authorized user 4 The screen prompts you to enter an activity How to Pull a key 1 Access the system using your badge and PIN 2 Enter the 2 digit Activity Code referring to list you have posted n...

Page 11: ...Review Keys Out 1 Access the system using your badge and pin 2 Enter Activity Code 06 Audit Keys Out 3 The screen will display a list of all of the keys out one at a time It will give the unit person...

Page 12: ...e Master Access to edit Keytags 2 Enter Activity Code 04 Edit key tag 3 Enter the old key tag number If you don t have the old tag you ll need to look it up on the Key Map 4 SCAN the new tag to enter...

Page 13: ...ctivity Code 02 Change APT UNIT The system will beep and prompt you to enter the old unit Type the APT UNIT you want to change and press ENTER 3 System will prompt you to enter new APT UNIT Type new A...

Page 14: ...VAC Fan 55 HVAC Thermostat 56 HVAC Filter 57 HVAC No Heat 58 Vendor 1 59 Vendor 2 60 Vendor 3 61 Appliances 62 Refrigerator 63 Stove 64 Oven 65 Dishwasher 66 Vent Hood 67 Microwave 68 Trash Compactor...

Reviews: