background image

61

30

65

40

50

60

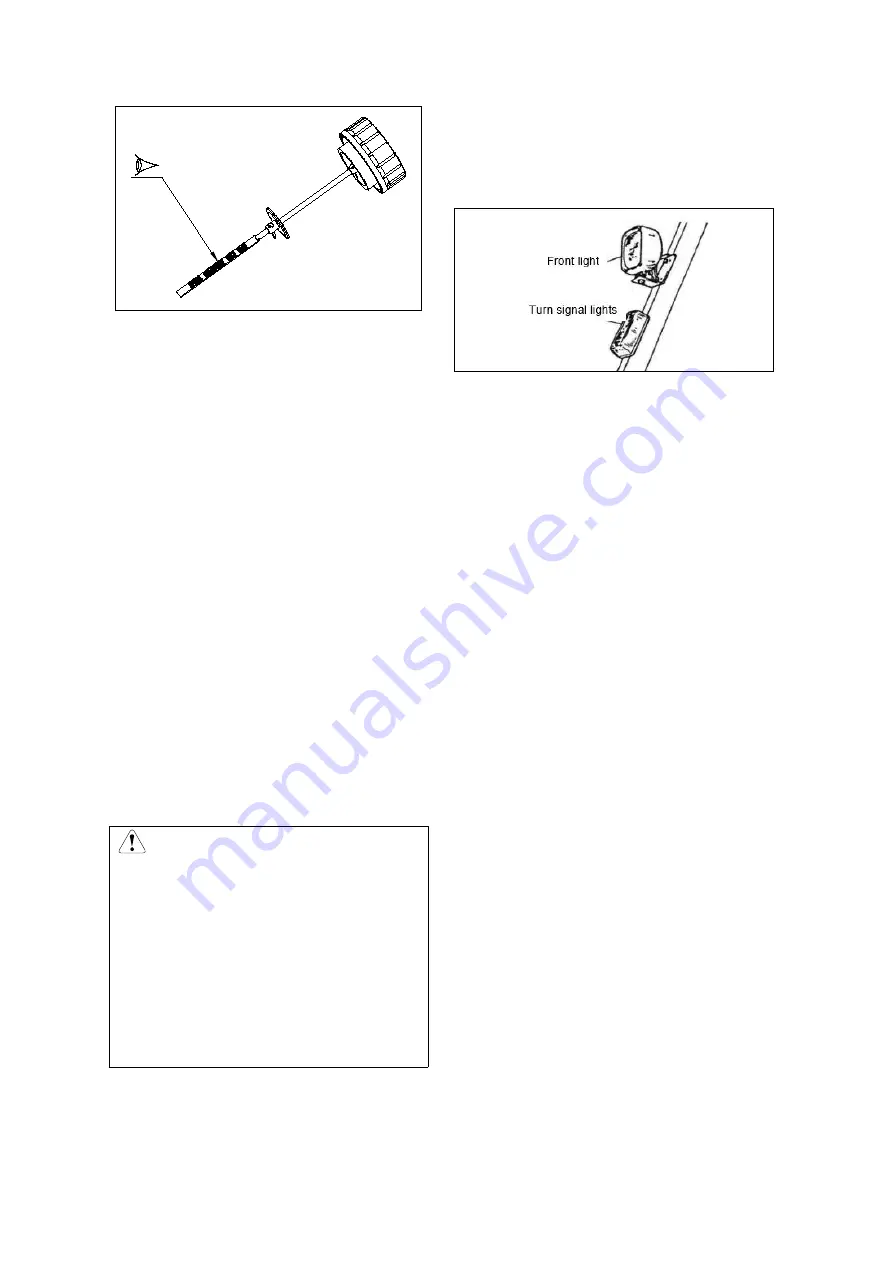
The height of the liquid level on the dipstick
corresponding to the different mast lifting
heights:
"30" refers to the hydraulic level when the lifting
height (H) ≤ 3.0 m
"40" refers to the hydraulic level when the lifting
height (H) ≤ 4.0 m
"50" refers to the hydraulic level when the lifting
height (H) ≤ 5.0 m
"60" refers to the hydraulic level when the lifting
height (H) ≤ 6.0 m
"65" refers to the hydraulic level when the lifting
height (H) ≤ 6.5 m

4. Brake fluid check

Open the lid of the brake reservoir and check
whether the brake fluid level is within the scale; if
it is insufficient, please top it up and check
whether there is air in the brake line.

Caution

Use the original brake fluid and do

not add brake fluid of another type.

Do not spill brake fluid on any

painted surface, as this will damage the
paint.

Prevent dust and water from mixing

with it when adding brake fluid.

Replacement of brake fluid
5. Light check

Ensure that the lights turns on when the ignition

key switch is on.

6. Indicator light check

Toggle the indicator light control lever and check
whether the indicator light operates normally.

7. Reversing light and reversing buzzer check
When the shift lever is in the R position, the
reversing light turns on and the reversing buzzer
sounds.
8. Steering

① The truck should be driven slowly.
② Turn the steering wheel three turns clockwise
and anticlockwise, respectively. Check whether
the left and right steering force are the same.

9. Horn

Press the horn button and check whether the
sound is normal.

10. Seat adjustment and safety belt check

Pull the seat adjusting lever back, adjust the

driver's seat to a comfortable position for your

hands and feet, release the seat adjusting lever,

and lock it.

Check whether the safety belt works normally.

11. Instrument

Check the timer, battery level, and whether any
faults occurred.

12. Check the brake pedal

Slow down and step on the brake pedal; after
stepping on the brake pedal, the brake light
should turn on.

13. Accelerator pedal

When the accelerator pedal is depressed, the
acceleration should increase and the pedal should
return when released.

15. Check the steering angle display

Rotate the steering wheel to the end position in

Summary of Contents for XE Series

Page 1: ...eel Lithium ion Battery Forklift Truck CPD15 18 20 25 30 35 38 38 XEY2 SI CPD20 XEXY2 SI CPD30 35 38 XEY2H1 SI CPD20 25 30 35 38 XEY2H SI CPD40 45 50 XEY2 SI CPD50 XEXY2 SI OPERATION AND MAINTENANCE M...

Page 2: ...e outdoor operation capability load capacity etc are optimized to meet customers usage scenarios for internal combustion forklift trucks New high performance models have been added to meet the usage n...

Page 3: ...2 2 DAILY CHECKS AND ADJUSTMENTS 27 2 3 ADJUSTMENT AND REPLACEMENT OF THE FORKS 28 2 4 STARTING THE TRUCK 29 2 5 DRIVING 30 2 6 STEERING 31 2 7 BRAKING 31 2 8 EMERGENCY STOP 31 2 9 LOADING STACKING A...

Page 4: ...R AND MAINTENANCE 60 6 1 DAILY MAINTENANCE EIGHT HOURS 60 6 2 WEEKLY MAINTENANCE 40 HOURS 62 6 3 EVERY ONE AND A HALF MONTH MAINTENANCE 250 HOURS 64 6 4 EVERY THREE MONTH MAINTENANCE 500 HOURS 65 6 5...

Page 5: ...ly improved with the overall vehicle performance significantly higher than the original models 5 The high torque permanent magnet synchronous motor and high ratio reduction gearbox significantly impro...

Page 6: ...duced by 15 20 under the same conditions compared to traditional asynchronous motor models 8 The low center of gravity provides more stable operation Appearance and main parts No Name No Name 1 Mast 7...

Page 7: ...forklift truck should be used within the specified rated load The forklift truck is only to be used in specific areas such as factory plants tourist attractions and amusement parks etc The forklift tr...

Page 8: ...e warehouses in cold storage warehouses 1 3 Display and controls 1 Steering wheel 5 Steering column adjustment switch 9 Lift control lever 13 Multi functional display screen 2 Horn button 6 Ignition k...

Page 9: ...wheel The user can sound the horn by pressing the edge of the horn button with his or her finger or pressing the center of the horn button with his or her palm Direction lever 3 The direction control...

Page 10: ...the parking brake for service braking Steering column adjustment switch 5 The steering column adjustment switch is used to adjust the front and rear positions of the steering wheel and is located belo...

Page 11: ...n lever to the neutral position and move their foot away from the accelerator pedal to start the truck At this time the fault code will disappear Brake pedal 7 The brake pedal is used for braking cont...

Page 12: ...ipped with a forward tilt self locking valve Therefore when the power is off the mast cannot tilt forward even if the tilt lever is pushed forward Side shift control lever 11 as required by attachment...

Page 13: ...power Traveling steering and lifting actions will be disabled Accelerator pedal 16 The accelerator pedal is used to control the driving speed Press the pedal to start the forklift truck Controls the s...

Page 14: ...ight G Speed display N Slow mode Running mode A There are four running modes respectively Mode S mode P and mode E slow mode Mode S refers to the fast mode In this mode the forklift truck s accelerati...

Page 15: ...ace Steering angle H Display the vehicle s left right steering angle unit Battery level I Display remaining battery capacity with a display range of 0 100 and accuracy of 1 It is recommended that the...

Page 16: ...on 1 on the main interface to view fault information Press button 1 and button 2 to page up down to view multiple fault messages Press button 4 to return to the main interface 2 Press button 2 on the...

Page 17: ...git password first The password input method is as follows Use button 1 to move the cursor to the digit to be modified use button 2 to change the value after all four digits are entered press button 3...

Page 18: ...The third press of button 3 confirms the modified value completing the parameter modification The interface automatically jumps back to the previous step press button 4 to cancel and return to the pre...

Page 19: ...ully 7 Options page 1 Language settings Press button 1 and button 2 to select between Chinese English press button 3 to confirm and the interface will automatically jump back and the language will cha...

Page 20: ...matically jump back and the power on screen will change accordingly press button 4 to cancel and return to the previous interface 1 4 Other parts Adjust the driver s seat before starting the truck to...

Page 21: ...releases the driver s seat position adjustment lever and ensures the position is locked The position is adjusted Adjustment of the driver s seat backrest Operating steps The driver sits on the seat T...

Page 22: ...driver observe the driving environment at the rear of the forklift truck and the wide angle mirror increases the visual range Adjustment of the rearview mirror Operating steps The operator adjusts the...

Page 23: ...ged or the driver is sitting on the seat correctly and the direction lever returns to the neutral position will the seat switch indicator light turn off and the OPS driving state be released Working p...

Page 24: ...k in the seat the seat switch indicator light does not turn off Caution For forklift trucks with seats provided with a safety belt protection switch after the driver first sits back on the driver s se...

Page 25: ...21 1 6 Nameplate and Marks 140psi 9 7bar 115psi 7 9bar 300mm RATED LOAD WEIGHT LOAD CENTRE POSITION 700 mm 900 1100 500 2500 2000 1500 1000 500 3m kg 3000 RATED CAPACITIES AND LOAD CENTRES GRAPH...

Page 26: ...abel 10 Tire pressure label 11 Typeface label 12 Load curve label 13 Engine hood opening label 14 Product nameplate Located on the front left of the instrument frame 15 Lifting label one for each mast...

Page 27: ...of the load is critical to the operation of the forklift truck Caution Load center of gravity The load profiles handled with the forklift truck vary in order to evaluate the forklift truck and its sta...

Page 28: ...avity of the load is determined by whether the mast is tilted forward or backward or whether it is lifted or lowered thus the combined center of gravity can change The combined center of gravity of th...

Page 29: ...refers to the maximum load that the fork can bear at the standard load center distance The relationship between the maximum load and the load center distance is shown on the Bearing Capacity Chart of...

Page 30: ...or the load will slide when a large force acts forward When the forklift truck turns a centrifugal force will be applied outwards from the turning center The forklift truck can be pulled out and rolle...

Page 31: ...hen carrying out a visual check of the forklift truck the operator should pay special attention to whether the wheels wheel bolts and load parts are damaged or loose Visually and manually check the dr...

Page 32: ...gear in both directions and check whether the wheel position is displayed on the instrumentation Check the hydraulic functions of lift lowering tilt and attachments Check whether the electrical compon...

Page 33: ...fork arm carrier to prevent the fork from falling off from the open position There is a bolt in the middle of the upper beam to prevent the fork from working there If the bolt is damaged it should be...

Page 34: ...o four seconds The welcome interface is displayed The forklift truck cannot be driven or lift during this time If the operator operates the direction switch accelerator pedal or the lifting switch dur...

Page 35: ...there is enough space behind the forklift before turning 2 7 Braking Decelerate and depress the brake pedal to stop the forklift truck Set the driving direction switch to neutral Lower the forks to th...

Page 36: ...as possible Lifting cargo First lift the forks 50 mm 100 mm above the ground to confirm whether the cargo is secure Then tilt the mast backwards lift the cargo 50 mm 100 mm above the ground and start...

Page 37: ...hen the forklift truck is 300 mm away from the cargo Check the cargo condition Tilt the mast forward to the fork level and lift the forks to the position of pallet or crosstie Confirm whether the fork...

Page 38: ...ge or foreign objects Check the wheel nuts for any looseness Check the electrolyte level If the fork did not lift to the maximum height during the operation on that day the forks should be raised to t...

Page 39: ...ift truck once a week Lift the forks to maximum height several times Check the specific gravity and level of electrolyte once a month Consistent charging should be done once a month Warning The wooden...

Page 40: ...36 truck and connect the battery leads Carefully carry out pre start inspection to check the starting forward reverse steering lifting lowering front and rear tilting functions of the forklift truck...

Page 41: ...rough the gap in the overhead guard to avoid placing any strain on the overhead guard Warning Only lifting tools with sufficient loading capacity can be used Tilt the mast backwards completely when li...

Page 42: ...d tighten the parking brake Fasten the tension belt to the cross beam and counterweight tow pin and tighten the tension belt with a tightening device Secure the front and rear wheels with suitable wed...

Page 43: ...ble e g its wheels are trapped into pits and cannot be driven Operating steps Turn off the key switch and unplug the battery power supply Release the parking brake Put the direction lever in the neutr...

Page 44: ...ault when lifting cargo or driving on gradients causing leakage of storage battery electrolyte or hydraulic oil and brake fluid personnel should be organized for repair immediately 5 The driving route...

Page 45: ...r in the neutral position No people should be around the forklift truck Do not depress the accelerator pedal or operate the lift control lever or tilt control lever before powering on Keep a stable an...

Page 46: ...ifted forks If it is unavoidable the user should choose a safe place and hold the forks or attachments with wooden blocks to prevent accidents 16 Do not stretch your head or body between the mast and...

Page 47: ...cal and then lifted do not lift the cargo when the mast is tilted forward When picking up goods at height insert the fork into the pallet slowly lift back up and then lower the forks to 15 cm 30 cm ab...

Page 48: ...er 26 Cargo must be aligned with the center of the forks when cargo is not aligned or when the pallet jack turns or crosses uneven surfaces the cargo may easily fall off The possibility of rollover is...

Page 49: ...forklift truck or touch the control lever otherwise it will cause serious injury 5 In order to ensure the safety and service life of the forklift truck it must be regularly lubricated and maintained...

Page 50: ...odify them please contact Hangcha dealers or agents Do not refit the attachments without permission 4 Use a pallet when handling small objects and do not place them on the forks directly 4 4 Safety ru...

Page 51: ...o prevent an electric shock during installation During the installation of the battery system the battery should be mechanically lifted and slowly installed into the battery compartment of the truck d...

Page 52: ...me it can usually be regarded as battery overcharge 5 3 7 Explosion The battery housing is broken and solid material is flushed out of the battery with an explosive sound 5 3 8 Fire Open fire comes ou...

Page 53: ...ng in personal injury 9 After charging please close the protective cover of the vehicle charging port to avoid foreign objects entering the port and causing damage during operation of the vehicle Caut...

Page 54: ...4 Battery packs of different brands different capacities or different types should not be used together 5 If there is a large amount of dust or other foreign objects on the top cover and posts of the...

Page 55: ...normal smell or smoke from the battery system 5 6 2 Emergency plan 1 All personnel at site should quickly leave the forklift truck and call the fire station 2 Carry out the following operations if pos...

Page 56: ...h L mm 1074 1074 Width W mm 620 620 Height H 415 415 Rated Ah 230 230 Rated V 76 8 76 8 Item CPD38 XEY2 SI CPD35 XEY2 SI CPD30 XEY2 SI Model DQ EB0080230A0 C120 DQ EB0080230A0 C120 DQ EB0080230A0 C120...

Page 57: ...04A0 C121 DQ EB2080304A0 C121 Length L mm 1074 1074 1074 Width W mm 761 761 761 Height H 415 415 415 Rated capacity Ah 304 304 304 Rated voltage V 76 8 76 8 76 8 Item CPD40 XEY2 SI CPD45 XEY2 SI CPD50...

Page 58: ...rger 1 Appearance and structure The product dimensions and weight are shown in the table below Model Weight kg L W H mm Cooling method Installation position 48 V 100 A 17 525 455 260 Forced air coolin...

Page 59: ...e or female connector available Cooling method Forced air cooling Forced air cooling Working temperature 20 C 50 C 20 C 50 C Working humidity 0 95 0 95 IP class IP20 IP20 Noise 65dB 65dB Altitude 2000...

Page 60: ...e fault is resolved 7 After the battery is fully charged the charger will automatically stop charging and the indicator light will be on 8 If the truck needs to be used before charging is complete pre...

Page 61: ...before charging or use Clean dust and other foreign objects from the charger air inlet and outlet Inspect monthly Confirm the charger input circuit breaker is working normally Contact the store or ma...

Page 62: ...58 F11 Other faults F12 Abnormal current F13 Abnormal voltage...

Page 63: ...each port and that the metal terminals are not damaged or affected by rust or corrosion 5 Connect the charger to the charging socket of the lithium ion battery the charger will check automatically and...

Page 64: ...l leak is found before work start the engine after eliminating the leakage Check whether there is any fuel leak or water leak in the drive axle hydraulic system braking system and lithium ion battery...

Page 65: ...6 Indicator light check Toggle the indicator light control lever and check whether the indicator light operates normally 7 Reversing light and reversing buzzer check When the shift lever is in the R p...

Page 66: ...ed first see the following table for pressure values over pressurizing may cause a serious accident In order to ensure safety the tire should be placed in a protective frame during air inflation 18 Ch...

Page 67: ...ngage the hand brake Prevent your hands and body from being caught when applying grease and take care to avoid falling when lubricating at height Be careful 4 Chain lubrication Spray the chain spray d...

Page 68: ...Gradually depress the brake pedal by 10 mm 20 mm the brake light switch should be turned on 6 3 Every one and a half month maintenance 250 hours Add the following maintenance items in addition to the...

Page 69: ...n the bolts 2 Check the braking master cylinder and wheel cylinder for any leaks or damage 6 5 Semi annual maintenance 1000 hours Add the following maintenance items in addition to every three month m...

Page 70: ...grease Refer to the drive axle hub content in the Maintenance Manual disassemble the wheel bearing and then change the grease 2 Change the rear wheel bearing lubricating grease Refer to the content o...

Page 71: ...se 5 Tilt the mast backward and place wooden blocks at the sides of the outer mast 6 Tilt the mast forward until the front wheels are lifted off the ground Caution Do not loosen the nuts until the fro...

Page 72: ...n each rear side of the forklift frame to support the forklift as shown in the diagram 6 Remove the wheel nuts and replace the rear wheels Warning a When removing the tire from the hub the rim bolts a...

Page 73: ...69...

Page 74: ...nd regulations Open the right door and unplug the battery Open the fuse box cover Check the fuses for any damage and replace the damaged fuse promptly Close the fuse box cover Caution Unplug the batte...

Page 75: ...ng post 4 Fuse Traction Controller 350A 5 Fuse Oil pump controller 250A Caution Unplug the battery before any operations on the electrical system of the forklift truck The controller is equipped with...

Page 76: ...uck whichever is the smallest Generally speaking the comprehensive bearing capacity of the complete truck is the lowest of the three Bearing capacity of accessories is a calculated value for the force...

Page 77: ...t truck forwards when transporting cargo ensure that cargo is 300 mm above the ground and the mast is tilted backward The weight of the cargo should not exceed the limit of the combined bearing capaci...

Page 78: ...ours Check fasteners for tightness Regularly check whether hydraulic circuit connections are loose and whether the hose is damaged If it is damaged it must not be used before repair Regularly check wh...

Page 79: ...n safety factors meet Machinery Directive 2006 42 EC EN ISO 12100 2010 EN ISO 3691 1 2015 A1 2020 EN1175 2020 EN 16307 1 2020 Noise is measured according to EN 12053 2001 A1 2008 Vibration parameters...

Page 80: ...ndy Yang General Manager We declare that the machinery Wir erkl ren hiermit dass die Maschine product name Electric Forklift Truck Produktbezeichnung commercial name Handelsbezeichnung function Funkti...

Page 81: ...77 Maintenance Record Sheet Date Maintenance content Maintenance personnel...

Page 82: ...CO LTD Address For OVERSEAS USERS Address 666 Xiangfu Road Lin an Economic Development Zone Zhejiang China Fax 0086 571 88926789 0086 571 88132890 ZIP 311305 Web http www hcforklift com E mail sales h...

Reviews: