background image

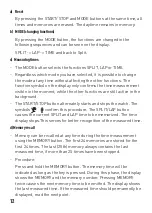
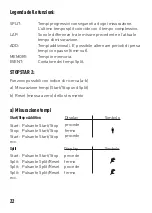
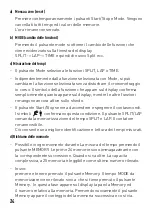
a)  Messa a zero (reset)

  Premere contemporaneamente i pulsanti Start/Stop e Mode. Vengono  
  cancellati tutti tempi ed i valori delle memorie.  
  L‘ora rimane conservato.

b)  MODE (cambio delle funzioni)

  Premendo il pulsante mode si ottiene il cambio delle funzioni che  
  viene evidenziato sulla finestra del display 
  SPLIT -> LAP -> TIME e quindi di nuovo Split ecc.

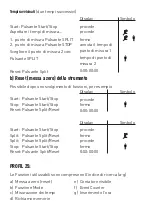
c) Misurazione del tempi

-  Il pulsante Mode seleziona le funzioni SPLIT, LAP o TIME.
-   Indipendentemente dalla funzione selezionata con Mode, si può  
  cambiare la funzione selezionata senza disturbare il cronometraggio  
  in corso. Il simbolo della funzione che appare sul display conferma  
  semplicemente quanto appare sul display, mentre le altre funzioni  
  rimangono ancora attive sullo sfondo.
-  Il pulsante Start/Stop serve ad accendere e spegnere il contasecondi.  
  I simboli 


confermano questa condizione. Il pulsante SPLIT/LAP  

  comanda la memorizza  zione del tempo SPLIT e LAP. Il contatore 
  rimane visibile.  
  Ciò consente una migliore identificazione e lettura dei tempi misurati.

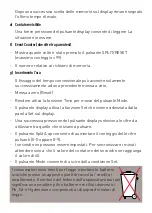
d) Richiamo delle memorie

-  Possibile in ogni momento durante La misura del tempo premendo il  
  pulsante MEMORY. Le prime 24 memorie sono immagazzinante con  
  la corrispondente successione. Quando si va oltre La capacita  
  complessiva, a 25 memoria è leggibile come ultimo numero rilevato.
- Inizio: 
  premere e tenere premuto il pulsante Memory. II tempo MODE da  
  memorizzare viene rilevato sino a che si tiene premuto il pulsante 
  Memory.  In questa fase appare sul display la parola Memory ed  
  il numero relativo alla memoria. Premendo nuovamente il pulsante  
  Memory appare il conteggio della memoria successiva e così via. 

24

Summary of Contents for PROFIL 25

Page 1: ...PROFIL 25 STOPSTAR Garantie Bedienungsanleitung Guarantee instructions for use Garantie mode d emploi Garanzia istruzioni per l uso...

Page 2: ...DEUTSCH ENGLISH FRAN AIS ITALIANO BEDIENUNGSANLEITUNG GARANTIE 2 INSTRUCTION BOOK GUARANTEE 8 MODE D EMPLOI GARANTIE 14 ISTRUZIONI PER L USO E GARANZIA 20...

Page 3: ...tact springs are corroded by batteries which have leaked Batter ies are not covered by this guarantee Hanhart garantie 2 deux ans Si un d faut apparaissait durant cette p riode nous changerions ou r p...

Page 4: ...f r ca 3 Wochen Gangreserve Display Profil 9 Digits 8 6 mm Ziffernh he Stopstar 7 Digits 6 5 4 mm Ziffernh he Anzeige 7 Digits bei Splitfunktion h mm ss 1 100 Sek 6 Digits bei Lapfunktion mm ss 1 100...

Page 5: ...atterie einsetzen auf richtige Polung achten Deckel wieder einrasten Kordel und Schutztasche montieren Batteriedeckel abnehmen und Kordel von der Geh useau enseite durch eines der beiden L cher einf h...

Page 6: ...Pausen zeiten Timeout MEMORY sind Zeiten im Speicher EVENT sind Z hler der gemessenen Splitzeiten STOPSTAR 2 M gliche Funktionen mit Suchindex a b a Zeiten messen Start Stop und Split b Reset der Stop...

Page 7: ...Split Reset oder Start Taste Start Stop Split Taste Split Reset Split Taste Split Reset Stop Taste Start Stop Reset Taste Split Reset PROFIL 25 M gliche Funktionen mit Suchindex a g a Reset der Uhr e...

Page 8: ...tionen im Hintergrund weiterhin parallel aktiv sind Mit Hilfe der Taste START STOP wird die Uhr abwechselnd gestartet und gestoppt Die Symbole best tigen diesen Zustand Die SPLIT LAP Taste veranlasst...

Page 9: ...h Reset der Uhr mit der MODE Taste auf TIME Funktion gehen Taste DISPLAY aktiviert den SET Vorgang mit dem Symbol SET im Display Ein weiteres Bet tigen von Taste DISPLAY selektiert das zu setzende Dig...

Page 10: ...ll an approx 3 week reserve Display Profil 9 digits height 8 6 mm Stopstar 7 digits height 6 5 4 mm Indication 7 digits at Split function h mm ss 1 100 sec 6 digits at Lap function mm ss 1 100 sec 2 d...

Page 11: ...e battery with the correct polarity Snap the cover back in place Installing lanyard and protection pouch Remove the battery cover Insert the lanyard from the outer side of the case through one of the...

Page 12: ...he registered times in memory EVENT is the number of the measured split times STOPSTAR 2 Available functions with search index a b a Measuring of time periods Start Stop und Split b Reset of the stopw...

Page 13: ...Stop Reset Button Split Reset or Start Button Start Stop Split Button Split Reset Split Button Split Reset Stop Button Start Stop Reset Button Split Reset PROFIL 25 Available Functions with search ind...

Page 14: ...TART STOP button alternately starts and stops the watch The symbols confirm this procedure The SPLIT LAP button causes the current SPLIT and LAP time to be memorized The time display stops This serves...

Page 15: ...the display A further pressing of the DISPLAY button selects the digit to be set which appears in a flashing mode The SPLIT LAP button is advancing the flashing digit 0 5 or 0 9 Seconds cannot be set...

Page 16: ...erve Affichage Profil 9 chiffres Taille des chiffres 8 6 mm Stopstar 7 chiffres Taille des chiffres 6 5 4 mm Indication 7 chiffres en fonction Split h mm ss 1 100 sec 6 chiffres en fonction Lap mm ss...

Page 17: ...a polarit Remettre le couvercle Apr s remplacement de la pile l heure et la date doivent tre introduites nouveau Montage du cordon et de la housse de protection Retirer le couvercle de la pile et intr...

Page 18: ...Y Temps enregistres dans la m moire EVENT Compteur du nombre de temps Split mesur s STOPSTAR 2 Fonctions possibles avec l index de recherche a b a Mesure des temps Start Stop und Split b Remise le chr...

Page 19: ...ouche Start Stop Split Touche Split Reset Split Touche Split Reset Stop Touche Start Stop Remise z ro Touche Split Reset PROFIL 25 Fonctions possibles avec l index de recherche a g a Remise le chronom...

Page 20: ...le compteur d marre ou stop Les symboles indiquent cette action Au moyen de la touche SPLIT LAP les valeurs des temps SPLIT et LAP sont enregistr s et m moris s L indication de temps reste fig e Ceci...

Page 21: ...SET dans l affichage par pression nouveau sur la touche DISPLAY le chiffre est s lectionn Ceci est affich par un clignotement la touche SPLIT LAP est pour avancer ce chiffre la valeur d sir e les sec...

Page 22: ...settimane in riserva di tempo Display Profil 9 cifre altezza 8 6 mm Stopstar 7 cifre altezza 6 5 4 mm Indication 7 cifre per funzione Split h mm ss 1 100 sec 6 cifre per funzione Lap mm ss 1 100 sec 2...

Page 23: ...nserire la nuova batteria facendo attenzione a fare coincidere i poli vedasi lo schizzo Montaggio dell astuccio e del cordoncino Rimuovere il coperchio del vano batterie ed inserire il cordoncino dall...

Page 24: ...Tempi in memoria EVENT Contatore dei tempi Split STOPSTAR 2 Funzioni possibili con indice di ricerca a b a Misurazione tempi Start Stop und Split b Reset messa a zero dello strumento a Misurazione tem...

Page 25: ...t Pulsante Split Reset Start Pulsante Start Stop Split Pulsante Split Reset Split Pulsante Split Reset Stop Pulsante Start Stop Reset Pulsante Split Reset PROFIL 25 Le Funzioni utilizzabili sono compr...

Page 26: ...attive sullo sfondo Il pulsante Start Stop serve ad accendere e spegnere il contasecondi I simboli confermano questa condizione Il pulsante SPLIT LAP comanda la memorizza zione del tempo SPLIT e LAP I...

Page 27: ...attiva la funzione Set che viene evidenziata dalla parola Set sul display Una successiva pressione del pulsante display seleziona le cifre da utilizzare tra quelle che iniziano a pulsare Il pulsante S...

Page 28: ...Hanhart 1882 GmbH Hauptstr 33 I 78148 G tenbach Germany www hanhart com...

Reviews: