background image

30 

BROMINE MEASUREMENT

•  Fill the cuvette up to the 10 mL mark with unreacted sample and replace the cap.

•  Place the cuvette into the cuvette holder and ensure that the notch on the cap is positioned 

securely into the groove.

• Press 

ZERO/CFM

 and the lamp, cuvette and detector icons will appear on the display, depending 

on the measurement phase.

•  After a few seconds, the display will show 

“-0.0-”

. The meter is now zeroed and ready for 

measurement.

MEASUREMENT PROCEDURE

•  Remove the cuvette.
•  Add the content of one packet of 

HI93716‑0

 reagent. Replace the cap and shake gently for  

20 seconds to dissolve most of the reagent.

Summary of Contents for HI96101C

Page 1: ...INSTRUCTION MANUAL HI96101C pH Chlorine Cyanuric Acid Iodine Bromine Iron LR ISM...

Page 2: ...the instrument as well as a precise idea of its versatility If you need additional technical information do not hesitate to e mail us at tech hannainst com or view our worldwide contact list at www ha...

Page 3: ...OF OPERATION FUNCTIONAL DESCRIPTION ERRORS AND WARNINGS GENERAL TIPS FOR AN ACCURATE MEASUREMENT STARTUP RANGE SELECTION MEASUREMENT PROCEDURE VALIDATION PROCEDURE CALIBRATION PROCEDURE GLP BATTERY M...

Page 4: ...Meter is supplied complete with Sample Cuvettes and Caps 2 pcs CAL Check standard cuvettes 9V Battery Scissors Cloth for wiping cuvettes Instrument quality certificate Instruction Manual and Quick Ref...

Page 5: ...ions Display messages aid the user in routine operation The meter has an auto shut off feature that will turn off the instrument after 10 minutes of non use in measurement mode or after 1 hour if left...

Page 6: ...0 to 12 5 mg L 0 00 to 10 00 mg L 0 00 to 1 60 mg L Resolution 0 1 pH 0 01 mg L under 3 50 mg L Chlorine 0 10 mg L above 3 50 mg L Chlorine 1 mg L Cyanuric Acid 0 1 mg L Iodine 0 01 mg L Bromine 0 01...

Page 7: ...a pink tint in the sample For Iron LR Adaptation of the TPTZ method The reaction between iron and the reagent causes a violet tint in the sample Environment 0 to 50 C 32 to 122 F max 95 RH non conden...

Page 8: ...he figure explains these definitions In a laboratory using a standard solution of the parameter and a representative lot of reagent for each parameter the following standard deviations were obtained P...

Page 9: ...concentration of the substance d optical path through the substance Therefore the concentration c can be calculated from the absorbance of the substance as the other factors are known Photometric chem...

Page 10: ...surement process is carried out in two phases first the meter is zeroed and then the actual measurement is performed The cuvette has a very important role because it is an optical element and thus req...

Page 11: ...enter calibration mode RANGE GLP this is a multi functional key In measurement mode press to change the parameter Press and hold for three seconds to enter GLP mode In calibration mode press to edit t...

Page 12: ...es the charge state of the battery 4 The hourglass appears when an internal check is in progress 5 Status messages 6 The chronometer appears when the reaction timer is running 7 The month day and date...

Page 13: ...nstrument shows clear messages when erroneous condition appears Messages are also displayed when the obtained values are outside expected range The beeper is playing a beep on errors Light High There...

Page 14: ...the meter Over Range A flashing value of the maximum concentration indicates an over range condition The concentration of the sample is beyond the programmed range dilute the sample and re run the te...

Page 15: ...vity on the top the bottom of this concavity must be at the same level of the 10 mL mark Proper use of the powder reagent packet a use the scissors to open the powder packet b push the edges of the pa...

Page 16: ...too long after reagent is added or accuracy will be lost It is possible to take multiple readings in a row but it is recommended to take a new zero reading for each sample and to use the same cuvette...

Page 17: ...rized and the selection remains unchanged at power off or when the battery is removed The HI96101 can measure pH when range P1 is selected Free Chlorine when range P2 Total Chlorine when range P3 Cyan...

Page 18: ...ple and replace the cap Place the cuvette into the cuvette holder and ensure that the notch on the cap is positioned securely into the groove MEASUREMENT PROCEDURE To compensate the meter for the samp...

Page 19: ...econds the display will show 0 0 The meter is now zeroed and ready for measurement Remove the cuvette and add 5 drops of the HI93710 0 Indicator Replace the cap and shake gently the solution Replace t...

Page 20: ...tioned securely into the groove Press ZERO CFM and the lamp cuvette and detector icons will appear on the display depending on the measurement phase Press READ TIMER The lamp cuvette and detector icon...

Page 21: ...e packet of HI93701 0 reagent Replace the cap and shake gently for 20 seconds Replace the cuvette into the cuvette holder and ensure that the notch on the cap is positioned securely into the groove Pr...

Page 22: ...play Interferences Interference may be caused by Bromine Iodine Chlorine Dioxide Ozone Oxidized Manganese and Chromium In case of water with alkalinity greater than 250 mg L CaCO3 or acidity greater t...

Page 23: ...is positioned securely into the groove Press ZERO CFM and the lamp cuvette and detector icons will appear on the display depending on the measurement phase After a few seconds the display will show 0...

Page 24: ...measurement The beeper is playing a beep at the end of countdown period Alternatively wait for 2 minutes and 30 seconds and just press READ TIMER In both cases the lamp cuvette and detector icons wil...

Page 25: ...e with diluted HCl or NaOH In case of water with hardness greater than 500 mg L CaCO3 shake the sample for approximately 2 minutes after adding the reagent CYANURIC ACID MEASUREMENT Fill the cuvette u...

Page 26: ...nd replace the cap Place the second cuvette into the cuvette holder and ensure that the notch on the cap is positioned securely into the groove Press and hold READ TIMER for three seconds The display...

Page 27: ...rectly displays concentration in mg L of cyanuric acid on the LCD MEASUREMENT PROCEDURE IODINE MEASUREMENT Fill the cuvette up to the 10 mL mark with unreacted sample and replace the cap Place the cuv...

Page 28: ...cap and shake gently for about 20 seconds to dissolve most of the reagent Replace the cuvette into the cuvette holder and ensure that the notch on the cap is positioned securely into the groove Press...

Page 29: ...odine on the LCD Interferences Bromine Chlorine Ozone Oxidized forms of Manganese and Chromium In case of water with alkalinity greater than 250 mg L CaCO3 or acidity greater than 150 mg L CaCO3 the c...

Page 30: ...y into the groove Press ZERO CFM and the lamp cuvette and detector icons will appear on the display depending on the measurement phase After a few seconds the display will show 0 0 The meter is now ze...

Page 31: ...er adding the reagent Replace the cuvette into the cuvette holder and ensure that the notch on the cap is positioned securely into the groove Press and hold READ TIMER for three seconds The display wi...

Page 32: ...of one packet of HI93746 0 reagent close the cylinder and shake vigorously for 30 seconds This is the blank Fill the cuvette up to the 10 mL mark with blank and replace the cap Place the cuvette into...

Page 33: ...er is now zeroed and ready for measurement Remove the cuvette Fill another graduated mixing cylinder up to the 25 mL mark with the sample Add the content of one packet of HI93746 0 reagent close the c...

Page 34: ...dity formation Place the cuvette into the cuvette holder and ensure that the notch on the cap is positioned securely into the groove Press and hold READ TIMER for three seconds The display will show t...

Page 35: ...meter For full validation of the instrument the following procedure must be performed for each parameter Turn the meter on by pressing ON OFF When the beeper sounds briefly and the LCD displays dashes...

Page 36: ...Total Chlorine B HI96711 11 Cyanuric Acid B HI96722 11 Iodine B HI96718 11 Bromine B HI96716 11 Iron LR B HI96746 11 Ensure that the notch on the cap is positioned securely into the groove Press CAL...

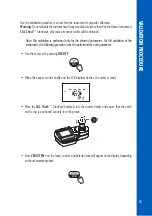
Page 37: ...ate the instrument with standard solutions other than the Hanna Instruments CAL Check Standards otherwise erroneous results will be obtained When calibrating only the selected range is affected Turn t...

Page 38: ...ation The blinking READ asks for reading calibration standard Remove the cuvette CALIBRATION PROCEDURE Place the specific CAL Check Standard Cuvette B into the cuvette holder for pH B HI96710 11 Free...

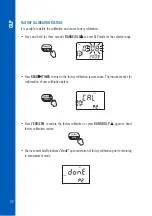
Page 39: ...s STD LOW the standard value was too low Verify that all CAL CheckTM Standards Cuvettes A and B are free of fingerprints or dirt and that they are inserted correctly Then the date of the last calibrat...

Page 40: ...show the day blinking Press RANGE GLP to edit the desired day 01 31 If the key is kept pressed the day number is automatically increased Note It is possible to change the editing from day to year and...

Page 41: ...factory calibration message F CAL will appear on the main display and the instrument returns to measurement mode after three seconds In the GLP mode the last user calibration date can be verified and...

Page 42: ...to enter in the factory calibration restore screen The instrument asks for confirmation of user calibration delete Press ZERO CFM to restore the factory calibration or press RANGE GLP again to abort...

Page 43: ...nd 750 measurements depending on the light level The remaining battery capacity is evaluated at the instrument startup and after each measurement The instrument displays a battery indicator with three...

Page 44: ...ment off by pressing ON OFF Turn the instrument upside down and remove the battery cover by turning it counterclockwise Extract the battery from its location and replace it with a fresh one Insert bac...

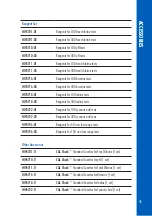
Page 45: ...tests HI93718 03 Reagents for 300 iodine tests HI93722 01 Reagents for 100 cyanuric acid tests HI93722 03 Reagents for 300 cyanuric acid tests HI93746 01 Reagents for 50 iron low range tests HI93746...

Page 46: ...Iron Low Range 1 set HI93703 50 Cuvette cleaning solution 230 mL HI740318 Carrying case HI740029P 9V battery 10 pcs HI731318 Cloth for wiping cuvettes 4 pcs HI731331 Glass cuvettes 4 pcs HI731335 Caps...

Page 47: ...eturned to Hanna Instruments first obtain a Returned Goods Authorization Number from the Customer Service Department and then send it with shipment costs prepaid When shipping any instrument make sure...

Page 48: ...a Instruments Inc Highland Industrial Park 584 Park East Drive Woonsocket RI 02895 USA www hannainst com Local Office Hanna Instruments USA 270 George Washington Highway Smithfield RI 02917 Phone 800...

Reviews: