INSTRUCTION MANUAL
HI96738
Chlorine Dioxide ISM
13•
When the correct year has been set, press
ZERO/CFM
or
READ
to confirm. Now
the display will show the month blinking.
14•
Press
GLP/
to edit the desired month
(01-12). If the key is kept pressed, the
month number is automatically increased.
15•
When the correct month has been set, press
ZERO/CFM
or
READ
to confirm. Now
the display will show the day blinking.
16•
Press
GLP/
to edit the desired day
(01-31). If the key is kept pressed, the
day number is automatically increased.
Note: It is possible to change the editing
from day to year and to month by pressing
READ .
17•
Press
ZERO/CFM
to save the calibration
date.
18•
The instrument displays “
Stor
” for one
second and the calibration is saved.
19•
The instrument will return automatically to
measurement mode by displaying dashes
on the LCD.
B
HI96738
3
4-5
7
9
3
4
5-6
8
B
HI96738
11-13
14-15
16
17
Last Calibration Date
1•
Press
GLP/
to enter GLP mode. The
calibration month and day will appear
on the main display and the year on the
secondary display.
2•
If no calibration was performed, the factory
calibration message,
“F.CAL”
will appear on
the main display and the instrument returns
to measurement mode after three seconds.
In GLP mode, the last calibration date can be verified and the factory
calibration can be restored.
3-4
2
3-4
To save the battery, the instrument shuts down after 10 minutes of non-use
in measurement mode and after 1 hour of non-use in calibration mode.
If a valid measurement was displayed before
auto-shut off, the value is displayed when the
instrument is switched on. The blinking
“ZERO”
means that a new zero has to be performed.
One fresh battery lasts for around 750 measurements, depending on the
light level.
The remaining battery capacity is evaluated at the instrument startup and
after each measurement.
The instrument displays a battery indicator with three levels as follows:
• 3 lines for 100 % capacity
• 2 lines for 66 % capacity
• 1 line for 33 % capacity
• Battery icon blinking if the capacity is under 10 %.
If the battery is empty and accurate measurements can’t be taken any
more, the instrument shows
“dEAd bAtt”
and turns off.
To restart the instrument, the battery must be replaced with a fresh one.
To replace the instrument’s battery, follow the steps:
• Turn the instrument off by pressing
ON/OFF
.
• Turn the instrument upside down and remove the battery cover by
turning it counterclockwise.
• Extract the battery from its location and replace it with a fresh one.
• Insert back the battery cover and turn it clockwise to close.
Calibration
Note: It is possible to interrupt the calibra-
tion procedure at any time by pressing
CAL CHECK or ON/OFF keys.
1•
Turn the meter on by pressing
ON/OFF
.
2•
When the beeper sounds briefly and the
LCD displays dashes, the meter is ready.
3•
Press and hold
CAL CHECK
for three
seconds to enter calibration mode. The
display will show
“CAL”
during calibration
procedure. The blinking
“ZERO”
asks for
instrument zeroing.
4•
Place the
CAL Check™
Standard
HI96738-11
Cuvette A into the cuvette
holder and ensure that the notch on the
cap is positioned securely into the groove.
5•
Press
ZERO/CFM
and the lamp, cuvette and
detector icons will appear on the display,
depending on the measurement phase.
6•
After a few seconds the display will show
“-0.0-”
. The meter is now zeroed and ready
for calibration. The blinking
“READ”
asks
for reading calibration standard.
7•
Remove the cuvette.
8•
Place the
CAL Check™
Standard
HI96738-11
Cuvette B into the holder
and ensure that the notch on the cap is
positioned securely into the groove.
9•
Press
READ
and the lamp, cuvette and
detector icons will appear on the display,
depending on the measurement phase.
10•
The instrument will show for three seconds
the
CAL Check™
standard value.
Note: If the display shows “STD HIGH”, the
standard value was too high. If the display
shows “STD LOW”, the standard value
was too low. Verify that both CAL Check™
Standard HI96738-11 Cuvettes, A and B
are free of fingerprints or dirt and that they
are inserted correctly.
11•
Then the date of last calibration (e.g.:
“01.08.2009”) appears on the display,
or “01.01.2009” if the factory calibration
was selected before. In both cases the year
number is blinking, ready for date input.
12•
Press
GLP/
to edit the desired year
(2009-2099). If the key is kept pressed,
the year number is automatically increased.
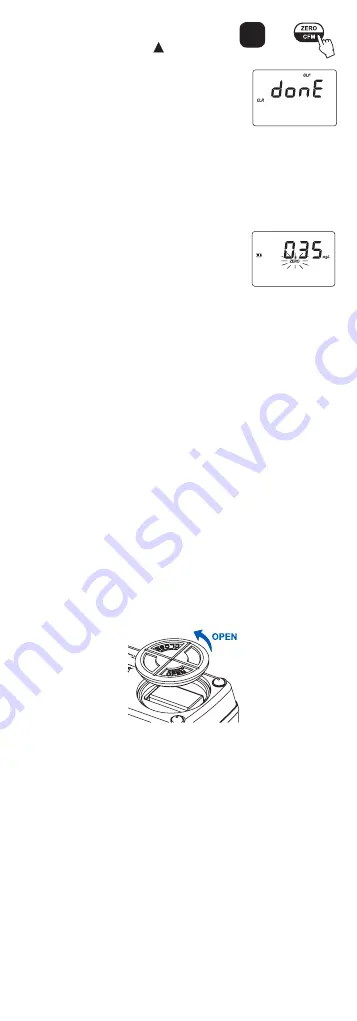
3•
Press
ZERO/CFM
to restore the factory
calibration or press
GLP/
again to abort
factory calibration restore.
4•
The instrument briefly indicates
“donE”
upon restoration of factory calibration prior
to returning to measurement mode.
2
1
18
8
9-10
Validation
1•
Turn the meter on by pressing
ON/OFF
.
2•
When the beeper sounds briefly and the
LCD displays dashes, the meter is ready.
3•
Place the
CAL Check™
Standard
HI96738-11
Cuvette A into the holder
and ensure that the notch on the cap is
positioned securely into the groove.
4•
Press
ZERO/CFM
and the lamp, cuvette and
detector icons will appear on the display,
depending on the measurement phase.
5•
After a few seconds the display will show
“-0.0-”
. The meter is now zeroed and ready
for validation.
6•
Remove the cuvette.
7•
Place the
CAL Check™
Standard
HI96738-11
Cuvette B into the holder
and ensure that the notch on the cap is
positioned securely into the groove.
8•
Press
CAL CHECK
key and the lamp,
cuvette and detector icons together with
“CAL CHECK”
will appear on the display,
depending on the measurement phase.
9•
At the end of the measurement the display
will show the validation standard value.
The reading should be within specifica-
tions as reported on the
CAL Check™
Standard Certificate. If the value is found
out of specifications, please check that the
cuvettes are free of fingerprints, oil or dirt
and repeat validation. If results are still
found out of specifications then recalibrate
the instrument.
Warning:
do not validate or calibrate the instrument with standard solu-
tions other than the Hanna Instruments
CAL Check™
Standards, otherwise
erroneous results will be obtained.
For accurate validation and calibration results, please perform tests at room
temperature (18 to 25 °C; 64.5 to 77.0 °F).
VALIDATION AND CALIBRATION PROCEDURES
Use the Hanna Instruments CAL Check™ cuvettes (see
“Accessories”) to validate or calibrate instruments.
Validation
Calibration
GLP
Last Calibration
Date
BATTERY MANAGEMENT
or
or
Factory Calibration
Restore
3''
Before using these products, make sure that they are entirely suitable for your
specific application and for the environment in which they are used.
Operation of these instruments may cause unacceptable interferences to other
electronic equipments, this requiring the operator to take all necessary steps
to correct interferences.
Any variation introduced by the user to the supplied equipment may degrade
the instrument’s EMC performance.
To avoid damages or burns, do not put the instrument in microwave oven.
For yours and the instrument safety do not use or store the instrument in
hazardous environments.
RECOMMENDATIONS FOR USERS
Factory Calibration Restore
It is possible to delete the calibration and
restore factory calibration.
1•
Press
GLP/
to enter GLP mode.
2•
Press
READ
to enter in the factory cali-
bration restore screen. The instrument asks
for confirmation of user calibration delete.


