background image

11

OPERATION INSTRUCTIONS

CARE AND MAINTENANCE

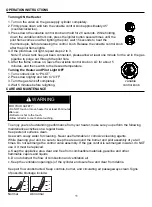
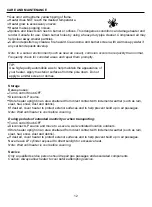
Turning ON the Heater

1. Turn on the valve on the gas supply cylinder completely.

2. Firmly press down and turn the variable control knob approximately 45°

    (counterclockwise).

3. Press down the variable control knob and hold for 20 seconds. While holding 

   down the variable control knob, press the igniter button several times until the    

   pilot flame comes on.After lighting the pilot, wait 15 seconds to heat the 

   thermocouple, before releasing the control knob. Release the variable control knob 

   after the pilot flame lights.

4. If the pilot does not light, repeat steps 2 to 3.

    Note: If a new tank has just been connected, please allow at least one minute for the air in the gas

    pipeline to purge out through the pilot hole.

5. After the flame comes on, leave the variable control knob on LO for about 5 

    minutes, and then switch to the desired temperature.

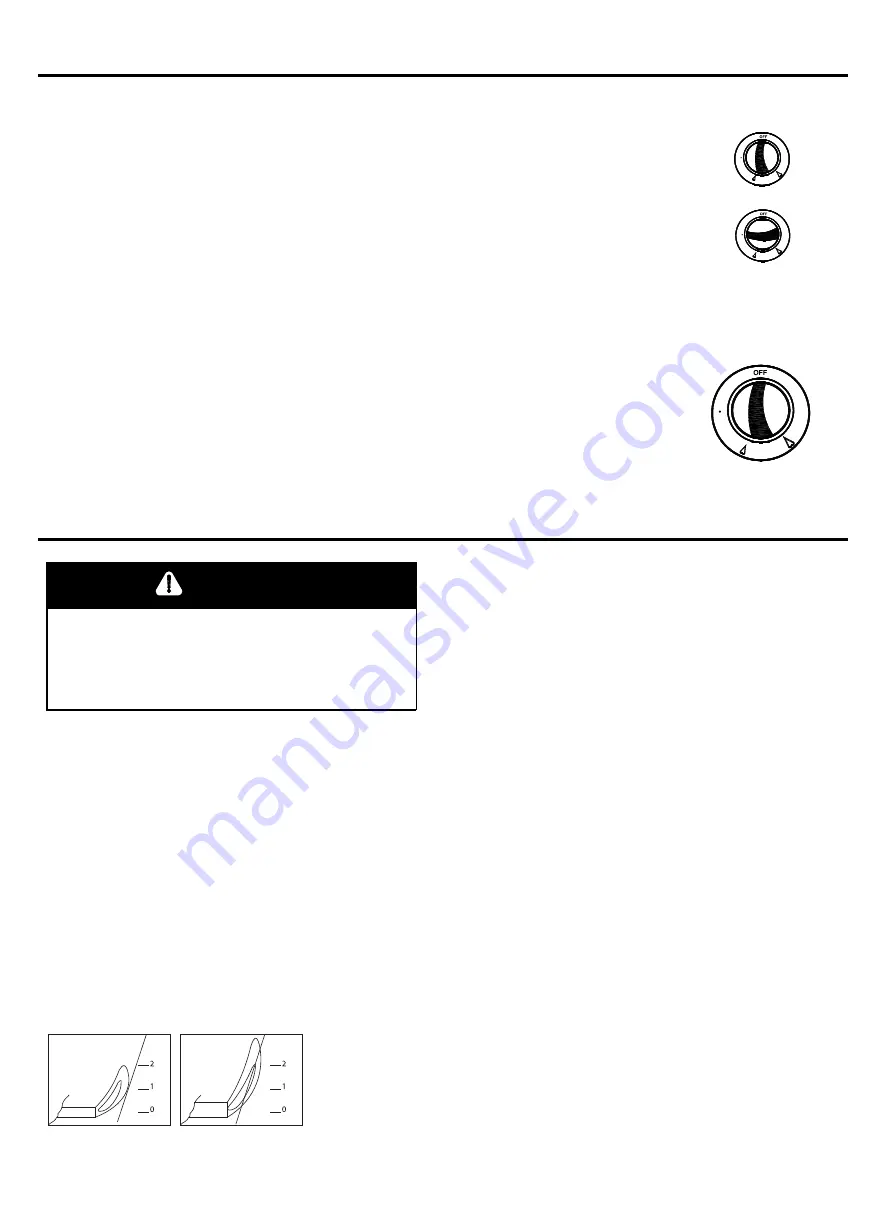
1. Turn control knob to “PILOT”.

2. Press down lightly and turn to “OFF”.

3. Turn the gas tank off completely.

4. Wait 5 minutes before relighting.

Turning the Heater and Pilot Light OFF

in.

in.

in.

in.

in.

in.

   variable 

control knob

O

L

tol

iP

IH

O

L

tol

iP

IH

O

L

tol

iP

IH

 WARNING


FOR YOUR SAFETY:

• Do NOT touch or move heater for at least 45 minutes

after use.

• Reflector is hot to the touch.

• Allow reflector to cool before touching.

To enjoy years of outstanding performance from your heater, make sure you perform the following 

maintenance activities on a regular basis:

Keep exterior surfaces clean.

Use warm soapy water for cleaning. Never use flammable or corrosive cleaning agents.

While cleaning your unit, be sure to keep the area around the burner and pilot assembly dry at all 

times. Do not submerge the control valve assembly. If the gas control is submerged in water, do NOT

use it. It must be replaced.

a. Keep the appliance area clear and free from combustible materials, gasoline and other 

flammable vapors and liquids.

b. Do not obstruct the flow of combustion and ventilation air.

c. Keep the ventilation opening(s) of the cylinder enclosure free and clear from debris.

Keep air flow unobstructed. Keep controls, burner, and circulating air passageways clean. Signs 

of possible blockage include:

Normal

Abnormal

Summary of Contents for 9710203

Page 1: ...in the vicinity of this or any other appliance An LP cylinder not connected for use shall not be stored in the vicinity of this or any other appliance WARNING Improper installation adjustment alteration service or maintenance can cause property damage injury or death Read the installation operation and maintenance instructions thoroughly before installing or servicing this equipment WARNING For Ou...

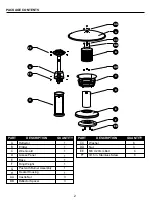
Page 2: ...1 CC Washer 6 BB Reflector Spacer 3 B Emitter 1 DD Nut Access Panel Base 3 C Wire Guard 1 D 1 E 1 F Ring Weight EE M6 X 20mm Bolt 3 16 in Stainless Screw 1 4 8 FF G H Post with Burner Assembly Heater Housing 1 1 N O I T P I R C S E D T R A P QUANTITY H AA A CC BB B DD C D E F EE FF G FF ...

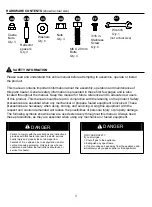
Page 3: ...fueled equipment is involved These precautions are necessary when using storing and servicing Using this equipment with the respect and caution demanded will reduce the possibilities of personal injury or property damage The following symbols shown below are used extensively throughout this manual Always heed these precautions as they are essential when using any mechanical or fueled equipment DAN...

Page 4: ...We cannot foresee every use which may be made of our heaters Check with your local fire safety authority if you have questions about heater use Other standards govern the use of fuel gases and heat producing products for specific uses Your local authorities can advise you about these If no local codes exist follow National Fuel Gas Code ANS Z223 1 In Canada installation must conform to local codes...

Page 5: ...y feet away from the original leak Use only propane gas set up for vapor withdrawal Store or use propane gas in compliance with local ordinances and codes or with ANS NFPA 58 Turn off propane when not in use WARNING Alert children and adults to the hazards of high surface temperatures Stay away from these surfaces to avoid burning skin or igniting clothing Carefully supervise young children when i...

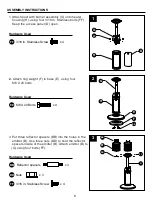
Page 6: ...n Stainless bolts FF Keep the access panel D open 2 Attach ring weight F to base E using four M6 X 20 bolts x 4 M6 X 20 Bolts 3 Put three reflector spacers BB into the holes in the emitter B Use three nuts DD to hold the reflector spacers inside of the emitter B Attach emitter B to G using four bolts FF x 3 Reflector spacers x 3 Nuts x 4 3 16 in Stainless Screw G H BB B DD FF G E F EE G FF D H ...

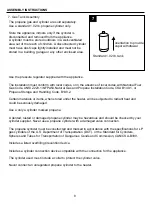
Page 7: ...ers CC into the top of support bolts Attach reflector to emitter assembly using 3 nuts AA and 3 washers CC 6 Rotate regulator toward opening in housing Line up threads on gas cylinder with those on the regulator Insert and rotate cylinder clockwise until tight Close D x 3 Castle Nuts x 6 Washers C G AA A CC D ...

Page 8: ... B149 2 Certain materials or items when stored under the heater will be subjected to radiant heat and could be seriously damaged Use a only a cylinder marked propane A dented rusted or damaged propane cylinder may be hazardous and should be checked by your cylinder supplier Never use a propane cylinder with a damaged valve connection The propane cylinder must be constructed and marked in accordanc...

Page 9: ... on all sides but with no overhead cover b Within a partial enclosure which includes an overhead cover and no more than two side walls These side walls may be parallel as in a breezeway or at right angles to each other c Within a partial enclosure which includes an overhead cover and three side walls as long as 30 percent or more of the horizontal periphery of the enclosure is permanently open Do ...

Page 10: ...ater The soap solution can be applied to hoses and connections with a spray bottle brush or rag 2 Make sure that the safety control valve is in the OFF position 3 Turn the cylinder valve ON and check for soap bubbles forming on and around connections and hoses If bubbles appear there is a leak present 4 If a leak is present remove the gas cylinder immediately tighten any leaking fittings replace t...

Page 11: ... 5 minutes before relighting Turning the Heater and Pilot Light OFF in in in in in in variable control knob O L t o l i P I H O L t o l i P I H O L t o l i P I H WARNING FOR YOUR SAFETY Do NOT touch or move heater for at least 45 minutes after use Reflector is hot to the touch Allow reflector to cool before touching To enjoy years of outstanding performance from your heater make sure you perform t...

Page 12: ...pply to emitter screen or domes Storage Between uses Turn Control Knob OFF Disconnect LP source Store heater upright in an area sheltered from direct contact with inclement weather such as rain sleet hail snow dust and debris If desired cover heater to protect exterior surfaces and to help prevent build up in air passages Note Wait until heater is cool before covering During periods of extended in...

Page 13: ...blockage Clean reflector and burner screen Outdoor temperature is less than 40ºF and tank is less than 1 4 full Wait until the propane cylinder warms up and becomes unfrosted Use a full cylinder Turn control knob to ON Dirt built up around pilot Connection between gas valve and pilot assembly is loose Thermocouple is not operating correctly Clean or replace orifice or pilot tube Open gas line and ...

Page 14: ...etion Any expenses or damage resulting from the installation removal or transportation of the product will the responsibility of the owner and are not covered by this warranty The owner assumes all other risks arising out from the use or misuse of the product The warranty will be void if the product damage or failure is deemed by the Company to be caused by accident alteration misuse abuse incorre...

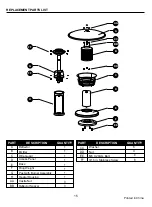
Page 15: ...A Reflector 1 CC Washer 6 BB Reflector Spacer 3 B Emitter 1 DD Nut Access Panel Base 3 C Wire Guard 1 D 1 E 1 F Ring Weight EE M6 X 20mm Bolt 3 16 in Stainless Screw 1 4 8 FF G H Post with Burner Assembly Heater Housing 1 1 N O I T P I R C S E D T R A P QUANTITY H AA A CC BB B DD C D E F EE FF G FF ...

Reviews: