73
Safety and Important Information
Hansgrohe products are safe provided they are installed,
used and maintained in accordance with these instructions
and recornrnendations.
Please read these instructions thoroughly and retain for
future use.
The plumbing installation of this thermostat mixing
valvemust comply with the requirements of UK
Water Regulations/Bylaws (Scotland), Building Regulati-
ons or any other regulations specified by the local Water
Authority and supplier.
The installation of thermostatic mixing valves must comply
with the requirements of the Water Supply (Water Fittings)
Regulations 1999.
We strongly recommend that you use a plumber registered
with or a member of an Association:
Chartered Institute of Plumbing and Heating Engineering
(CIPHE)
Water Industry Approved Plumber Scheme (WIAPS)
Dispose of plastic bags carefully
Keep children well away from the work area.
Check for hidden pipes and cables in the wall before
drilling holes.
The unit must be mounted on a finished waterproofed wall
surface (usually tiles).
If you are using power tools (e.g. to drill holes) wear sa-
fety glasses and always disconnect tools from the power
supply after use.
Do not operate the shower unit if the hand shower or spray
hose has been damaged or is blocked.
Do not block the flow of water from the hand shower, by
placing it on your hand or any other part of your body
or foreign object.
The thermostatic unit should be serviced annually by a
qualified person to ensure maximum safety during use.
The mixer is fitted with check valves (page 69 - 72 pos.
94074000). There are filters on the thermostatic element
too (page 69 - 72 pos. A).
The fitting of isolation valves is required (preferred location
page 75 Installation Requirements)
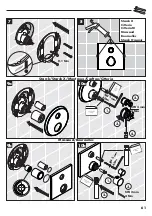
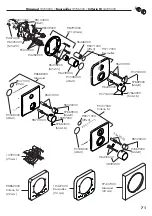
On the following pages 73 - 78 you can
find important information only for the
installation in UK
Summary of Contents for AXOR Uno 38720 Series
Page 25: ...64 68 MTC 42 C 65 C 180 180 60 25...
Page 27: ...64 68 42 65 180 60 27...
Page 43: ...64 68 42 C 65 C 180 180 60 43...
Page 55: ...64 68 42 C 65 C 180 180 60 55...
Page 58: ...64 68 42 65 180 180 60 58...
Page 60: ...60 Montage 1 2 1 2 2 4 3 5 6 1 2 mm X 11 X...
Page 64: ...64 Safety Function Bedienung 7 8a 8b SW 2 mm 4 Nm SW 2 mm 4 Nm 1 2 40 C...
Page 79: ...79...


