9
Bath / Shower Thermostat
(positioned over a bath)
The thermostatic mixing valve must be installed in a
position that is easily accessible for commissioning and
future servicing.
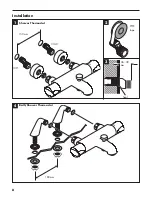
1. The hot and cold water outlets should be 150 mm
apart (plus or minus 12mm). Hot on the left and cold
on the right (fig. 1). The recommended plumbing
fittings are ½“ back plate elbows (not supplied).
2. Flush through the hot and cold water supplies.
3. Wrap PTFE tape round the S-unions and screw into the
backplate elbows. The S-unions must protrude beyond
the tiled surface between 32 and 41mm (figs.2-3).
4. Seal the gap between the S-unions and the tiles (fig.3).
5. Screw the escutcheons onto the S-unions.
6. Fasten the thermostatic mixer onto the S-unions using
the union nuts. Align the unit and tighten the nuts (be
careful not to damage the chrome finish). The S-unions
allow inaccuracies to be compensated for.
Bath/Shower Thermostat (
Fitting to the bath using
pillar unions).
The thermostatic mixing valve must be installed in a
position that is easily accessible for commissioning and
future servicing.
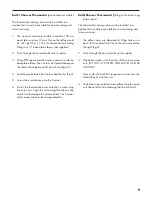
1. The pillar unions are designed to fit tap holes on a
bath 180 mm apart with hot on the left and cold on
the right (fig.4).
2. Flush through the hot and cold water supplies.
3. Place fibre washers into the holes of the chrome union
nuts. (DO NOT USE FILTERS WHEN USING PILLAR
UNIONS!)
From under the bath fit a large seal washer over the
thread then fix with the nuts.
4. Fasten the mixer onto the union pillars using the union
nuts (be careful not to damage the chrome finish).


