background image

5

Français

Español

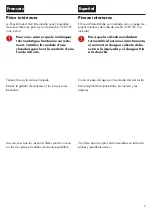
Pièce intérieure

Le Ecostat Select doit être installé avec l’ensemble 

de pièce intérieure pour tuyau de douche 16181181 

(non inclus). 

Pour vous assurer que le mélangeur 

thermostatique fonctionne correcte-

ment, installez la conduite d’eau 

chaude à gauche et la conduite d’eau 

froide à droite.

Piezas interiores

El Ecostat Select debe ser instalado con un juego de 

piezas interiores del tubo de ducha 16181181 (no 

incluido). 

Para que la válvula mezcladora 

termostática funcione correctamente, 

el suministro de agua caliente debe 

estar a la izquierda y el de agua fría 

a la derecha.

Fermez l'eau à la valve principale.

Retirez le gabarit d’espacement, les écrous et les 
bouchons.

Assurez-vous que les raccords filetés sont au niveau 
sur tous les plans et installés de manière parallèle.

Cierre el paso del agua en la entrada del suministro.

Retire la plantilla espaciadora, las tuercas y los 

tapones.

Confirme que los niples estén nivelados en todos los 

planos y paralelos entre sí.

Summary of Contents for Ecostat Select 13161001

Page 1: ...Ecostat Select 13161001 13161401 EN Installation User Instructions Warranty FR Instructions de montage Mode d emploi Garantie ES Instrucciones de montaje Manejo Garant a...

Page 2: ...ot to total cold The mixer is equipped with check valves The check valves must be checked regularly at least once a year to insure reliable service of the mixer and to protect the drinking water suppl...

Page 3: ...leto y el recibo u otro compro bante del lugar y fecha de compra de este pro ducto en lugar seguro El recibo se requiere en caso de ser necesario solicitar piezas bajo garant a Vous devez conna tre et...

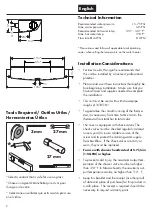
Page 4: ...luded To insure correct operation of the thermostatic mixing valve the hot supply must be on the left and the cold supply must be on the right Turn the water off at the main Remove the spacing jig nut...

Page 5: ...res del tubo de ducha 16181181 no incluido Para que la v lvula mezcladora termost tica funcione correctamente el suministro de agua caliente debe estar a la izquierda y el de agua fr a a la derecha Fe...

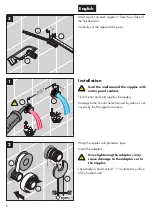
Page 6: ...the surface of the finished wall Installation Seal the wall around the nipples with waterproof sealant Flush the hot and cold supplies thoroughly Damage to the Ecostat Select caused by debris is not...

Page 7: ...ace du mur fini Instalaci n Selle la pared alrededor de los niples con un sellador impermeable Lave a fondo los suministros fr o y caliente Los da os al Ecostat Select causados por residuos no est n c...

Page 8: ...en the screws or damage to the unit may result Seal the wall around the top of the unit with water proof sealant Use the spacing jig to confirm that the adapters are positioned correctly and are level...

Page 9: ...rtie sup rieure du produit l aide d un agent d tanch it Use la plantilla espaciadora para confirmar que los adaptadores est n bien colocados y nivelados Instale el Ecostat Select Apriete los tornillos...

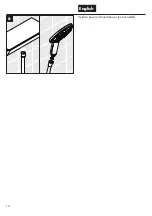
Page 10: ...10 English Install a hose and handshower not included 6...

Page 11: ...11 Fran ais Espa ol Instale un tuyau et une douchette pas d inclus Instale una manguera y una ducha de mano no incluidos...

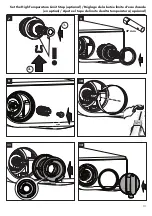
Page 12: ...12 Set the High Temperature Limit Stop optional R glage de la but e limite d eau chaude en option Ajuste el tope de l mite de alta temperatura opcional 2 1 3 mm 27 mm 2 1 4 3 6 5...

Page 13: ...13 Set the High Temperature Limit Stop optional R glage de la but e limite d eau chaude en option Ajuste el tope de l mite de alta temperatura opcional 7 8 1 2 27 mm 9 10 11 12...

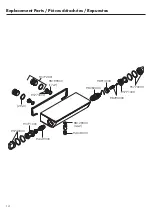
Page 14: ...14 Replacement Parts Pi ces d tach es Repuestos 95770000 95772001 94074000 98199000 17x2 29x3 98282000 98913000 95771000 95770000 98129000 14x2 94149000 95771000 95773000 98290000...

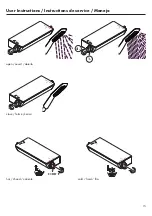
Page 15: ...15 User Instructions Instructions de service Manejo open ouvert abierto close ferm cerrar hot chaud caliente cold froid fr o 100 F 1 2...

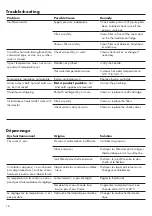
Page 16: ...Cause Remedy Insufficient water Supply pressure inadequate Check water pressure If a pump has been installed check to see if the pump is working Filters are dirty Clean filter in front of the mixer an...

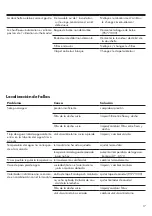
Page 17: ...cal en el asiento de la junta o montura da ada limpiar cambiar montura Calentador instant neo no se encien de en combinaci n con el termostato anillo de tope Ecostop a n montado quitar tope de caudal...

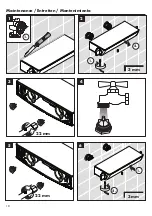
Page 18: ...18 Maintenance Entretien Mantenimiento 3 mm 22 mm 3 mm 22 mm 1 1 2 3 4 5 1 2 6 1 2...

Page 19: ...Entretien Mantenimiento Select a sealant that is safe for use on glass Seleccione un sellador que est a salvo para uso en el vidrio Chosez un agent d tanch it qui est s r pour l usage sur le verre 1 2...

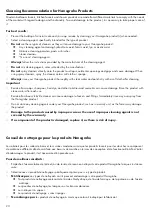
Page 20: ...care of it For best results Prevent the buildup of mineral scale and or soap residue by cleaning your Hansgrohe product s when needed Select a cleaning agent specifically intended for the type of prod...

Page 21: ...da uso Los residuos de limpiadores para lavatorios ba eras o azulejos pueden causar da o a los grifos y accesorios En juague inmediatamente cualquier derrame que haya sobre el producto de Hansgrohe Ta...

Page 22: ...espect to Axor products THIS WARRANTY DOES NOT COVER AND HANSGROHE WILL NOT PAY FOR A Conditions malfunctions or damage not resulting from defects in material or workmanship B Conditions malfunctions...

Page 23: ...rights that vary from state to state TO THE EXTENT PERMITTED BY LAW ANY IMPLIED WARRANTIES OF MERCHANTABILITY AND FITNESS FOR A PARTICULAR PURPOSE ARE LIMITED TO THE DURATION OF THE EXPRESS WARRANTY...

Page 24: ...Hansgrohe Inc 1490 Bluegrass Lakes Parkway Alpharetta GA 30004 Tel 800 334 0455 Fax 770 360 9887 www hansgrohe usa com US Installation Instructions Part No 90141821 Revised 11 2014...

Reviews: