background image

Metris C

15752xx1

E

04352xx0

EN

  Installation / User Instructions / Warranty

FR

  Instructions de montage / Mode d'emploi / Garantie

ES

  Instrucciones de montaje / Manejo / Garantía

Summary of Contents for Metris C 15752 1 Series

Page 1: ...Metris C 15752xx1 E 04352xx0 EN Installation User Instructions Warranty FR Instructions de montage Mode d emploi Garantie ES Instrucciones de montaje Manejo Garant a...

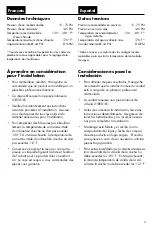
Page 2: ...inning installation Make sure that you have all tools and supplies needed to complete the installation This trim is for use with iBox Universal Plus model 01850181 not included To prevent scald injury...

Page 3: ...installation Pour emp cher des blessures par bouillan tement la temp rature de sortie maximale du robinet de douche ne doit pas exc der 120 F Au Massachusetts la temp rature de sortie maximale du robi...

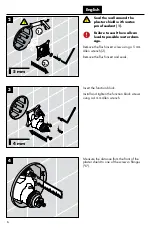
Page 4: ...4 Close the cold stop Installation Close the stops using a 4 mm Allen wrench Cut the plaster shield so that it extends from the finished wall surface 1 Remove the flushing block using a 5 mm Allen wre...

Page 5: ...agua fr a para por lo menos cinco minutos 4 Cierre el paso del agua fr a en el cierre de servicio Instalaci n Cierre el paso del agua en la entrada del suministro o los cierres de servicio con una lla...

Page 6: ...ble water dam age Remove the flush insert screw using a 5 mm Allen wrench 2 Remove the flush insert and seals Insert the function block Install and tighten the function block screws using a 4 mm Allen...

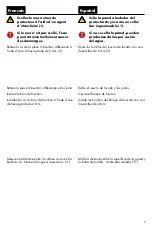
Page 7: ...e d une cl hexagonale de 4 mm Mesurez la distance entre la surface du mur et la bride du vis Notez la longueur mesur e X Selle la pared alrededor del protector de yeso con un sella dor impermeable 1 S...

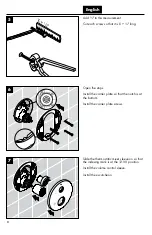
Page 8: ...ong Open the stops Install the carrier plate so that the notch is at the bottom Install the carrier plate screws Slide the thermostatic mixer sleeve on so that the indexing mark is at the 12 00 positi...

Page 9: ...le thermostatique de fa on ce que la marque de rep re soit la position 12 00 Installez la douille inverseur Installez le rosace Agregue a X Anote esta medida Corte el tornillo de modo que sobresalga X...

Page 10: ...the handle adapters and screws 2 Tighten the screws using a 3 mm Allen wrench Install the volume control handle 1 Tighten the screw using a 2 mm Allen wrench Install the thermostatic mixer handle so...

Page 11: ...la but e de s curit soit la position 9 00 2 Serrez la vis l aide d une cl hexagonale de 2 5 mm Coloque un poco de sellador a prueba de agua en las uniones de la lechada de cemento Lubrique el v stago...

Page 12: ...urn the cartridge stem until the output water is the desired high temperature usually 110 112 F Replace the stop ring so that the tooth is against the cartridge stop Replace the clip It should not be...

Page 13: ...sur la but e de la cartouche Remettez l trier en place La tige ne doit pas pouvoir tourner plus loin dans le sens antihoraire Fije el tope de l mite de alta temperatura Retire la presilla y el aro de...

Page 14: ...crew Remove the handle Turn the water on to one of the functions Turn the cartridge stem until the output water is 100 F Install the handle so that the override button is next to the 100 mark Tighten...

Page 15: ...e de fa on ce que le bouton de surpassement soit pr s de la marque de rep re du manchon Serrez la vis de la poign e Ajuste el mando Afloje el tornillo del mando Retire el mando Gire el v stago del car...

Page 16: ...Remove the trim Close both stops using a 4 mm Allen wrench Remove the thermostatic cartridge using a wrench Rinse the filters using clear water Replace the thermostatic cartridge Open the stops Repla...

Page 17: ...res de servicio con una llave Allen de 4 mm Retirez la cartouche thermostatique l aide d une cl Rinez les filtres avec l eau claire Remplacez la cartouche thermostatique Ouvrez l eau lex but es d arr...

Page 18: ...d cold supplies are reversed Turn the function block 180 Thermostatic cartridge dirty or worn Replace the thermostatic cartridge Troubleshooting D pannage Dysfonctionnement Origine Solution Pas assez...

Page 19: ...o comprobar presi n limpiar filtro ver p gina 16 limpiar cambiar filtros entre flexo y ducha Flujo de agua cruzada agua caliente entra en la tuber a del agua fr a o al rev s v lvula antirretorno sucia...

Page 20: ...d Bronze 98133000 13595000 not included pas d inclus no incluidos 94073000 94074000 96525000 94009000 98793000 29x3 48x3 95550xx0 96446xx0 96551xx1 96451000 96435000 95181000 29x3 48x3 95550xx0 96446x...

Page 21: ...nder the effect of the cleansers Components with damaged surfaces must be replaced otherwise there is a risk of injury Damage caused by improper treatment is not covered by our warranty Conseil de net...

Page 22: ...usar da os importantes Detergentes que contienen cido fosf rico tampoco pueden ser aplicados ilimitadamente Por regla general no se deben mezclar detergentes Tampoco se deben utilizar utensilios abras...

Page 23: ...t to Hansgrohe Commercial products and ii for 5 years with respect to Axor products THIS WARRANTY DOES NOT COVER AND HANSGROHE WILL NOT PAY FOR A Conditions malfunctions or damage not resulting from d...

Page 24: ...sequential damages so the above limitation or exclusion may not apply to you This warranty gives you specific legal rights and you may also have other rights that vary from state to state TO THE EXTEN...

Reviews: