40
41
Deutsch
Deutsch
Montage Dampfdusche/Dachabdeckung
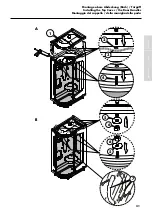
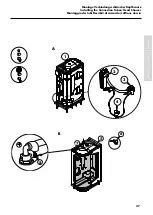
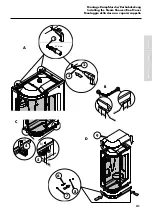
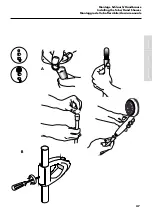
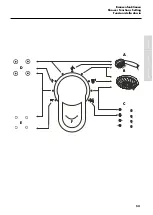
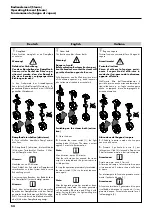
Befestigung (Abb. A):
Vorsicht!
Stromschlag oder Wasseraustritt. Beim Boh-
ren auf Strom- und Wasserleitungen achten!
• Dampfdusche in die Einbauposition bringen
und Abwasserleitung anschliessen.
Hinweis:
Beim Bohren: Absaugung verwenden!
Ausrichtung der Dampfdusche in die senk-
rechte (Wasserwaage: senkrechter Stand)!
• Befestigungsbohrungen mit Ø 6 mm ausfüh-
ren (1) und Dübel mit Ø 6 mm einsetzen.
Befestigung:
• Mit Befestigungsschrauben (3) 4 x 40 mm
die endgültige Position fixieren. Unterleg-
scheiben (2) 4,3 x 16 mm verwenden (Abb.
A).
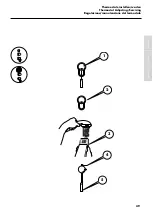
Befestigung Wannenschürze:
• Bohrungen Ø 4 an Wannenschschürze an-
bringen (Abb. B).
• Befestigungshalter (4) am Wannengestell
einrastem, an Wand und seitlichem Wannen-
rand ausrichten und mit Schraube (5) fixieren
(Abb. C).
Den zweiten Befestigungshalter entsprechend
anbringen.
• Folie von Wannenschürze entfernen.
• Wannenschürze mit selbstbohrenden
Schrauben (6) 4 x 24 mm und Kunststoffdicht-
scheiben (8) befestigen. Abdeckkappen (7)
aufsetzen.
• Deckel (9) auf obere Abdeckung aufsetzen
(Abb. D).
English
English
Installing the Steam Shower/Roof Cover
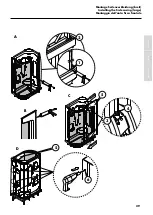
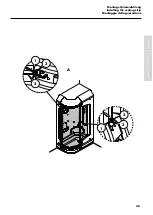
Fixation (Fig. A):
Caution!
Electric shock or water emergence. Observe
all current and water lines when drilling!
• Place the steam shower in its mounting po-
sition and connect the drains.
Note:
When drilling: Use extreme caution!
Position the steam shower vertically (spirit
level: vertical application)!
• Drill fixation holes of Ø 6 mm (1) and insert
Ø 6 mm plugs.
Fixation:
• Fixate the final position using 4 x 40 fixati-
on screws (3). Use 4.3 x 16 mm washers
(2) (Fig. A).
Tray skirt fixation:
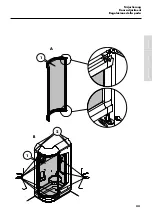
• Drill holes Ø 4 into the tray skirt (Abb. B).
• Snap in the fixing bracket for tray skirt (4)
into the frame of shower tray, adjust it to the
wall and to the side of shower tray. Fixate
the fixing bracket for tray skirt with screw (5)
(Fig. C).
Assemble the second fixing bracket in the
same way.
• Replace the foil from the tray skirt.
• Fixate the tray skirt using 4 x 24 mm self-
drilling screws (6) and plastic sealing was-
hers (8). Attach the cover caps (7).
• Attach the cover (9) to the upper casing
(Fig. D).
Italiano
Italiano
Montaggio della doccia a vapore/cappello
Fissaggio (fig. A):
Cautela!
Folgorazione o perdite d'acqua. Nel
praticare i fori attenzione a non danneggiare
linee elettriche ed idriche!
•
Portare la doccia a vapore in posizione di
montaggio e collegare il tubo di scarico.
Avvertenza:
Per praticare i fori impiegare un sistema di
aspirazione!
Posizionare verticalmente la doccia a vapore
(livella a bolla d'aria verticale)!
•
Praticare i fori di fissaggio con una punta
Ø 6 mm (1) e applicare tasselli Ø 6 mm.
Fissaggio:
•
Fissare nella posizione definitiva con le viti
(3) 4 x 40 mm. Impiegare le rondelle (2) 4,3
x 16 mm.
Fissaggio pannello frontale piatto:
• Praticare dei fori del Ø 4 an sul pannello
frontale piatto (Abb. B).
• Inserire la staffa di fissaggio (4) del pan-
nello frontale piatto nel talaio del piatto,
regolandola alla parete ed al lato del piatto.
Fissarla con le viti (5) (Abb. C).
Assemblare la seconda staffa di fissaggio
procedendo nello stesso modo.
• Ricollocare il pannello.
• Con l’avvitatore con inserto a croce fissare
il pannello, utilizzando le viti AUT. TCB
4,2x32 (6), i sottocappucci (8) ed i cappucci
(7).
• Adagiare il controcappello (9) come da
indicazioni riportate in figura D.

