background image

27

Conseil de nettoyage pour les produits Hansgrohe

De nos jours le sanitaire moderne, la robinetterie et les douchettes se composent de matériaux très différents pour satisfaire 
à la demande concernant le design et la fonctionnalité. Pour éviter les détériorations et les réclamations, aussi bien pour 
l’utilisation que pour le nettoyage prochain, certains critères seront à prendre en considération.

A prendre en considération lors de l’entretien de la robinetterie et de douchettes:

•  On doit seulement utiliser les produits de nettoyage qui sont formellement prévus pour ce domaine.
•  Aucun contact avec l’application de nettoyants contenant de l’acide chlorhydrique, de l’acide formique ou de l’acide 

acétique qui peuvent causer de considérables détériorations.

•  Les nettoyants à base d’acide phosphorique, aussi, ne sont pas à utiliser sans réserves.
•  Le mélange de nettoyants en général n’est pas autorisé.
•  L’utilisation de produits de nettoyage récurants et des ustensiles comme des frottoirs, des éponges à récurer et des 

torchons microfibres est exclue.

•  Les conseils d’entretien des producteurs de nettoyants sont à suivre obligatoirement.
•  Le nettoyage est à faire correspondre avec le dosage, le temps d’action, spécifique à l’objet et à la nécessité.
•  Le dépôt de calcaire est évité par un nettoyage régulier.

Cleaning Recommendation for Hansgrohe Products

Modern bathroom faucets, kitchen faucets and shower products are made from different materials to comply with the needs 
of the market with regard to design and functionality. To avoid damage to the product, it is necessary to take proper care of 
it.

For best results:

•  Prevent the buildup of mineral scale and /or soap residue by cleaning your Hansgrohe product(s) when needed.
•  Select a cleaning agent specifically intended for the type of product.
• 

Do not

 use these types of cleaners as they will cause damage to your Hansgrohe product:

  Any cleaning agent containing hydrochloric acid, formic acid, lye, or acetic acid.

  Abrasive cleaning powders, pads, or brushes.

  Steam cleaners.

  “No rinse” cleaning agents.

• 

Always

 follow the instructions provided by the manufacturer of the cleaning agent.  

• 

Do not

 mix cleaning agents, unless directed by the manufacturer.

• 

Do not

 spray cleaners directly onto the product as drops could enter openings and gaps and cause damage. When 

using spray cleaners, spray the cleaner onto a soft cloth or sponge.  

• 

Always

 rinse your Hansgrohe product thoroughly with clear water and polish dry with a soft cloth after cleaning.

Important

•  Residue from soaps and shampoos can cause damage. Rinse the product with clean water after each use. 
•  Residue from basin/tub/tile cleaner can cause damage to faucets and fittings. Immediately rinse any overspray from 

the Hansgrohe product.

• 

Damage to the product caused by improper care or the use of improper cleaning agents is not 

covered by the warranty.

• 

If a component of the product is damaged, replace it, as there is risk of injury.

All manuals and user guides at all-guides.com

Summary of Contents for Raindance Showerpipe 27165 1 Series

Page 1: ...nce Showerpipe 27165xx1 EN Installation User Instructions Warranty FR Instructions de montage Mode d emploi Garantie ES Instrucciones de montaje Manejo Garant a All manuals and user guides at all guid...

Page 2: ...red In this case the minimum ceiling height of 91 from the standing surface and all other measurements must be changed The installer must ensure that the entire area of the wall to which the mounting...

Page 3: ...a de la ducha no debe exceder los 112 F Mantenga este folleto y el recibo u otro comprobante del lugar y fecha de compra de este producto en lugar seguro El recibo se requiere en caso de ser necesario...

Page 4: ...4 40 40 5 3 18 1 7 12 3 G 2 11 1 4 3 3 All manuals and user guides at all guides com...

Page 5: ...5 min 91 89 47 40 18 Installation Suggestion All manuals and user guides at all guides com...

Page 6: ...must be on the left and the cold supply must be on the right Turn the water off at the main Remove the spacing jig nuts and plugs Confirm that the nipples are level in all planes and are parallel to e...

Page 7: ...ord filet po de la surface du mur fini Coupez soigneusement le raccord filet sur cette marque Instalaci n El showerpipe debe ser instalado con un juego de piezas interiores del tubo de ducha 16181181...

Page 8: ...heon mounting plates Wrap the nipples with plumbers tape Install the stops Lightly lubricate the o rings on the mounting plates using white plumbers grease Install the escutcheons Install the mixer Ti...

Page 9: ...vice Lubrifiez les joints toriques Installez les cussons Selle la pared alrededor de los niples con un sellador impermeable Instale las piezas de montaje para los escudos Envuelva los niples con cinta...

Page 10: ...rs Seal the wall around the anchors with waterproof sealant Failure to seal the wall may result in water damage Install the shower arm mounting plate using the included screws and washers Do not tight...

Page 11: ...utilisant les vis et rondelles fournies Ne serrez pas compl tement les vis Perfore los orificios para la placa de montaje con una broca de 6 mm Instale los pernos de anclaje Selle la pared alrededor...

Page 12: ...e with the tile matching disk 98681000 Do not tighten the screws completely Push the riser firmly over the valve outlet Make sure that the riser is level Press the shower arm onto the riser Place the...

Page 13: ...ba de la pared instale la placa de montaje con el disco que coincida con el azulejo No ajuste los tornillos completamente Presione el brazo de ducha en la tuber a de subida Coloque el escudo en el bra...

Page 14: ...owerhead Push the shower arm assembly over the mounting plate Tighten the screw using a 3 mm Allen wrench Install the showerhead on the shower arm Tighten the screw 2 mm 2 mm 12 11 2 1 3 mm 13 All man...

Page 15: ...is de la pomme de douche Presione lel brazo de ducha sobre la placa de montaje Apriete el tornillo con una llave Allen de 3 mm Quite el tornillo de la ducha cabezal Installez la pomme de douche sur le...

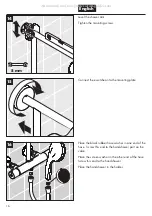
Page 16: ...g plate Place the black rubber hose washer in one end of the hose Screw this end to the handshower port on the valve Place the screen washer in the other end of the hose Screw this end to the handshow...

Page 17: ...r mit du tuyau Vissez cette extr mit la douchette Placez la douchette dans son support Nivele el brazo de ducha Apriete los tornillos de montaje Conecte el escudo a la placa de montaje Coloque la aran...

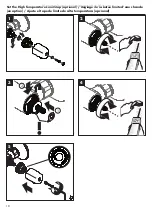
Page 18: ...the High Temperature Limit Stop optional R glage de la but e limite d eau chaude en option Ajuste el tope de l mite de alta temperatura opcional 1 2 3 4 5 1 2 All manuals and user guides at all guide...

Page 19: ...x2 5 98810xx1 95795xx0 97651xx0 94246000 98915xx0 98916000 98282000 28276xx3 98283000 98916000 98915xx0 98913000 96157xx0 96922000 96737000 98131000 15x2 5 12x2 96770xx0 98131000 15x2 5 10x1 5 98681xx...

Page 20: ...20 User Instructions Instructions de service Manejo 100 F Full Intense Turbo Pulsating Massage function lever levier palanca 1 2 3 1 2 1 2 All manuals and user guides at all guides com...

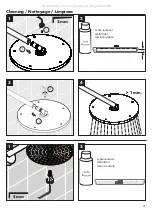
Page 21: ...21 Cleaning Nettoyage Limpieza scale remover d tartrant desincrustante scale remover d tartrant desincrustante 5 mm 1 2 3 4 1 2 2 mm 2 1 2 1 1 min All manuals and user guides at all guides com...

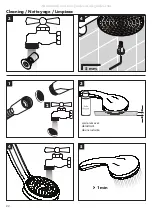
Page 22: ...22 Cleaning Nettoyage Limpieza 5 mm 3 4 1 min 5 4 1 2 scale remover d tartrant desincrustante 3 All manuals and user guides at all guides com...

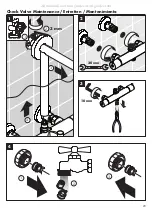
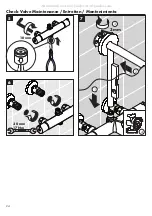
Page 23: ...23 Check Valve Maintenance Entretien Mantenimiento 3 mm 2 3 4 30 mm 2 10 mm 1 3 4 1 2 3 1 All manuals and user guides at all guides com...

Page 24: ...24 Check Valve Maintenance Entretien Mantenimiento 3 mm 1 2 3 5 7 10 mm 30 mm 17 Nm 6 4 All manuals and user guides at all guides com...

Page 25: ...r worn Replace check valves Dysfonctionnement Origine Solution Pas assez d eau Pression d alimentation insuffisante Contr ler la pression Filtres encrass s 96922000 Nettoyer les filtres devant le miti...

Page 26: ...impiar cambiar v lvula Temperatura del agua no corresponde a lo marcado termostato no ha sido ajustado ajustar termostato Temperatura del agua demasiado baja no hay aumentar temperatura del agua calie...

Page 27: ...shower products are made from different materials to comply with the needs of the market with regard to design and functionality To avoid damage to the product it is necessary to take proper care of i...

Page 28: ...amente el resto de detergente La utilizaci n de limpiadores a vapor no est permitida las altas temperaturas pueden da ar los productos Indicaciones importantes Los residuos de productos de aseo como j...

Page 29: ...THIS WARRANTY DOES NOT COVER AND HANSGROHE WILL NOT PAY FOR A Conditions malfunctions or damage not resulting from defects in material or workmanship B Conditions malfunctions or damage resulting fro...

Page 30: ...state to state TO THE EXTENT PERMITTED BY LAW ANY IMPLIED WARRANTIES OF MERCHANTABILITY AND FITNESS FOR A PARTICULAR PURPOSE ARE LIMITED TO THE DURATION OF THE EXPRESS WARRANTY Some states do not all...

Page 31: ...31 All manuals and user guides at all guides com...

Page 32: ...1490 Bluegrass Lakes Parkway Alpharetta GA 30004 Tel 800 334 0455 Fax 770 360 9887 www hansgrohe usa com US Installation Instructions Part No 90409425 Revised 09 2012 All manuals and user guides at a...

Reviews: