background image

32

Hansgrohe, Inc. 

 1490 Bluegrass Lakes Parkway 

 Alpharetta, GA  30004

Tel. 800-334-0455 

 Fax 770-889-1783

www.hansgrohe-usa.com

US

 - 

Ins

tallation

 Ins

tructions


 P

ar

t N

o.

 90223822


 R

evised

 1

0/20

18

This warranty is limited to products manufactured by Hansgrohe, Inc. 
(“Hansgrohe”) that are purchased by a consumer in the United States 
or Canada after March 1, 1996, and installed in either the United 
States or in Canada.

WHO IS COVERED BY THE WARRANTY

This  limited  warranty  extends  to  the  original  purchaser  only.  This 
warranty is non-transferable. Hansgrohe neither assumes nor authorizes 
any person to create for it any other obligation or liability in connection 
with this product.

LENGTH OF WARRANTY

If you are a consumer who purchased the product for use primarily 
for  personal,  family  or  household  purposes,  this  limited  warranty 
starts on the date of purchase and extends for as long as you own 
the product and the home in which the product is originally installed. 
If you purchased the product for use primarily for any other purpose, 
including, without limitation, a commercial purpose, this limited warranty 
starts on the date of purchase and extends (i) for 1 year, with respect to 
Hansgrohe and Commercial products, and (ii) for 5 years, with respect 
to Axor products. The Rubbed Bronze finish is subject to a 3-year limited 
warranty starting on the date of purchase.

WHAT IS COVERED BY THE WARRANTY

This  limited  warranty  covers  only  your  Hansgrohe  manufactured 
product. Hansgrohe warrants this product against defects in material 
or workmanship as follows:

Hansgrohe will replace at no charge for parts only or, at its 
option, replace any product or part of the product that proves 
defective because of improper workmanship and/or material, 
under  normal  installation,  use,  service  and  maintenance.  If 
Hansgrohe is unable to provide a replacement and repair is 
not practical or cannot be made in timely fashion, Hansgrohe 
may  elect  to  refund  the  purchase  price  in  exchange  for  the 
return  of  the  product.  REPAIR  OR  REPLACEMENT  (OR,  IN 
LIMITED  CIRCUMSTANCES,  REFUND  OF  THE  PURCHASE 
PRICE) AS PROVIDED UNDER THIS LIMITED WARRANTY IS 
THE EXCLUSIVE REMEDY OF THE PURCHASER.

WHAT IS NOT COVERED BY THE WARRANTY

A.  Conditions, malfunctions or damage not resulting from defects 

in material or workmanship.

B.  Conditions, malfunctions or damage resulting from (1) normal 

wear and tear, improper installation, improper maintenance, 
misuse, abuse, negligence, accident or alteration; (2) the use 
of abrasive or caustic cleaning agents or “no-rinse” cleaning 
products, or the use of the product in any manner contrary to 
the product instructions; or (3) conditions in the home such as 

excessive water pressure or corrosion.

C.  Labor  and  other  expenses  for  disconnection,  deinstallation, 

or  return  of  the  product  for  warranty  service  (including  but 
not  limited  to  proper  packaging  and  shipping  costs),  or  for 
installation or reinstallation of the product.

D.  Accessories,  connected  materials  and  products,  or  related 

products not manufactured by Hansgrohe.

E.  Any Hansgrohe or Axor product sold for display purposes.

HANSGROHE  SHALL  NOT  BE  LIABLE  TO  PURCHASER  OR 
ANY OTHER PERSON FOR ANY INCIDENTAL, SPECIAL OR 
CONSEQUENTIAL DAMAGES, ARISING OUT OF BREACH OF 
THIS LIMITED WARRANTY.

Some provinces and some states do not allow the exclusion or limitation 
of  incidental  or  consequential  damages,  so  the  above  limitation  or 
exclusion may not apply to you.

TO OBTAIN WARRANTY PARTS OR INFORMATION

Contact your Hansgrohe retailer, or contact Technical Service at:

Hansgrohe, Inc.

1492 Bluegrass Lakes Parkway

Alpharetta, GA 30004

Toll-free 800-334-0455

In requesting warranty service, you will need to provide:

1.  The sales receipt or other evidence of the date and place of 

purchase.

2.  A description of the problem.
3.  Delivery of the product or the defective part, postage prepaid 

and carefully packed and insured, to:

Hansgrohe, Inc.

1492 Bluegrass Lakes Parkway

Alpharetta, GA 30004

Toll-free 800-334-0455

When warranty service is completed, any repaired or replacement 
product  or  part  will  be  returned  to  you  postage  prepaid.  REVISED 
MAY 1, 2016.

PRODUCT INSTRUCTIONS AND QUESTIONS

Upon  purchase  or  prior  to  installation,  please  carefully  inspect 
your Hansgrohe product for any damage or visible defect. Prior to 
installing, always carefully study the enclosed instructions on the proper 
installation and the care and maintenance of this product. If you have 
questions at any time about the use, installation or performance of 
your Hansgrohe product, or this warranty, please write us or call us 
toll-free at 800-334-0455.

Limited Consumer Warranty 

Summary of Contents for ShowerSelect 15744 1 Series

Page 1: ...ShowerSelect 15762xx1 F 100 100 F ShowerSelect 15744xx1 EN Installation User Instructions Warranty FR Instructions de montage Mode d emploi Garantie ES Instrucciones de montaje Manejo Garantía ...

Page 2: ...d it be necessary to request warranty parts Données techniques Pression d eau recommandée 15 75 PSI 0 1 0 5 MPa maximum 145 PSI 1 MPa Température d eau chaude recommandée 120 140 F 48 60 C maximum 158 F 70 C Capacité nominale 6 8 GPM 25 7 L min 44 PSI 0 3 MPa Vous devez connaître et respecter tous les codes de plom berie locaux applicables pour le réglage de la température du chauffe eau Àprendree...

Page 3: ... insumos necesarios para completar la instalación La unidad requiere una pieza interior de válvula 01850181 Para evitar escaldaduras la máxima temperatura de salida de la válvula de la ducha no debe exceder los 120 F En Massachusetts la máxima temperatura de salida de la válvula de la ducha no debe exceder los 112 F El mezclador termostático está diseñado para uso con cabezales de ducha calificado...

Page 4: ... 4 111 mm 6 6 155 155 mm 2 3 54 82 mm 20 mm 6 155 mm 6 155 mm Ø5 150 mm 4 106 mm 2 57 mm 1 44 mm Ø1 44 mm 2 3 54 82mm 20mm Ø5 150 mm 1 44mm Service Stops Butées d arrêt d isolation Cierres de servicio closed ferme cerrado open ouvert abierto 4 mm ...

Page 5: ...Cierre el paso del agua en la en trada del suministro o en las llaves de paso en la pieza interior iBox Universal Plus Cut the plaster shield so that it extends 1 2 mm outside the surface of the finished wall Corte el protector de yeso de modo que sobresalga 1 2 mm de la superficie de la pared terminada Coupez la coque de protection de façon à ce qu elle dépasse de à po 1 2 mm à l extérieur de la ...

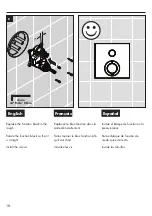
Page 6: ...stré Retire el inserto de lavado y los sellos del inserto de lavado Lightly lubricate the function block o rings Install the function block Lubrifiez légèrement les joints toriques de le bloc fonction Installez le bloc fonction Lubrique levemente los retenes anulares del bloque de funciÓn Instale el bloque de función 5 mm 3 4 mm 3 7 ft lb 5 Nm 4 ...

Page 7: ...ntretoise Baje el separador Remove the backing from the adhesive pads on the fitting aid Retirez la pellicule protectrice des plaquettes adhésives sur l aide au montage Retire la parte posterior de las al mohadillas adhesivas de la ayuda de montaje 4 mm 5 6 ...

Page 8: ... arrêt Posicione la ayuda de montaje sobre el vástago de cierre Cut the shutoff stem so that it is even with the front of the fitting aid Coupez le tige d arrêt afin qu elles soient de niveau avec le devant de l aide au montage Corte el vástago de cierre de modo que esté parejo con el frente de la ayuda de montaje 7 8 ...

Page 9: ... the spacer Raise the spacer so that it is even with the back of the fitting aid Repositionnez l aide au montage afin que l un des petits trous se trouve au dessus de l entretoise Remontez l entretoise afin qu elle soit de niveau avec l arrière de l aide au montage Vuelva a colocar la ayuda de montaje de modo que uno de los orificios pequeños quede sobre el separador Eleve el separador para que qu...

Page 10: ... autour de la coque de protection à l aide d un produit de scellement Si le mur n est pas scellé l eau pourrait causer des dommages Retire la ayuda de montaje Selle la pared alred edor del protector de yeso con un sellador impermeable Si no se sella la pared pueden producirse daños por acción del agua Tighten the nut on the spacer Apriete la tuerca en el separador Serrez l écrou sur l entretoise 1...

Page 11: ...es tiges Instale la tuerca en el vástago de la válvula de cierre de modo que queden parejos con el frente de el vástago Measure the distance between the outside edge of the plaster shield and the screw flange X Mesurez la distance entre le bord extérieur de la coque de protection et la collerette de la vis X Mida la distancia entre el borde externo del protector de yeso y la brida del tornillo X 1...

Page 12: ...odo que el largo sea X X 11 mm Place a small amount of caulk at the top and side grout joints Make sure that the stops are open Placez une petite quantité de pâte d étanchéité au niveau des joints de coulis en haut et sur les côtés Assurez vous que les vannes d arrêt soient ouvertes Coloque una pequeña cantidad de calafate en la parte superior y uniones de lechada de cemento laterales Asegúrese de...

Page 13: ...r plate Installez la plaque d arrêt Instale la placa de sujeción Remove the safety guard from the shutoff valve Retirez les pièces de protection des vannes d arrêt Retire las protecciones de seguri dad de las válvulas de cierre 0 74 ft lb 1 Nm 17 18 ...

Page 14: ...rrêt pour ouvrir l eau afin de tester le fonction Abra el paso del agua en la entrada del suministro Presione el vástago de cierre para encender el agua y probar la funciÓn Install the thermostatic mixer sleeve Install the escutcheon Installez la douille du mitigeur thermostatique Installez l écusson Instale el manguito del mezclador termostático Instale el escudo 100 F 20 19 1 2 ...

Page 15: ... F Install the handle so that the lever is next to the indexing mark on the sleeve and the 100 marking on the escutcheon Tighten the handle screw Installez la manette afin que le levi er se trouve à côté de la marque de positionnement sur la douille et de la marque 100 sur l écusson Serrez la vis de poignée Instale la manija de modo que la palanca esté al lado de la marca indicadora en el manguito...

Page 16: ...at the escutcheon is level Assurez vous que l écusson est de niveau Asegúrese de que el escudo quede nivelado If it is not turn to page 17 Si ce n est pas le cas référez vous à la page 17 Si no lo está vaya a la página 17 100 F 17 23 24 max 5 ...

Page 17: ...des vannes d arrêt Enlevez le bloc fonction Si el escudo está inclinado 5 o menos siga estos pasos Cierre el paso del agua en la entrada del suministro o en las llaves de paso Retire el bloque de función Use a drill bit to slightly enlarge the screw holes on the function block Utilisez une mèche de po pour légèrement agrandir les trous de vis du bloc fonction Use una broca de para agran dar leveme...

Page 18: ...t is straight Install the screws Replacez le bloc fonction dans la boîte d encastrement Faites tourner le bloc fonction afin qu il soit droit Installez les vis Instale el bloque de función en la pieza interior Rote el bloque de función de modo que esté recto Instale los tornillos 0 c 4 mm 3 7 ft lb 5 Nm ...

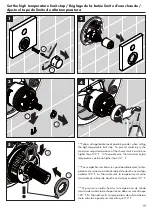
Page 19: ...Massachusetts the maximum output temperature can be no higher than 112 F Pour empêcher des blessures par ébouillantement la tem pérature de sortie maximale du robinet de douche ne doit pas excéder 120 F Au Massachusetts la température de sortie maximale du robinet de douche ne doit pas excéder 112 F Al prevnent escalda herida la temperatura de salida máxima de la válvula de chaparrón no debe ser m...

Page 20: ...20 Set the high temperature limit stop Réglage de la butée limite d eau chaude Ajuste el tope de límite de alta temperatura F 100 F 100 F 100 3 m m 0 7 f t l b 1 N m 2 mm 6 7 8 9 ...

Page 21: ...597xx0 22 mm 13595000 1 25 mm 97980000 94073000 98133000 16x2 95758000 98368000 M28x1 5 SW 19 mm 92219000 98282001 98913000 M34x1 5 SW 27 mm 96454000 M5x55 92216xx0 92234xx1 92215xx1 92218xx0 98471000 44x4 95843000 3 mm 96525000 M5x20 4 mm 92272xx1 2 mm 92594000 92540000 92218xx0 98197000 20x1 5 98146000 25x1 5 92146000 25x2 5 98793000 5 145 mm ...

Page 22: ...22 User Instructions Instructions de service Manejo F 100 F 100 40 C 100 F F 100 F 100 open ouvert abierto close fermé cerrado hot chaud caliente cold froid frío 1 2 ...

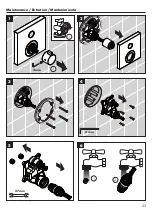
Page 23: ...23 Maintenance Entretien Mantenimiento F 100 4 mm 27 mm 1 2 1 2 2 mm 1 3 2 4 5 6 ...

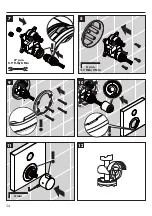
Page 24: ...24 F 100 4 mm 3 7 ft lb 5 Nm 27 mm 5 9 ft lb 8 Nm 2 mm 7 8 9 10 11 12 ...

Page 25: ...rating Spring dirty or worn Clean spring and or button replace if necessary Button calcified Shutoff valve stiff Select shutoff valve DN9 dirty or worn Replace Select shutoff valve DN9 Shower or spout dripping Select shutoff valve DN9 dirty or worn Replace Select shutoff valve DN9 Pushbutton cannot be actuated or is without function Safety guard of on off valve has not been removed Remove safety g...

Page 26: ...ion à 180º Bouton à pression du verrouillage de sécurité défectueux Ressort défectueux Nettoyer le ressort ou bien le bouton à pression le changer éventuellement Bouton à pression entartré Fonctionnement de la poignée difficile Select robinet d arrêt DN9 d arrêt défectueux Changez le Select robinet d arrêt DN9 La douchette ou le bec verseur goutte Select robinet d arrêt DN9 d arrêt défectueux Chan...

Page 27: ...a capa de grasa en el muelle y el pulsador botón lleno de cal Llave de paso va duro Select llave de paso DN9 dañada cambiar Select llave de paso DN9 Pierde permanentemente agua por el caño Select llave de paso DN9 dañada cambiar Select llave de paso DN9 El pulsador no puede accionarse o no funciona El seguro de la válvula de cierre no se ha retirado Retirar el seguro de la válvula de cierre Pulsad...

Page 28: ...your Hansgrohe product such as in a vanity unit as the fumes may damage the product Damage to the product caused by improper care or the use of improper cleaning agents is not covered by the warranty If a component of the product is damaged replace it as there is risk of injury Conseil de nettoyage pour les produits Hansgrohe Les robinets pour les salles de bains et les cuisines modernes ainsi que...

Page 29: ... perfumes lociones de afeitado y esmalte de unas pueden danar tambien los materiales Enjuague el producto con agua limpia después de cada uso Los residuos de limpiadores para lavatorios bañeras o azulejos pueden causar daño a los grifos y accesorios Enjuague inmediatamente cualquier derrame que haya sobre el producto de Hansgrohe Tampoco pueden generarse depositos de productos de limpieza o quimic...

Page 30: ...30 ...

Page 31: ...31 ...

Page 32: ... A Conditions malfunctions or damage not resulting from defects in material or workmanship B Conditions malfunctions or damage resulting from 1 normal wear and tear improper installation improper maintenance misuse abuse negligence accident or alteration 2 the use of abrasive or caustic cleaning agents or no rinse cleaning products or the use of the product in any manner contrary to the product in...

Reviews: