background image

29

Troubleshooting

Problem

Possible Cause

Solution

Insufficient water

Supply pressure inadequate

Check water pressure (If a pump 
has been installed check to see if 
the pump is working).

Regulator filter dirty

Clean filters

Handshower filter seal dirty

Clean filter seal between hand-
shower and hose

Crossflow, hot water being forced into 
cold water pipe, or vice versa, when 
mixer is closed

Backflow preventers dirty or worn

Clean backflow preventers, replace 
if necessary

Spout temperature does not cor-
respond with temperature set

Thermostat has not been adjusted

Adjust thermostat

Hot water temperature too low

Increase hot water temperature

Temperature regulation not possible

Thermostatic cartridge dirty or worn

Clean thermostatic cartridge, 
replace if necessary

For new installations: rough valve 
incorrectly connected (should be: 
cold right, hot left)

Rotate function block 180°or cor-
rect the plumbing

Safety stop button not operating

Spring dirty or worn

Clean spring and/or button, 
replace if necessary

Button calcified

Shutoff valve stiff

Select shutoff valve DN9 dirty or 
worn

Replace Select shutoff valve DN9

Shower or spout dripping

Select shutoff valve DN9 dirty or 
worn

Replace Select shutoff valve DN9

Pushbutton cannot be actuated or is 
without function

Safety guard of on-off valve has not 
been removed

Remove safety guard from isolating 
valve

Pushbutton is jammed or stiff

O-ring needs to be lubricated

Lightly lubricate the o-ring using 
white plumbers' grease

Pushbutton does not snap in

Select Adapter trimmed incorrectly

Trim and mount Select Adapter ac-
cording to Fig. 8 (see page 8)
Press the pushbutton into the 
escutcheon, then mount the escutch-
eon.

Maintenance

• Inspect the check valves at least once per year.  

Replace the check valves if necessary.

• Should the volume of water decrease over time, 

inspect and clean the filters on the thermostatic 

cartridge.    After  reassembly,  set  the  high 

temperature limit stop and justify the handle.  

• To prolong the life of the themostatic cartridge, 

regularly  run  it  through  its  full  range  of 

temperatures.

Summary of Contents for ShowerSelect 15763 1 Series

Page 1: ...EN Installation User Instructions Warranty FR Instructions de montage Mode d emploi Garantie ES Instrucciones de montaje Manejo Garant a ShowerSelect 15763xx1 F 100 100 F ShowerSelect 15743xx1...

Page 2: ...e necessary to request warranty parts Donn es techniques Pression d eau recommand e 15 75 PSI 0 1 0 5 MPa maximum 145 PSI 1 MPa Temp rature d eau chaude recommand e 120 140 F 48 60 C maximum 158 F 70...

Page 3: ...i n La unidad requiere una pieza interior de v lvula 01850181 Para evitar escaldaduras la m xima temperatura de salida de la v lvula de la ducha no debe exceder los 120 F 49 C En Massachusetts la m xi...

Page 4: ...4 82mm 1 47 mm 4 108 mm 6 6 155 155 mm 1 44 mm 6 155 mm 6 155 mm 1 2 40 C 1 2 Button 1 left controls the bottom outlet Button 2 right controls the top outlet Le bouton de s lection 1 sur le c t gauche...

Page 5: ...rre el paso del agua en la entrada del suministro o en las llaves de paso en la pieza interior iBox Universal Plus Cut the plaster shield so that it extends 1 2 mm outside the surface of the finished...

Page 6: ...h insert seals Retirez le module encastr et les joints d tanch it du module encastr Retire el inserto de lavado y los sellos del inserto de lavado Install the function block Installez le bloc fonction...

Page 7: ...ntretoise Baje el separador Remove the backing from the adhesive pads on the fitting aid Retirez la pellicule protectrice des plaquettes adh sives sur l aide au montage Retire la parte posterior de la...

Page 8: ...Posicione la ayuda de montaje sobre los v stagos de cierre Cut the shutoff stems so that they are even with the front of the fitting aid Coupez les tiges d arr t afin qu elles soient de niveau avec l...

Page 9: ...over the spacer Raise the spacer so that it is even with the back of the fitting aid Repositionnez l aide au mon tage afin que l un des petits trous se trouve au dessus de l entretoise Remontez l ent...

Page 10: ...ntage Scellez le mur autour de la coque de protection l aide d un produit de scellement Si le mur n est pas scell l eau pourrait causer des dommages Serrez l crou sur l entretoise Retire la ayuda de m...

Page 11: ...allez les crous sur les tiges des vannes d arr t afin qu ils soient de niveau avec l avant des tiges Mesurez la distance entre le bord ext rieur de la coque de protection et la collerette de la vis X...

Page 12: ...do que el largo sea X X 11 mm Place a small amount of caulk at the top and side grout joints Make sure that the stops are open Placez une petite quantit de p te d tanch it au niveau des joints de coul...

Page 13: ...retainer plate Installez la plaque d arr t Instale la placa de sujeci n Remove the safety guard from the shutoff valves Retirez les pi ces de protection des vannes d arr t Retire las protecciones de s...

Page 14: ...water on to test the functions Ouvrez l eau au niveau de la conduite principale Appuyez sur les tiges d arr t pour ouvrir l eau afin de tester les fonctions Abra el paso del agua en la entrada del sum...

Page 15: ...lez les boutons d arr t Instale los botones de cierre Install the thermostatic mixer sleeve Install the escutcheon Installez la douille du mitigeur thermostatique Installez l cusson Instale el manguit...

Page 16: ...t en 104 F Install the handle so that the le ver is next to the indexing mark on the sleeve and the 100 marking on the escutcheon Install the screw cover Installez la manette afin que le levier se tro...

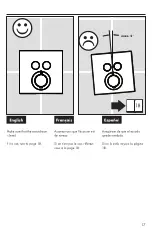
Page 17: ...sure that the escutcheon is level If it is not turn to page 18 Assurez vous que l cusson est de niveau Si ce n est pas le cas r f rez vous la page 18 Aseg rese de que el escudo quede nivelado Si no lo...

Page 18: ...s d arr t Enlevez le bloc fonction Si el escudo est inclinado 5 o menos siga estos pasos Cierre el paso del agua en la entrada del suministro o en las llaves de paso Retire el bloque de funci n Use a...

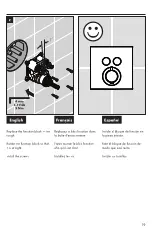
Page 19: ...t is straight Install the screws Replacez le bloc fonction dans la bo te d encastrement Faites tourner le bloc fonction afin qu il soit droit Installez les vis Instale el bloque de funci n en la pieza...

Page 20: ...e total flow of water in the shower to 2 GPM 80 PSI Si votre code de plomberie exige installez le lim iteur de d bit pour r duire le d bit total de l eau dans la douche 2 GPM 80 PSI Si el c digo de in...

Page 21: ...husetts the maximum output temperature can be no higher than 112 F Pour emp cher des blessures par bouillantement la temp rature de sortie maximale du robinet de douche ne doit pas exc der 120 F Au Ma...

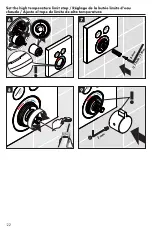
Page 22: ...22 Set the high temperature limit stop R glage de la but e limite d eau chaude Ajuste el tope de l mite de alta temperatura 6 6 7 8 3 m m 0 7 f t l b 1 N m 9 2 mm...

Page 23: ...W 4 mm 98156000 36x2 94073000 95758000 98368000 M28x1 SW 19 mm 92219000 96454000 M5x55 98793000 145 mm 95843000 SW 3 mm 98197000 20x1 5 98282001 98146000 25x1 5 92146000 25x2 5 98913000 M34x1 5 SW 27...

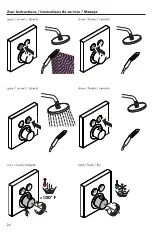
Page 24: ...4 User Instructions Instructions de service Manejo 100 F F 100 open ouvert abierto close ferm cerrado hot chaud caliente cold froid fr o 40 C 40 C 40 C 40 C F 100 open ouvert abierto close ferm cerrad...

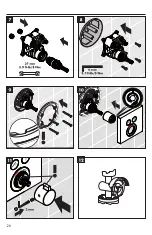
Page 25: ...25 Maintenance Entretien Mantenimiento 4 mm 27 mm 1 2 1 2 2 mm 3 1 2 3 4 5 6...

Page 26: ...26 27 mm 5 9 ft lb 8 Nm 4 mm 3 7 ft lb 5 Nm 2 mm 7 8 9 10 11 12...

Page 27: ...nder your Hansgrohe product such as in a vanity unit as the fumes may damage the product Damage to the product caused by improper care or the use of improper cleaning agents is not covered by the warr...

Page 28: ...erfumes lociones de afeitado y esmalte de unas pueden danar tambien los materiales Enjuague el producto con agua limpia despu s de cada uso Los residuos de limpiadores para lavatorios ba eras o azulej...

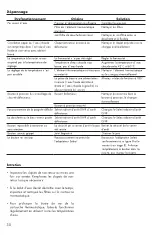
Page 29: ...perating Spring dirty or worn Clean spring and or button replace if necessary Button calcified Shutoff valve stiff Select shutoff valve DN9 dirty or worn Replace Select shutoff valve DN9 Shower or spo...

Page 30: ...ction 180 Bouton pression du verrouillage de s curit d fectueux Ressort d fectueux Nettoyer le ressort ou bien le bouton pression le changer ventuellement Bouton pression entartr Fonctionnement de la...

Page 31: ...ina capa de grasa en el muelle y el pulsador bot n lleno de cal Llave de paso va duro Select llave de paso DN9 da ada cambiar Select llave de paso DN9 Pierde permanentemente agua por el ca o Select ll...

Page 32: ...TY A Conditions malfunctions or damage not resulting from defects in material or workmanship B Conditions malfunctions or damage resulting from 1 normal wear and tear improper installation improper ma...

Reviews: